Restoring the traditional icon-based tab bar on iPad with Liquid Glass 22 Jan 6:00 AM (last month)
iPadOS 18 forced a UI change to tab bars that was arguably worse for users and added extra work for developers who had no choice but to support it. No longer would it render along the bottom of the screen with icons and text side-by-side, but instead would be more akin to a segmented control at the top of the screen with no icons at all. This change happened as soon as you recompiled with Xcode 15 and could not be opted out of.
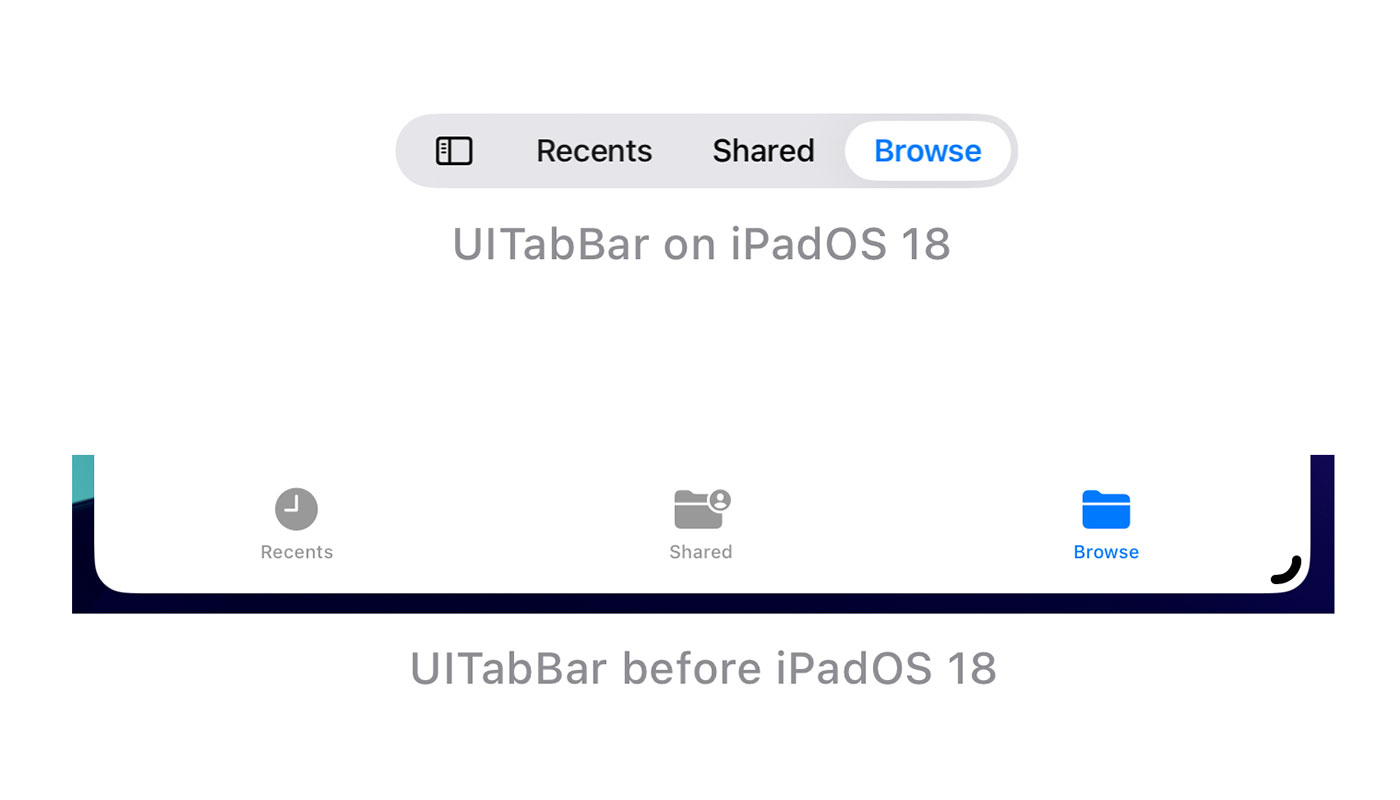
Apple’s goal with this redesign was to “provide more space for content and other functionality”. I’m not sure why the iPad with its massive screens would benefit from this more than the iPhone which did not get this change, but there are improvements when you consider the integrated search and the ability to animate from the segmented tab bar to a side bar navigation.
That said, I feel the overall change was negative as there were less visual affordances with the removal of icons1 and long text is frequently truncated (i.e. from localisations). There are further reductions in the user experience when you consider that the tab bar position changes from the bottom of the screen2 to the top of the screen as you switch between compact and regular size classes.
Fortunately, the design language of iOS 18 meant it was fairly easy for developers to create custom tab bars that looked like those on iOS 17.
Then, in the summer of 2025, Liquid Glass3 appeared…
Chromatic aberration! Real-time distortion! Bendy bubbles that react in real time to your swipes! These are all huge flexes for the Apple Silicon team but they suddenly make the idea of recreating the bottom iOS tab bar in iPadOS unrealistic as many of these design features are not available to developers.
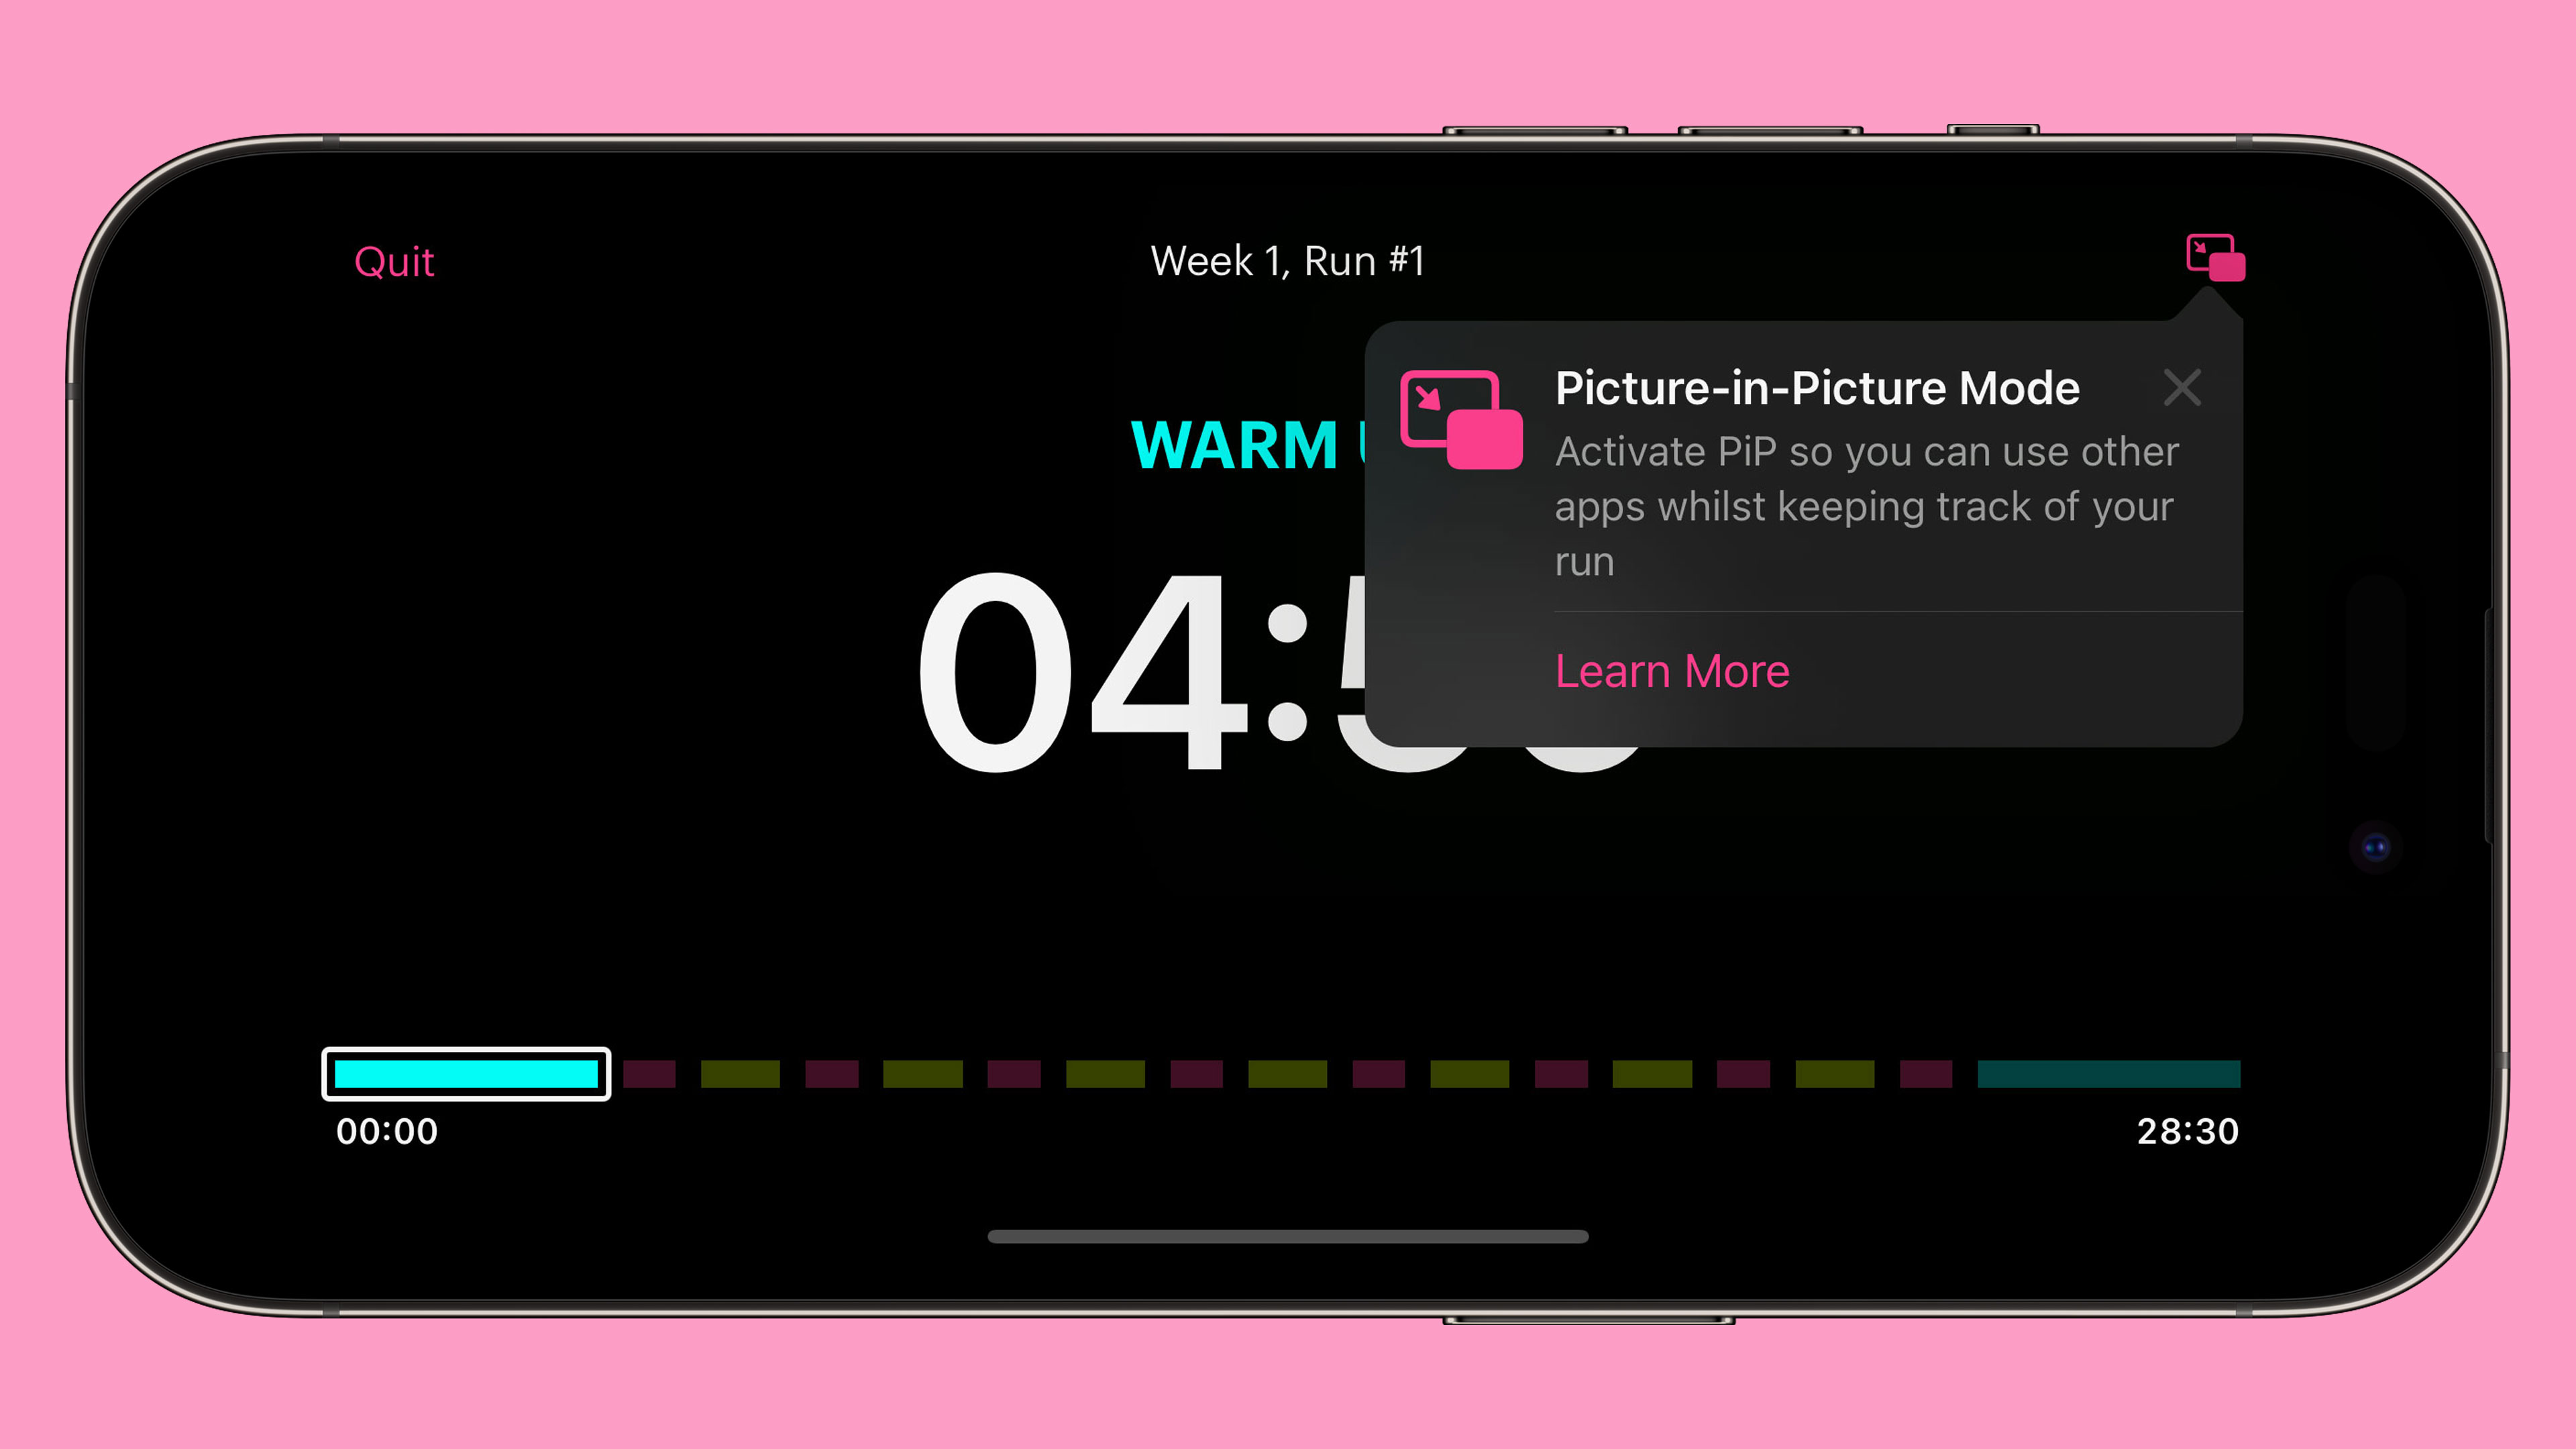
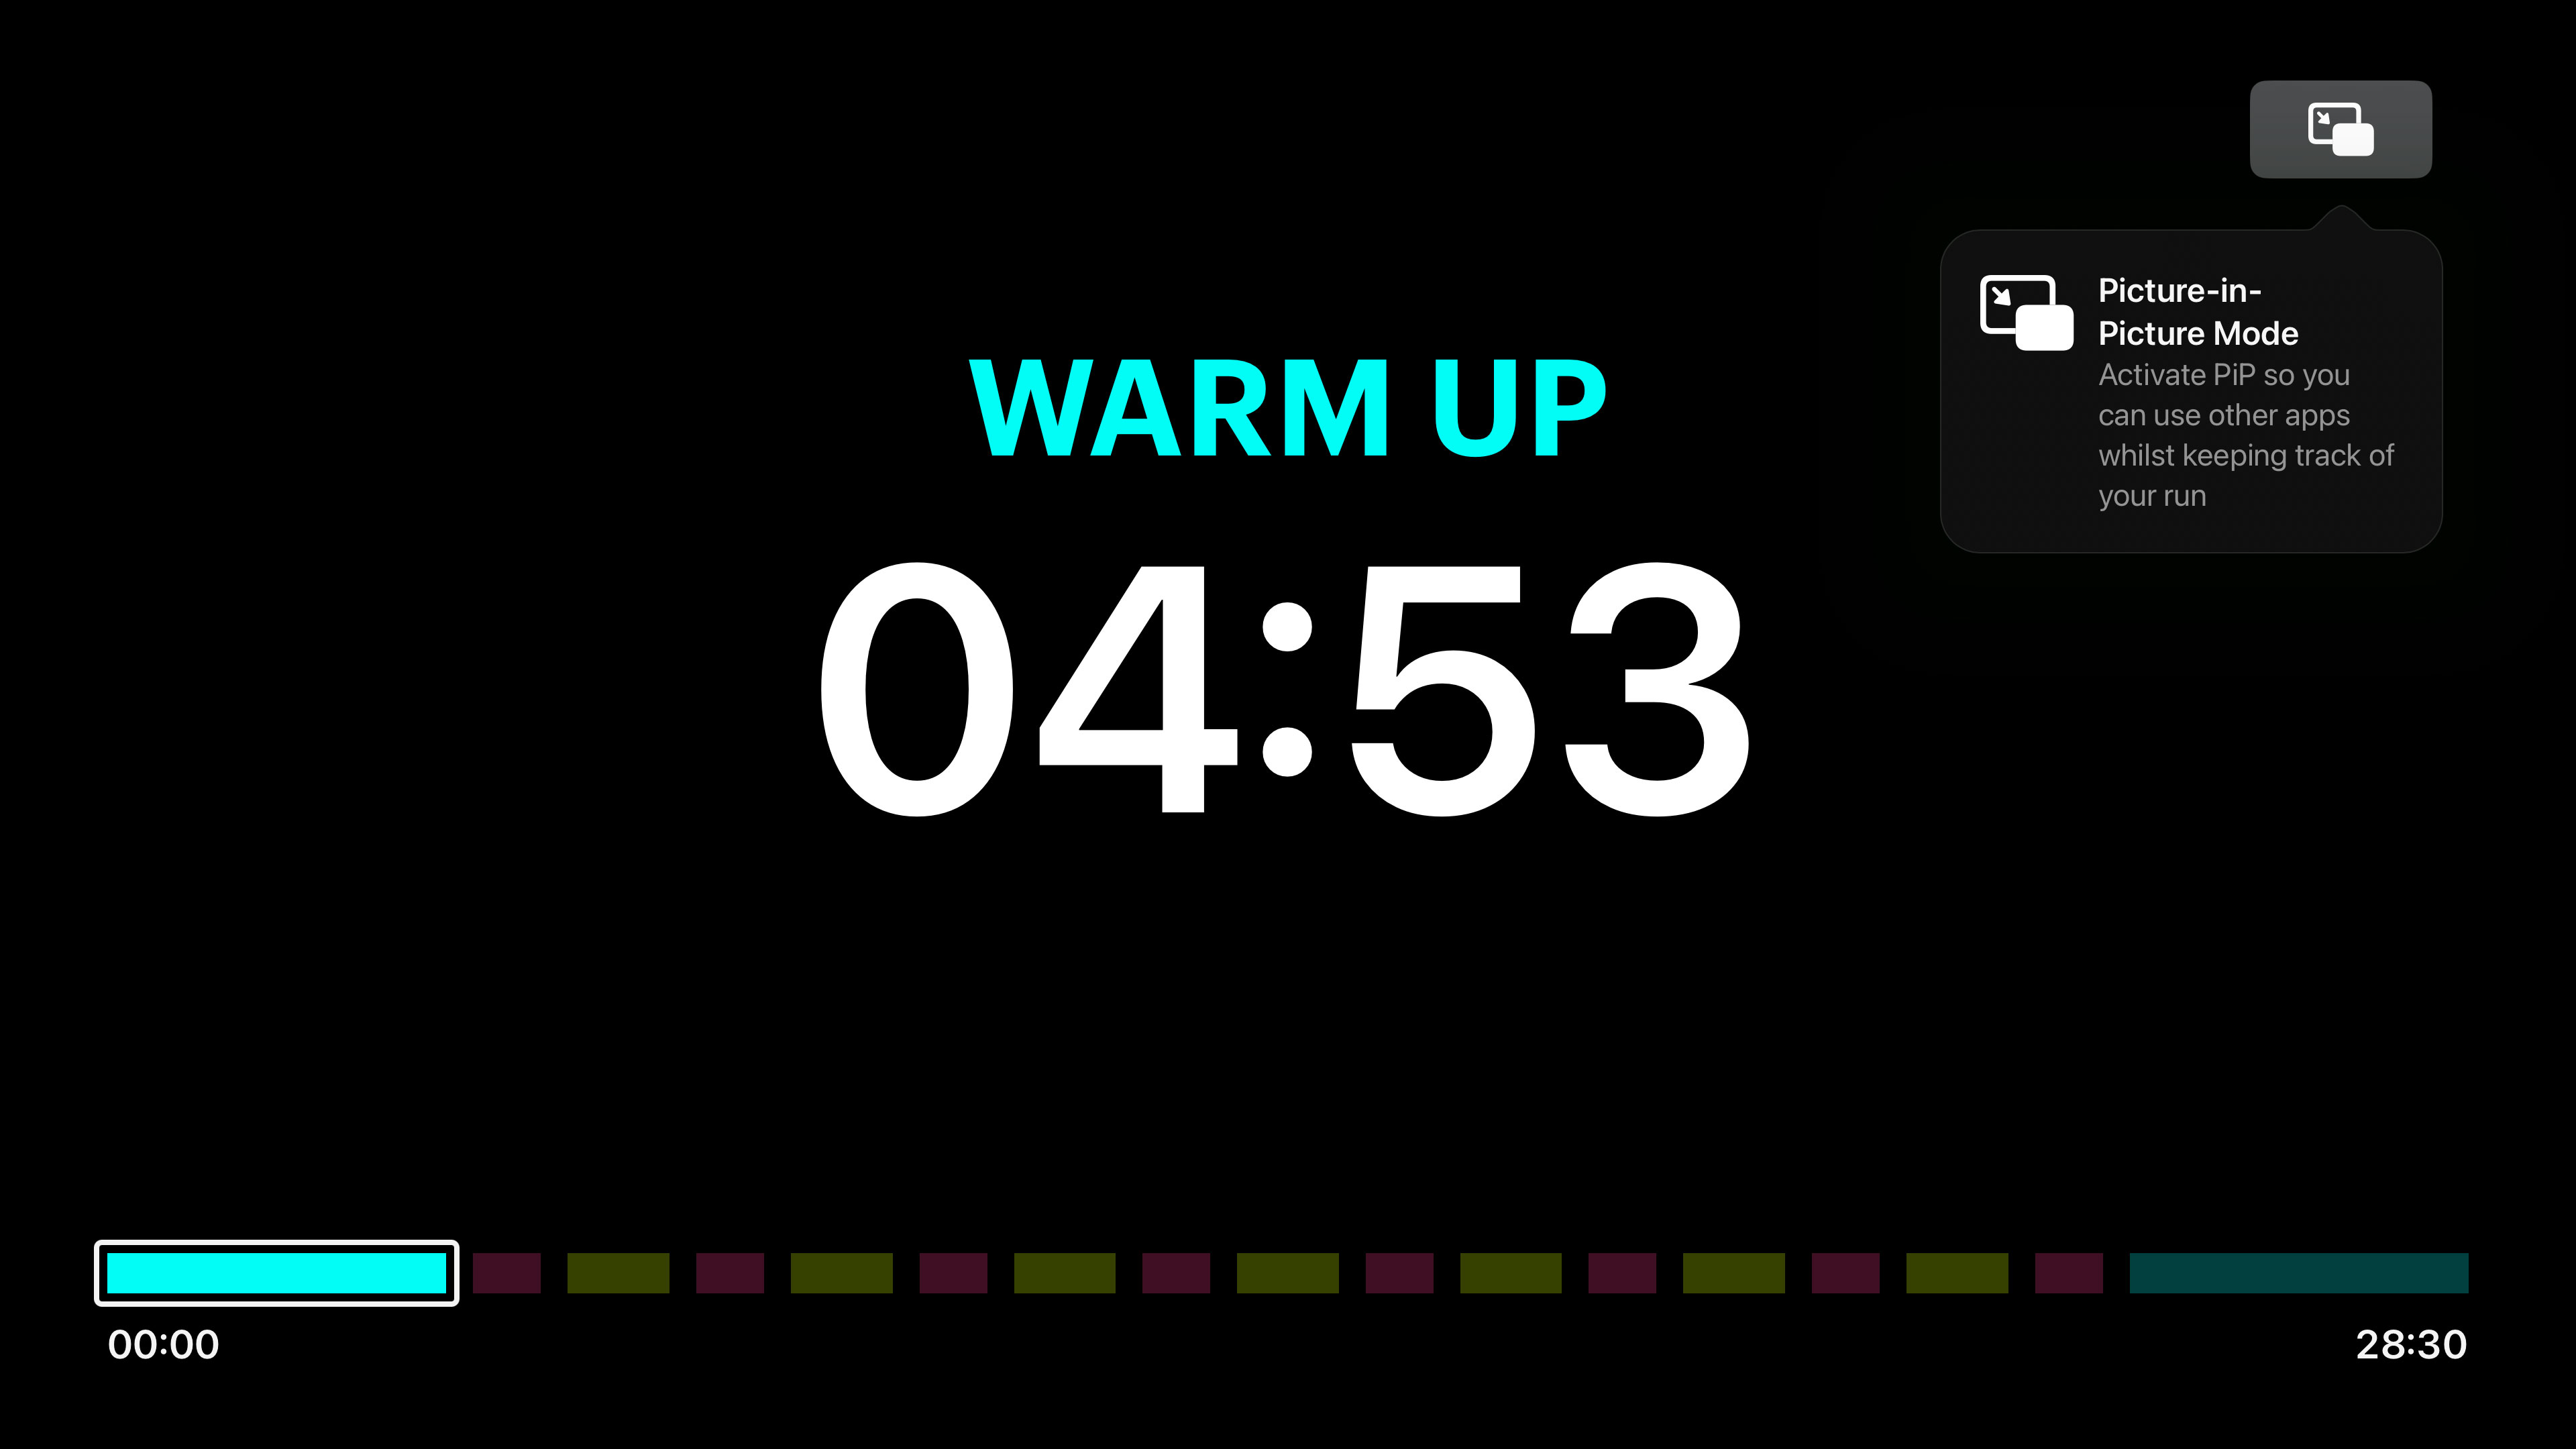
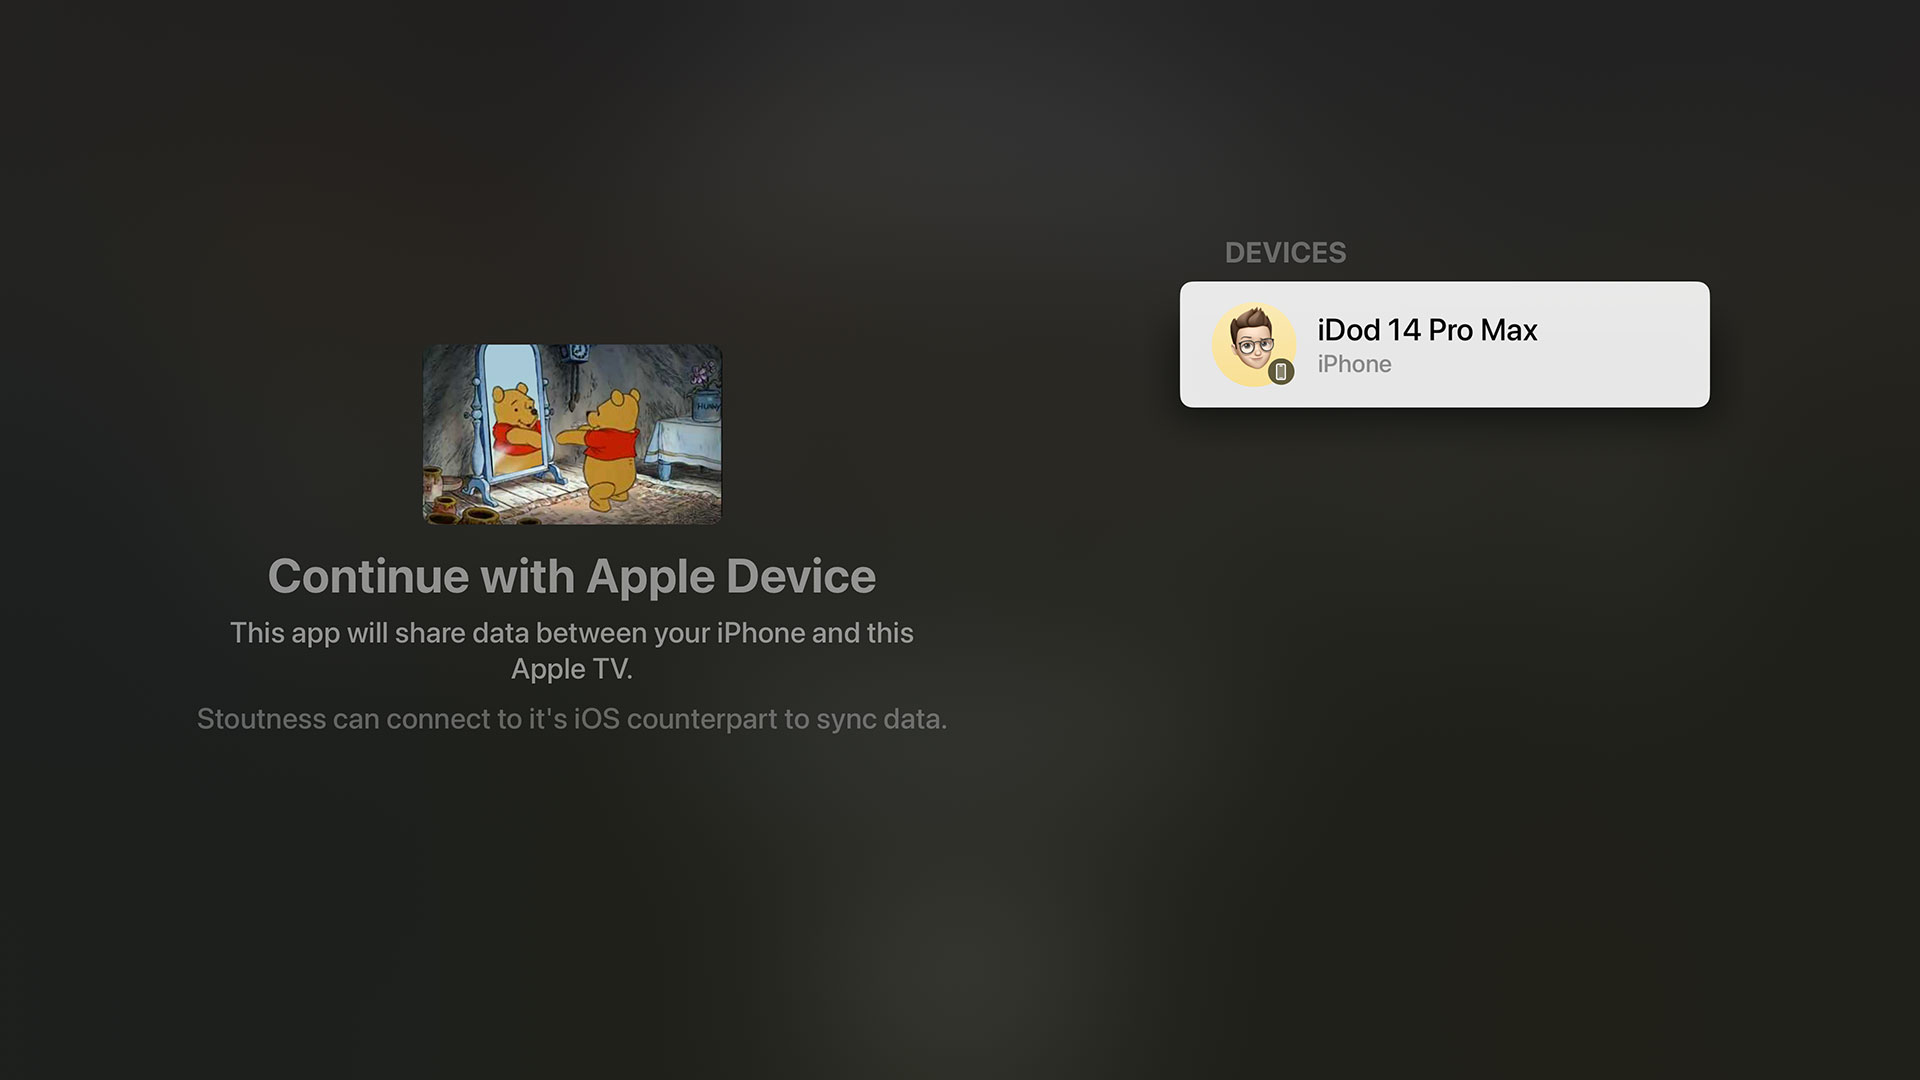
The one “fix” I see regularly for this is to trick the tab bar into believing it is permanently running in compact mode (the size class that is used when you shrink iPad windows down to iPhone sizes):
// SwiftUI
TabView {
}
.environment(\.horizontalSizeClass, .compact)

// UIKit
tabBarController.traitOverrides.horizontalSizeClass = .compact
This works, to a point, but can lead to visual glitches in your navigation hierarchy. It also falls flat on iPadOS 26 as the tab bar is no longer full width but instead only as large as it needs to be; as the icon appears above the text in compact mode, this can lead to a very small tab bar on a 13” iPad Pro. This can be remedied by setting UIDesignRequiresCompatibility to YES in your Info.plist but this will disable Liquid Glass throughout your app and is only a stop-gap solution that is scheduled to be removed in iPadOS 274.
Fortunately there is another way. With just a single line of code, you can get the traditional tab bar back on iPadOS 18 and an updated Liquid Glass version of it on iPadOS 26:
UserDefaults.standard.register(defaults: ["UseFloatingTabBar": false])This works for both UIKit and SwiftUI apps, you just need to call it at the start of your application lifecycle.

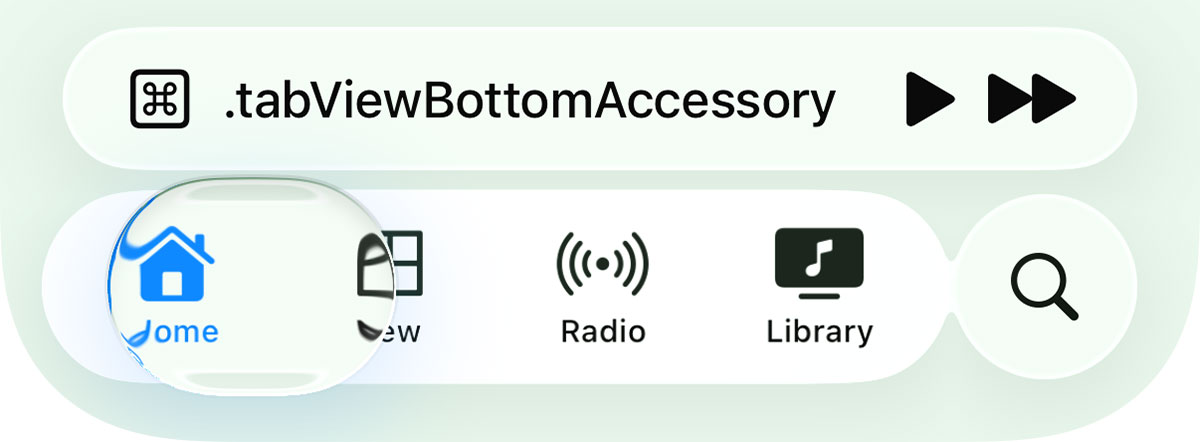
All of the iOS 26 additions are supported such as the new search API seamlessly splitting the tab bar in half and allowing the search text field to appear at the bottom of the screen. This extends to other modern tab bar features such as tabBarMinimizeBehavior and tabViewBottomAccessory. This is not a hacky solution, but something Apple engineers have clearly put a lot of consideration into.

There are two caveats to this approach:
-
This is an internal flag within the system similar to
defaults writeon macOS. That means it is officially unsupported and could be removed in a future version of iPadOS but the risks are manageable. I have used it in several production apps since the launch of iPadOS 18 in 2024 and have never had any issues with App Review. The fact that they redesigned this component for Liquid Glass makes me fairly confident it won’t be removed anytime soon. -
If your app is using UIKit storyboards and your initial view controller is a
UITabBarControllerthen simply registering the defaults in your App Delegate will not work because the storyboard will already be loaded. Instead, you’ll need to remove the automated way of having your storyboard load from Xcode and instead manually load it in the App Delegate by creating a UIWindow and assigning the initial view controller from your storyboard to it’srootViewControllerproperty.
If you do go down this route, just be prepared that a future iPadOS update may remove the setting5 so it is best to make sure your app would still function without it enabled.
I think this tab bar looks and works a lot better than the segmented control approach we currently have and I wish Apple would support it fully by providing an explicit opt-in on UITabBarController / TabView. The Liquid Glass version of the traditional tab bar arguably does a better job of meeting Apple’s stated goal of providing more space for content while retaining the visual affordances that have been present in the tab bar for nearly two decades.
-
It is ironic that the icons have been removed from tab bars when in macOS 26 (Tahoe) icons have been added throughout the menuing system to much dismay. ↩︎
-
The tab bar is at the bottom of the iPhone because it is easier for our thumbs to stretch that far; I would suggest that keeping it at the bottom of the iPad is also more beneficial as you don’t need to cover the display with your arm as you switch between tabs. ↩︎
-
I’m not going to delve into the rights and wrongs of Liquid Glass in this post but I am planning on talking about it in my newsletter, The Dodo Developer, in the next issue coming later this month. Join over 4000 discerning subscribers - it’s free! ↩︎
-
I applaud Apple for having the ability for developers to opt out of potentially breaking UI changes. This should have been the approach in iOS 18 for the tab bar in my opinion; letting developers have more time to adjust an iPad app to newer UI paradigms rather than forcing them immediately. ↩︎
-
Usually UI changes require the developer to recompile the app with the version of Xcode that released alongside it so an Xcode 15 compiled app running on iPadOS 18 will show the full tab bar - it is only when building with Xcode 16 that you get forced into the new UI. However, if a theoretical future iPadOS version removed support for the UserDefault, then the tab bar would revert to the segmented control version immediately upon the user updating their iPad. Make sure your app can still run if this default is not set even if it may not look visually how you would prefer. ↩︎
You can get exclusive updates on my projects and early access to my apps by joining my free newsletter, The Dodo Developer.


Getting the new portrait artwork from the iOS 26 Apple TV app 22 Sep 2025 6:30 AM (5 months ago)
iTunes added the ability to purchase TV shows in 2005 with movies following a year later. For both of these, artwork was available in a square aspect ratio usually at 600x600px. With iOS 12.3 in 2019, Apple moved the video content in iTunes to a new Apple TV app which incorporated a 16:9 aspect ratio for artwork, typically at 4K resolution. Now with the launch of iOS 26 and macOS Tahoe, Apple has once again changed its artwork to a 2:3 portrait aspect ratio.
For over a decade, I’ve been providing a way to easily access high-resolution artwork through my iTunes Artwork Finder and later the 16:9 Artwork Finder. Today, I’m happy to announce the latest version of these tools with the new Apple TV Shows & Movies Artwork Finder, updated for the iOS 26 style.

The new artwork finder doesn’t only add support for the new portrait images for shows and movies available to purchase within the Apple TV app; it also supports Apple TV+ and all of the streaming services that can connect to the Apple TV app such as BBC iPlayer, Amazon Prime, and Disney Plus. This means you can now get hi-resolution portrait artwork for tens of thousands of TV shows and films.
In addition to my free artwork finder, I’ve also created a new Apple Shortcut that opens up numerous possiblities for automation. Introducing the Hi-Res Apple TV Artwork Shortcut available exclusively on Gumroad.
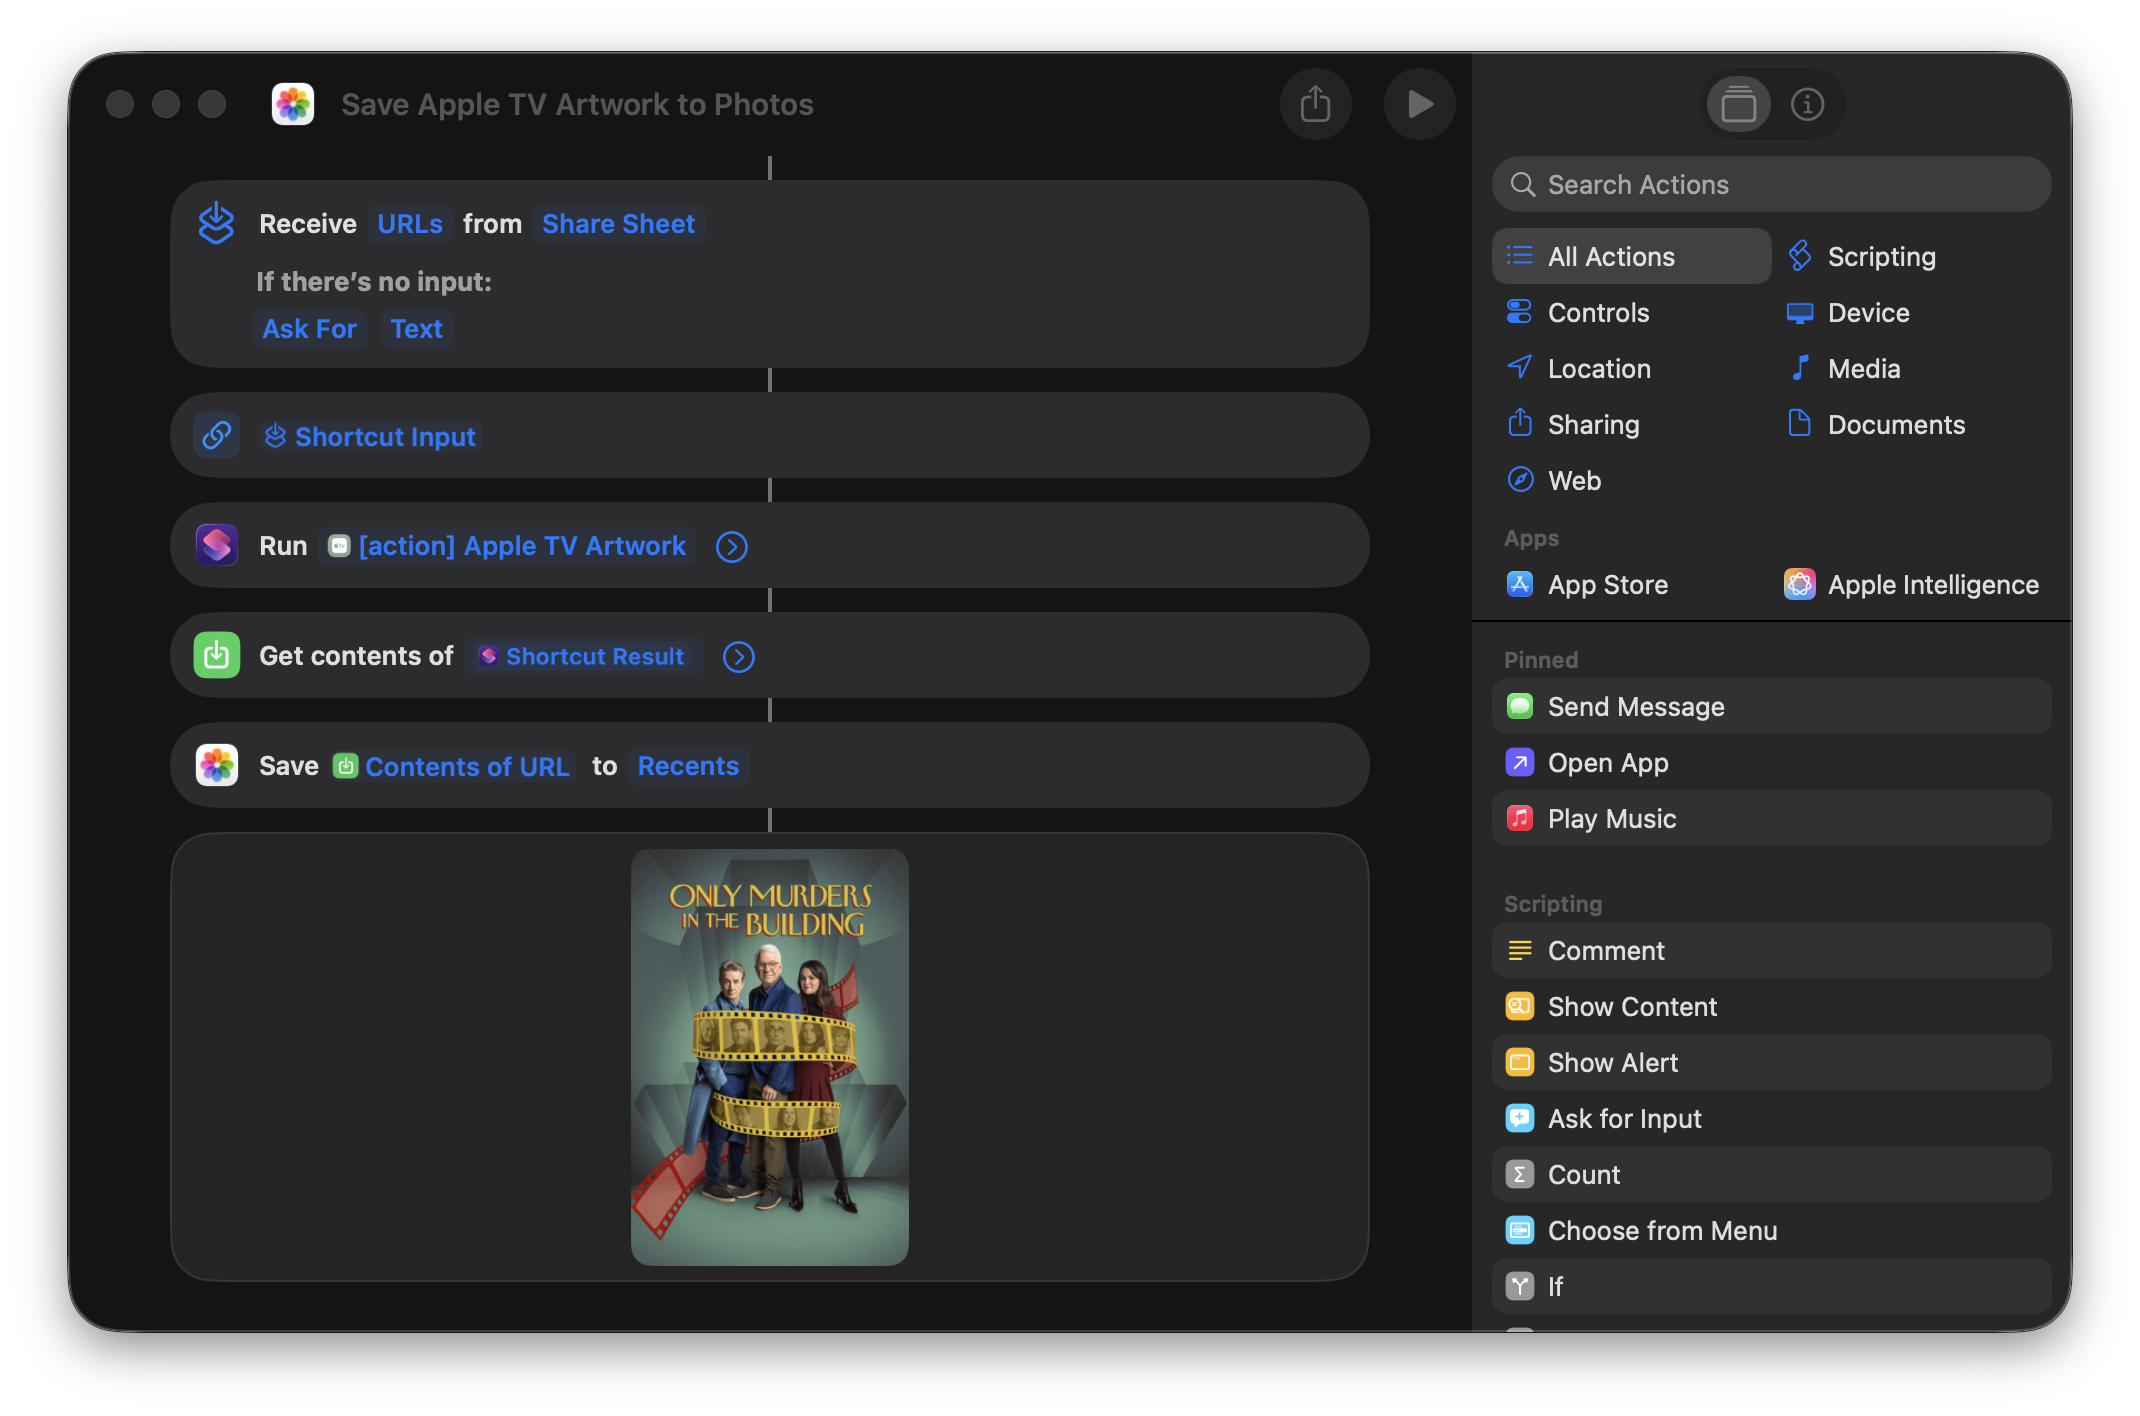
With this new shortcut, all you need is an Apple TV URL. Feed it in, and you’ll get back a direct link to the highest resolution artwork available. There are advanced options so you can choose between the new 2:3 portrait style or the older 16:9 aspect ratio along with ways to return additional metadata such as the title (useful for naming files when saving). I’ve also included three demo shortcuts that show you how to use this tool as part of a larger automation. As with the artwork finder updates above, this new shortcut also works across all the streaming services that connect to the Apple TV app.
These new tools will hopefully allow you to update your personal libraries to match the new style Apple are using across iOS 26 and macOS Tahoe. If you run into any issues or have any suggestions for improvements, then please feel free to contact me.
Links:
You can get exclusive updates on my projects and early access to my apps by joining my free newsletter, The Dodo Developer.
.%20I%E2%80%99ve%20also%20included%20three%20demo%20shortcuts%20that%20show%20you%20how%20to%20use%20this%20tool%20as%20part%20of%20a%20larger%20automation.%20As%20with%20the%20artwork%20finder%20updates%20above,%20this%20new%20shortcut%20also%20works%20across%20all%20the%20streaming%20services%20that%20connect%20to%20the%20Apple%20TV%20app.%3C/p%3E%0A%0A%3Cp%3EThese%20new%20tools%20will%20hopefully%20allow%20you%20to%20update%20your%20personal%20libraries%20to%20match%20the%20new%20style%20Apple%20are%20using%20across%20iOS%2026%20and%20macOS%20Tahoe.%20If%20you%20run%20into%20any%20issues%20or%20have%20any%20suggestions%20for%20improvements,%20then%20please%20feel%20free%20to%20%3Ca%20href%3D%22https://bendodson.com/contact/%22%3Econtact%20me%3C/a%3E.%3C/p%3E%0A%0A%3Ch3%3ELinks:%3C/h3%3E%0A%3Cul%3E%0A%20%20%3Cli%3E%3Cstrong%3E%3Ca%20href%3D%22https://bendodson.com/projects/apple-tv-movies-artwork-finder/%22%3EApple%20TV%20%26amp;%20Movies%20Artwork%20Finder%3C/a%3E%3C/strong%3E%3C/li%3E%0A%20%20%3Cli%3E%3Cstrong%3E%3Ca%20href%3D%22https://bendodson.gumroad.com/l/apple-tv-artwork-shortcut%22%3EHi-Res%20Apple%20TV%20Artwork%20Shortcut%3C/a%3E%3C/strong%3E%3C/li%3E%0A%3C/ul%3E%0A%3Cp%3EYou%20can%20get%20exclusive%20updates%20on%20my%20projects%20and%20early%20access%20to%20my%20apps%20by%20joining%20my%20free%20newsletter,%20%3Ca%20href%3D%22https://www.thedododeveloper.com/%22%3EThe%20Dodo%20Developer%3C/a%3E.%3C/p%3E)
Getting Hi-Res Album Artwork in Apple Shortcuts 20 Aug 2024 7:34 AM (last year)
For over a decade, I’ve been providing a way to easily access high-resolution album artwork through my iTunes Artwork Finder and Apple Music Artwork Finder. These tools allow you to uncover the original, uncompressed artwork files exactly as they were delivered to Apple by the artist or their label — no compression, no quality loss, just high quality imagery.
Over the years, I’ve received countless messages from users who loved these tools but wished for more; specifically, the ability to fetch multiple pieces of artwork at once or automate the process…
Today, I’m thrilled to announce an Apple Shortcut that lets you do just that, now available exclusively on Gumroad.
With this new shortcut, all you need is an Apple Music URL. Feed it in, and you’ll get back a direct link to the highest resolution, uncompressed artwork available. I’ve also created a demo shortcut that shows you how to use this tool as part of a larger automation. Imagine easily inputting a URL and having the artwork automatically downloaded to your device. It’s that simple.
This shortcut isn’t just limited to album artwork. It works with playlists, stations, artists, music videos, and curators too. Essentially, if it’s on Apple Music, you can get the artwork.
I’m genuinely excited to see how people will use this shortcut. If there’s enough interest, I might expand this functionality to include my other artwork finders. If that’s something you’d like to see, let me know!
You can get exclusive updates on my projects and early access to my apps by joining my free newsletter, The Dodo Developer.

Using your Personal Voice (along with system and novelty voices) in an iOS app 3 Apr 2024 4:34 AM (last year)
Text to speech has been around on iOS for over a decade, but Apple added a few new features in iOS 17 that could make interesting additions to your app. In this tutorial I’ll show you how to use AVSpeechSynthesizer to speak with the default system voices, the new “novelty” voices, and to even speak with the users own AI generated “Personal Voice”!
The motivation for this came about when a user of my Chaise Longue to 5K app asked me to add some sounds so they knew when to alternate between running and walking1. Whilst browsing some royalty free sfx libraries it occurred to me that there isn’t really a good way to signal “start walking” or “start running”; A single blast of a whistle for walk and a double blast for run? Instead, I decided that it might be better to use the text to speech features as then I could literally say “walk for 1 minute and 30 seconds” or “run for 3 minutes”.
To do this is relatively straightforward:
class Speaker: NSObject {

    static let shared = Speaker()

    lazy var synthesizer: AVSpeechSynthesizer = {
        let synthesizer = AVSpeechSynthesizer()
        synthesizer.delegate = self
        return synthesizer
    }()

    func speak(_ string: String) {
        let utterance = AVSpeechUtterance(string: string)
        synthesizer.speak(utterance)
    }
}

extension Speaker: AVSpeechSynthesizerDelegate {

    func speechSynthesizer(_ synthesizer: AVSpeechSynthesizer, willSpeakRangeOfSpeechString characterRange: NSRange, utterance: AVSpeechUtterance) {
        try? AVAudioSession.sharedInstance().setActive(true)
        try? AVAudioSession.sharedInstance().setCategory(.playback, options: .interruptSpokenAudioAndMixWithOthers)
    }

    func speechSynthesizer(_ synthesizer: AVSpeechSynthesizer, didFinish utterance: AVSpeechUtterance) {
        try? AVAudioSession.sharedInstance().setActive(false, options: .notifyOthersOnDeactivation)
    }
}
The key components of this Speaker class I’ve created are the AVSpeechSynthesizer which we need to retain a reference to along with the AVSpeechSynthesizerDelegate which will allow us to change the AVAudioSession when speaking starts and finishes. In this case I’m using the .interruptSpokenAudioAndMixWithOthers category which will ensure our audio plays alongside music but will temporarily pause any spoken audio content such as podcasts or audio books.
To do the actual speaking, we just need to create an AVSpeechUtterance with our string and then pass that to the synthesizer using speak(). With that, we have a working text to audio system using the default system voice.
At our call site, it takes just a single line of code to get our device to speak:
// Singleton approach
Speaker.shared.speak("Hello, world!")

// Using the object only within a specific controller
let speaker = Speaker() // make sure this is retained
[...]
speaker.speak("Hello, world!")
Using System Voices
Where things get more interesting is that we can allow the user to choose a specific voice to be used. You can fetch an array of AVSpeechSynthesisVoice by calling AVSpeechSynthesisVoice.speechVoices() and then use them directly with an utterance or by looking them up by their identifier:
// if you have a reference to your AVSpeechSynthesisVoice
utterance.voice = voice

// if you have only stored the identifier
utterance.voice = AVSpeechSynthesisVoice(identifier: identifier)
Within Chaise Longue to 5K, I list all of the English voices in a UIMenu and let the user pick one. The identifier is then stored in UserDefaults and I use this identifier whenever I want the app to speak. Should a voice ever be unavailable (more on that shortly) then using an unknown identifier will cause the system to simply use the default voice. You can also use AVSpeechSynthesisVoice.AVSpeechSynthesisVoiceIdentifierAlex to get the identifier for the default “Alex” voice.
Locales
When you fetch voices you’ll discover that there are a lot of them. In fact, there are over 150 preinstalled on iOS 17. This is because there are several default voices for most major languages. Due to this, you’ll likely want to filter out any that aren’t tuned to the language you are planning to speak or to the user’s own language. Apple provide a AVSpeechSynthesisVoice.currentLanguageCode() method to get the current BCP 47 code of the user’s locale as this differs to the identifier you may usually fetch via Locale.current.identifier2.
// getting only the voices available in the user's current locale
let voices = AVSpeechSynthesisVoice.speechVoices().filter({$0.language == AVSpeechSynthesisVoice.currentLanguageCode()})
Enhanced and Premium Voices
With our voices filtered by locale, the next item of interest is the quality parameter which tells us whether our voice is default, enhanced, or premium. All of the preinstalled voices are default and it shows 😂. iOS 16 added the enhanced and premium voices but you have to manually download them as they are each over 100MB. To do this, you need to go to Accessibility > Live Speech > Voices3 within the Settings app. Here you can browse all of the voices and download any additional ones you may want. Once they are downloaded, you’ll be able to use them within your own app.
// only enhanced voices
let voices = AVSpeechSynthesisVoice.speechVoices().filter({$0.quality == .enhanced})

// only premium voices
let voices = AVSpeechSynthesisVoice.speechVoices().filter({$0.quality == .premium})
As these downloaded voices can be deleted by the user, it’s worth checking that the voice still exists if you’re letting a user choose a specific voice in your app (although, as mentioned earlier, it will fall back to the default voice if you provide a now invalid identifier).
Novelty Voices
In iOS 17, Apple added a number of novelty voices to the system. These range from cellos that speak to the cadence of Edvard Grieg’s “In the Hall of the Mountain King”4 or alien voices in the form of Trinoids. There’s also a really creepy clown that just laughs as it talks. I don’t know why anybody would actually want to use these but if you do it’s as simple as filtering by the isNoveltyVoice trait:
// only novelty voices
let voices = AVSpeechSynthesisVoice.speechVoices().filter({$0.voiceTraits == .isNoveltyVoice})

// only non-novelty voices
let voices = AVSpeechSynthesisVoice.speechVoices().filter({$0.voiceTraits != .isNoveltyVoice})
These are only available in en-US but it may be worth specifying this in case they get ported to other languages in a future update. Depending on your app, you may also want to filter out these voices from your UI.
Personal Voice
Personal Voice was announced in May 2023 in advance of it’s debut in iOS 17:
For users at risk of losing their ability to speak — such as those with a recent diagnosis of ALS (amyotrophic lateral sclerosis) or other conditions that can progressively impact speaking ability — Personal Voice is a simple and secure way to create a voice that sounds like them.
Users can create a Personal Voice by reading along with a randomized set of text prompts to record 15 minutes of audio on iPhone or iPad. This speech accessibility feature uses on-device machine learning to keep users’ information private and secure, and integrates seamlessly with Live Speech so users can speak with their Personal Voice when connecting with loved ones.
Essentially, Personal Voice is using on-device AI to create a private recreation of your voice. What I hadn’t realised at the time is that apps are able to use these user-created voices if the user allows it. What better motivation for my running app than having you speak to yourself!
To create a Personal Voice, you need to go to Settings > Accessibility > Personal Voice and then choose “Create a Personal Voice”. You’ll read out 150 text prompts (which takes around 15 minutes) at which point you’ll need to leave your device connected to power and in standby mode so it can do the necessary algorithm crunching to generate your soundalike. In my experience, this took around 3 hours on an iPhone 15 Pro Max.
Once completed, there is a crucial button you’ll need to enable if you want your voice to be available to other apps; the aptly named “Allow Apps to Request to Use”. This does not magically make your voice available to be used in other apps but allows apps to request the permission, otherwise any request is automatically denied. You can also choose for your voices to be synced across your devices although this currently only extends to iPhone, iPad, and Mac and as yet I’ve not managed to get it working correctly.
Now we have our voice, let’s look at how we can access it within an app:
// request permission
AVSpeechSynthesizer.requestPersonalVoiceAuthorization { status in
    // check `status` to see if you're authorized and then refetch your voices
}
As soon as the authorization is granted, personal voices will appear within AVSpeechSynthesisVoice.speechVoices() with the isPersonalVoice trait. This means you can filter voices to just Personal Voices very easily:
// fetch only personal voices
let voices = AVSpeechSynthesisVoice.speechVoices().filter({$0.voiceTraits == .isPersonalVoice})
The user can choose to remove authorization for your app at any point in the Personal Voice settings panel either by turning off the toggle for your app or by disabling the “Allow Apps to Request to Use” toggle. This is slightly confusing as if you disable requests your app may still be toggled on making it seem like it would work. Your app settings also do not contain any mention of Personal Voice, even when enabled, so you can’t link to UIApplication.openSettingsURLString to get the user to view these settings.
To further confuse things, Personal Voice only works on iPhone, iPad, and Mac and only on newer models. There is an .unsupported value for PersonalVoiceAuthorizationStatus but this is only used when running on the Simulator or using an unsupported platform such as tvOS, watchOS, or visionOS; it is not called when trying to run on an older device in a supported platform (i.e. a 2nd Gen 11” iPad Pro) with .denied being sent back instead. Do bear this in mind when crafting any alert text you may display to users when they are trying to authorize your app!
I hope you enjoyed this tutorial. I’ll leave it to my Personal Voice5 to sign off…
-
The app was designed for Picture-in-Picture mode on an Apple TV so you could see when to run / walk whilst using other apps. I ported it to iPhone, iPad, and Mac with the same feature set but hadn’t added any sounds for those that want to run with their device in standby mode. ↩︎
-
Localewill give you something like en_GB whereas the BCP 47 code is en-GB. iOS 17 did add aLocale.IndentifierTypeso you can callLocale.current.identifier(.bcp47)but this will matchAVSpeechSynthesisVoice.currentLanguageCode()which has been around since iOS 7. ↩︎ -
This is the same on macOS but on tvOS the only way to download extra voices is in Accessibility > VoiceOver > Voice ↩︎
-
Seriously. ↩︎
-
Here’s a transcript in case you can’t listen to audio right now: “Hi, I’m Ben’s personal Voice. I hope you enjoyed this tutorial and have seen how easy it is to incorporate system voices, novelty voices, and even personal voices like this one into your apps. Personal voice will be available in an update for Chaise Longue to 5K very soon and I’m looking forward to seeing how you use them in your own apps in the future!” ↩︎
You can get exclusive updates on my projects and early access to my apps by joining my free newsletter, The Dodo Developer.
Adding teachable moments to your apps with TipKit 25 Jul 2023 11:30 PM (2 years ago)
When TipKit was first mentioned during the WWDC 2023 State of the Union, I assumed it was going to be a way for apps to appear within the Tips app and maybe appear within Spotlight. Instead, it’s a built-in component for adding small tutorial views to your own app across all platforms complete with a rules system for condition-based display and syncing across multiple devices via iCloud! Even better, it’s something Apple are using themselves throughout iOS 17 such as in the Messages and Photos apps.
Having built a fair few popover onboarding systems in the past, this was quickly my most anticipated feature from WWDC 2023. I was slightly disappointed then when Xcode beta after Xcode beta was missing the TipKit framework. Fortunately, Xcode 15 beta 5 (released last night) now includes the relevant framework and documentation allowing me to integrate tips into my own apps.
Before I demonstrate how TipKit works and how you can incorporate it into your own apps, here is a really key piece of advice from Ellie Gattozzi in the “Make features discoverable with TipKit” talk from WWDC 2023:
Useful tips have direct action phrases as titles that say what the feature is and messages with easy to remember benefit info or instructions so users know why they’d want to use the feature and are later able to accomplish the task on their own.
With that said, let’s create our first tip!
Note: I’ve included code for both SwiftUI and UIKit below but Apple also provided a way to display tips in AppKit. It should be noted that the UIKit versions are not available on watchOS or tvOS. It’s also worth noting that there are a few bugs in the TipKit framework in beta 5, particularly around actions which I’ve documented below.
1. Creating a Tip
First we need to initiate the Tips system when our app launches using Tips.configure()1:
// SwiftUI
var body: some Scene {
    WindowGroup {
        ContentView()
        .task {
            try? await Tips.configure()
        }
    }
}

// UIKit
func application(_ application: UIApplication, didFinishLaunchingWithOptions launchOptions: [UIApplication.LaunchOptionsKey: Any]?) -> Bool {
    Task {
        try? await Tips.configure()
    }
    return true
}
Next, we create the struct that defines our tip:
struct SearchTip: Tip {
    var title: Text {
        Text("Add a new game")
    }

    var message: Text? {
        Text("Search for new games to play via IGDB.")
    }

    var asset: Image? {
        Image(systemName: "magnifyingglass")
    }
}
Finally, we display our tip:
// SwiftUI
ExampleView()
    .toolbar(content: {
        ToolbarItem(placement: .primaryAction) {
            Button {
                displayingSearch = true
            } label: {
                Image(systemName: "magnifyingglass")
            }
            .popoverTip(SearchTip())
        }
    })


// UIKit
class ExampleViewController: UIViewController {
    var searchButton: UIButton
    var searchTip = SearchTip()

    override func viewDidAppear(_ animated: Bool) {
        super.viewDidAppear(animated)
        Task { @MainActor in
            for await shouldDisplay in searchTip.shouldDisplayUpdates {
                if shouldDisplay {
                    let controller = TipUIPopoverViewController(searchTip, sourceItem: searchButton)
                    present(controller)
                } else if presentedViewController is TipUIPopoverViewController {
                    dismiss(animated: true)
                }
            }
        }
    }
}
This code is all that is required to display our provided tip the first time the view appears:
There are two kinds of tip views:
- Popover: appears as an overlay on the app’s UI which lets you direct users without changing the view
- In-line: temporarily adjusts the app’s UI around it so nothing is covered (this is not available on tvOS)
If we wanted to display an in-line tip instead, our code would look like this:
// SwiftUI
VStack {
    TipView(LongPressTip())
}

// UIKit
class ExampleViewController: UIViewController {
    var longPressGameTip = LongPressGameTip()

    override func viewDidAppear(_ animated: Bool) {
        super.viewDidAppear(animated)
        Task { @MainActor in
            for await shouldDisplay in longPressGameTip.shouldDisplayUpdates {
                if shouldDisplay {
                    let tipView = TipUIView(longPressGameTip)
                    view.addSubview(tipView)
                } else if let tipView = view.subviews.first(where: { $0 is TipUIView }) {
                    tipView.removeFromSuperview()
                }
            }
        }
    }
}
UIKit also has a TipUICollectionViewCell for displaying tips within a collection view which should be the route used for table-based interfaces as well. The SwiftUI code is definitely less verbose 🤣
2. Making your tips look tip-top 🎩
You can customise your tips with changes to text colour and fonts along with background colour, corner radius, and icons. The tip views are also fully compatible with dark mode.
Fonts and text colour
These are customised within the Tip structs themselves as you are returning instances of SwiftUI.Text even if you are ultimately rendering your tip in UIKit or AppKit.
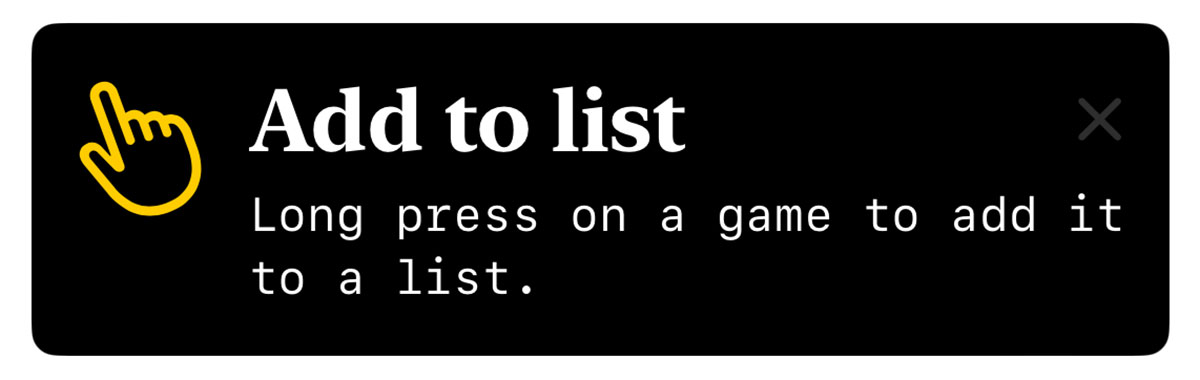
struct LongPressTip: Tip {
    var title: Text {
        Text("Add to list")
            .foregroundStyle(.white)
            .font(.title)
            .fontDesign(.serif)
            .bold()
    }

    var message: Text? {
        Text("Long press on a game to add it to a list.")
            .foregroundStyle(.white)
            .fontDesign(.monospaced)
    }

    var asset: Image? {
        Image(systemName: "hand.point.up.left")
    }
}
As the title and message both use Text, you can use any modifiers that return a Text instance such as foregroundStyle, font, and convenience methods like bold(). The icon is returned as an Image so if we want to change anything like the icon colour we have to do this from the Tip view itself:
Icon colour, background colour, and dismiss button colour
// SwiftUI
TipView(LongPressGameTip())
    .tipBackground(.black)
    .tint(.yellow)
    .foregroundStyle(.white)

// UIKit
let tipView = TipUIView(LongPressGameTip())
tipView.backgroundColor = .black
tipView.tintColor = .yellow
A method is provided to change the colour of the tip background itself but to change the icon colour we need to use a global tint whilst the dismiss button colour is affected by the foregroundStyle; note that this button appears to be 50% opaque so if you are using a dark background you’ll struggle to see anything other than white. There does not appear to be a way to alter this button with UIKit.
Whilst there are no Human Interface Guidelines for tips yet, looking through the iOS 17 beta and the WWDC 2023 talk shows that Apple uses un-filled SF Symbols for all of their tips. For this reason, I’d suggest doing the same!
Corner Radius
// SwiftUI
TipView(LongPressGameTip())
    .tipCornerRadius(8)
The default corner radius for tips on iOS is 13. If you want to change this to match other curved elements within your app, you can do this with tipCornerRadius() in SwiftUI. UIKit does not have a way to change the corner radius of tip views.
I was pleasantly surprised by how flexible the design was for this first version of TipKit. However, I’d urge caution in customising tips too far as having them match the default system tips is surely a boon in terms of user experience.
3. Lights, Cameras, Actions!
Tips allow you to add multiple buttons known as actions which can be used to take users to a relevant setting or a more in-depth tutorial. This feature is not available on tvOS.
To add an action, you first need to adjust your Tip struct with some identifying details:
// SwiftUI
struct LongPressGameTip: Tip {

    // [...] title, message, asset

    var actions: [Action] {
        [Action(id: "learn-more", title: "Learn More")]
    }
}
Note that the Action initialiser also has an option to use a Text block rather than a String which allows for all of the colour and font customisations mentioned earlier.
With this in place, we can alter our tip view to perform an action once the button has been pressed:
// SwiftUI
Button {
    displayingSearch = true
} label: {
    Image(systemName: "magnifyingglass")
}
    .popoverTip(LongPressGameTip()) { action in
        guard action.id == "learn-more" else { return }
        displayingLearnMore = true
    }

// UIKit
let tipView = TipUIView(LongPressGameTip()) { action in
    guard action.id == "learn-more" else { return }
    let controller = TutorialViewController()
    self.present(controller, animated: true)
}
Alternatively, we can add action handlers directly to the Tip struct:
var actions: [Action] {
    [Action(id: "learn-more", title: "Learn More", perform: {
        print("'Learn More' pressed")
    })]
}
Important: Whilst you can add actions in Xcode 15 beta 5, the handlers do not currently trigger when pressing the button regardless of whether you use the struct or view method to attach them.
One final thing to note on actions is that they can be disabled if you wish to grey them out for some reason (i.e. if a user isn’t signed in or subscribed to a premium feature):
var actions: [Action] {
    [Action(id: "pro-feature", title: "Add a new list", disabled: true)]
}
4. Laying down the rules
By default, tips appear as soon as the view they are attached to appears on screen. However, you may not want to show a tip in a certain view until some condition has been met (i.e. the user is logged in) or you may want a user to have to interact with a feature a certain number of times before the tip is displayed. Luckily Apple has thought of this and added a concept known as “rules” to let you limit when tips will appear.
There are two types of rules:
- Parameter-based: These are persistent and are matched to Swift value types such as booleans
- Event-based: Defines an action that must be performed before a tip is eligible for display
Important: In Xcode 15 beta 5 there is a bug which will prevent the @Parameter macro from compiling for simulators or for macOS apps. The workaround is to add the following to the “Other Swift Flags” build setting:
-external-plugin-path $(SYSTEM_DEVELOPER_DIR)/Platforms/iPhoneOS.platform/Developer/usr/lib/swift/host/plugins#$(SYSTEM_DEVELOPER_DIR)/Platforms/iPhoneOS.platform/Developer/usr/bin/swift-plugin-serverParameter-based Rules
struct LongPressGameTip: Tip {

    @Parameter
    static var isLoggedIn: Bool = false

    var rules: [Rule] {
        #Rule(Self.$isLoggedIn) { $0 == true }
    }

    // [...] title, message, asset, actions, etc.

}
The syntax is relativelty straightforward thanks to the new Macro support in Xcode 15. We first define a static variable for the condition, in this case a boolean detailing if the user is logged in or not. Next we provide a rule based on that condition being true.
If we ran our app now, the tip would no longer be displayed on launch. However, once we mark the static property as true the tip will show up the next time the relevant view is displayed:
LongPressGameTip.isLoggedIn = trueEvent-based Rules
struct LongPressGameTip: Tip {

    static let appOpenedCount = Event(id: "appOpenedCount")

    var rules: [Rule] {
        #Rule(Self.appOpenedCount) { $0.donations.count >= 3 }
    }

    // [...] title, message, asset, actions, etc.

}
The event-based rules are slightly different in that instead of a parameter we use an Event object with an identifier of our choosing. The rule then checks the donations property of this event to determine if the app has been opened three or more times. In order for this to work, we need to be able to “donate” when this event has occured. We do this by using the donate method on the event itself:
SomeView()
    .onAppear() {
        LongPressTip.appOpenedCount.donate()
    }
The donation on an event contains a date property that is set to the time at which the event was donated. This means you can add rules to check if somebody has opened the app three times or more today:
struct LongPressGameTip: Tip {

    static let appOpenedCount: Event = Event(id: "appOpenedCount")

    var rules: [Rule] {
        #Rule(Self.appOpenedCount) {
            $0.donations.filter {
                Calendar.current.isDateInToday($0.date)
            }
            .count >= 3
        }
    }

    // [...] title, message, asset, actions, etc.

}Important: Whilst this code should be possible according to the WWDC 2023 talk, it gives a “the filter function is not supported in this rule” when run on Xcode 15 beta 5.
5. To display, or not to display?
Whilst rules can limit our tips to displaying at the optimal time, there is always the possibility that multiple tips might try to display at the same time. It may also be that we no longer want to display a tip if the user interacts with our feature before our tip was displayed. To get around this, Apple provides us with ways to manage frequency, display count, and to invalidate tips. They also provide a mechanism for syncing the display status of your tips across multiple devices.
Frequency
By default, tips appear as soon as they are allowed to. We can change this by setting a DisplayFrequency when initiating our Tips store on app launch:
try? await Tips.configure(options: {
    DisplayFrequency(.daily)
})
With this in place, only one tip will be able to appear each day.
There are several predefined values for DisplayFrequency such as .daily and .hourly but you can also provide a TimeInterval if you need something custom. Alternatively, you can restore the default behaviour by using .immediate.
If you have set a non-immediate display frequency but have a tip that you want to display immediately, you can do so by using the IgnoresDisplayFrequency() option on the Tip struct:
struct LongPressGameTip: Tip {

    var options: [TipOption] {
        [Tip.IgnoresDisplayFrequency(true)]
    }

    // [...] title, message, asset, actions, etc.

}
Display Count
If a tip is not manually dismissed by the user then it will be reshown the next time the relevant view appears even after app launches. To avoid a tip being shown repeatedly to a user, you can set a MaxDisplayCount which will limit the number of appearances until the tip is no longer displayed:
struct LongPressGameTip: Tip {

    var options: [TipOption] {
        [Tip.MaxDisplayCount(3)]
    }

    // [...] title, message, asset, actions, etc.

}
Invalidation
Depending on our rules and display frequency, it may be that a user interacts with a feature before our tip has been displayed. In this case, we would want to invalidate our tip so that it is not displayed at a later date:
longPressGameTip.invalidate(reason: .userPerformedAction)There are three possible reasons for a tip to be invalidated:
- maxDisplayCountExceeded
- userClosedTip
- userPerformedAction
The first two are performed by the system depending on whether the display count or the user caused the tip to be dismissed. This means you will always want to use .userPerformedAction when invalidating your tips.
iCloud Sync
During the “Make features discoverable with TipKit”, Charlie Parks mentions:
TipKit can also sync tip status via iCloud to ensure that tips seen on one device won’t be seen on the other. For instance, if someone using the app has it installed on both an iPad and an iPhone, and the features are identical on both of those devices, it’s probably best to not educate them on both devices about the feature.
This feature appears to be enabled by default with no options for disabling it meaning you’ll need to provide custom identiers for each tip on the platforms you support if you want to make sure tips are re-displayed on every device for some reason (i.e. if the UI is significantly different between devices).
6. Debugging
TipKit provides convenient APIs for testing, allowing you to show or hide tips as needed, inspect all the tips without satisfying their rules, or purge all info in the TipKit data store for a pristine app build state.
// Show all defined tips in the app
Tips.showAllTips()

// Show the specified tips
Tips.showTips([searchTip, longPressGameTip])

// Hide the specified tips
Tips.hideTips([searchTip, longPressGameTip])

// Hide all tips defined in the app
Tips.hideAllTips()
If we want to purge all TipKit related data, we need to use the DatastoreLocation modifier when initialising the Tips framework on app launch:
try? await Tips.configure(options: {
    DatastoreLocation(.applicationDefault, shouldReset: true)
})
Conclusion
Tips are instrumental in helping users discover features in your app be it on iOS, iPadOS, macOS, watchOS, or tvOS. Remember to keep your tips short, instructional, and actionable, and make use of the rules system, display frequency, and invalidation to ensure tips are only shown when they need to be.
-
Note that this differs from the
TipsCenter.shared.configure()that was previewed in the WWDC 2023 talk “Make features discoverable with TipKit”. ↩︎
You can get exclusive updates on my projects and early access to my apps by joining my free newsletter, The Dodo Developer.
Attempting to connect a tvOS app to an iOS app with DeviceDiscoveryUI 10 May 2023 5:00 AM (2 years ago)
As we get to the final month before WWDC 2023, I’m reminded of all the new APIs that were released at WWDC 2022 that I haven’t made use of yet. One of those new APIs was the DeviceDiscoveryUI framework which allows an Apple TV app to connect and communicate with an iPhone, iPad, or Apple Watch.
A good example of this would be how the Apple Watch communicates with the Apple Fitness app:

It’s not necessarily a fair comparison as whilst you might expect them to be the same, the DeviceDiscoveryUI framework has a number of restrictions:
- It only works on tvOS (so you can’t communicate between an Apple Watch and an iPad like Apple Fitness can)
- It only works on Apple TV 4K (Apple Fitness can work with Apple TV HD)
- The tvOS app can only connect to one device at a time (i.e. you couldn’t make a game with this that used two iPhones as controllers)
- The tvOS app can only connect to other versions of your app that share the same bundle identifier (and are thus sold with Universal Purchase)
- This will not work on either the tvOS or iOS simulators. You must use physical devices.
The UI for the connection setup is also different to Apple Fitness as we will see shortly.
My use case for this technology is a bit convoluted as I was really looking for an excuse to use it rather than the best fit. I have a personal app named Stoutness that I use on my Apple TV every morning to give me a briefing on my day whilst I do my chiropractic stretches. Using shortcuts and various apps on my iPhone, I send a ton of data to my server which the Apple TV app then fetches and uses. The app also communicates directly with some 3rd party APIs such as YouTube and Pocket.
One of the main reasons for the app is to get me to work through my backlogs of games, books, videos, and articles by having the app randomly pick from my various lists and presenting them to me; I then know “out of the 4 books I’m currently reading, I should read x today”. The problem is that later in the day I often forget what the app had decided I should use, a particular problem when it suggests 5 articles for me to read from a backlog of about 200 😬. Whilst I cache this information daily in the Apple TV app, it’s a bit of a pain to fire it up just to skip through a few screens and remember what I should be reading. Surely this information would be better on my phone?
The obvious way to do this would be for the server to make the calls to Pocket and YouTube and then store the daily cache in my database along with the random choices of games and books. An iOS app could then download that in the same way the tvOS app does. This is true, but it’s not as fun as learning a new framework and having my phone connect to the Apple TV to a) send all the data that my shortcuts used to do directly and b) have the cache be sent back in response ready to be used on iOS.
After a brief look at the docs, I naively assumed this would be done in an hour as it looked vaguely similar to the way in which an iPhone app can talk to an embedded Apple Watch app or a Safari extension via two way messaging. After 4 hours, I finally got something working but it does not feel as solid as I would like…
Apple provide a developer article titled “Connecting a tvOS app to other devices over the local network” that sounds like it should be exactly what we need. It details how we present the connection UI (in both SwiftUI and UIKit), how to listen for the connection on iOS / iPadOS / watchOS, and how to initiate the connection. However, there are two issues with this article.
First of all, most of the code in it doesn’t actually compile or is being used incorrectly. The SwiftUI code references a “device name” variable which isn’t present1, fails to include the required “fallback” view block (for displaying on unsupported devices like the Apple TV HD), and presents the device picker behind a connect button failing to notice that the picker itself has it’s own connect button which sits transparently above the one you just pressed.
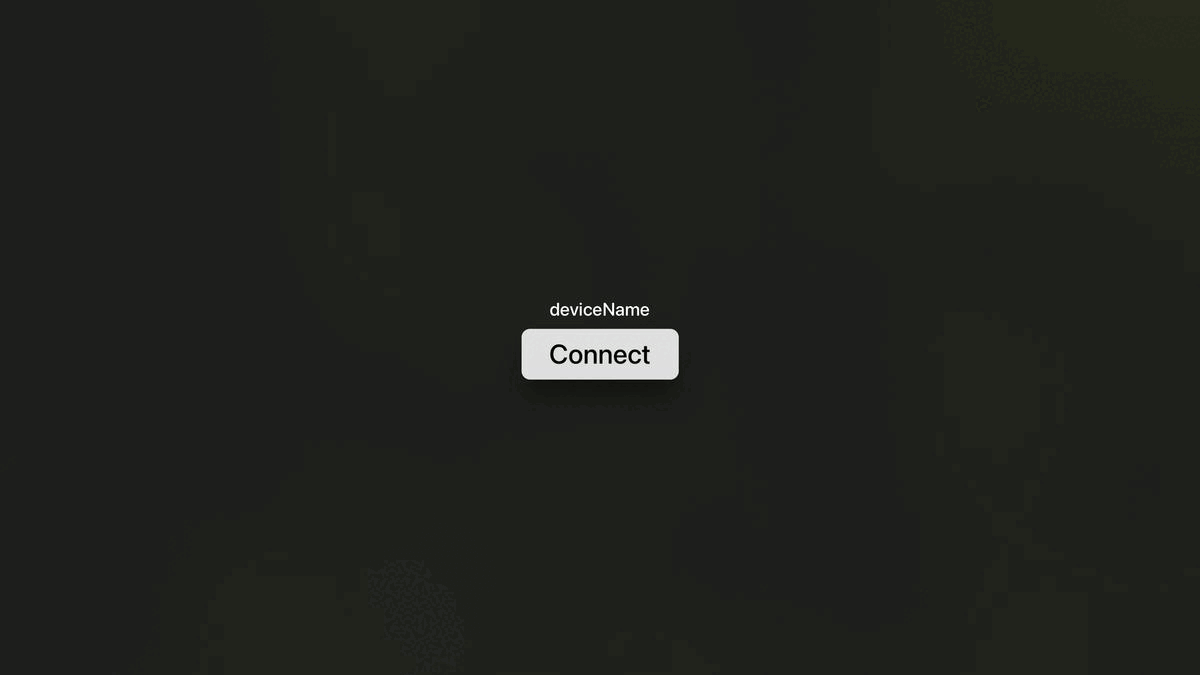
For the UIKit code, it references an NWEndpointPickerViewController which doesn’t exist. The correct name is DDDevicePickerViewController.
Once the actual picker is presented, things start to look very promising. You get a fullscreen view that shows your app icon with a privacy string that you define within Info.plist on the left hand side whilst any applicable devices are listed on the right hand side:
An important thing to note here is that the devices do not necessarily have your app installed, they are merely devices potentially capable of running your app.
When we initiate a connection to an iPhone, a notification is displayed. The wording can’t be controlled and will be different depending on whether the corresponding app is installed or not:
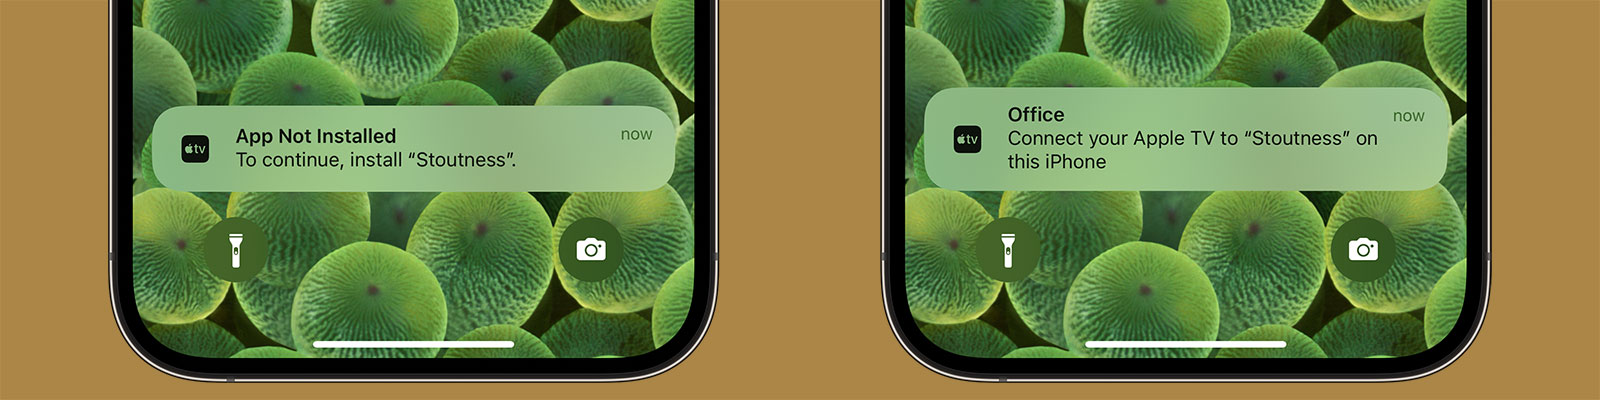
You seem to have around 30 seconds to accept the connection otherwise the tvOS interface goes back a step and you need to send a new request. If you do not have the app installed, tapping the notification will take you to the App Store page.
We now come to the second problem in Apple’s documentation:
As soon as the user selects a device, the system passes you an
NWEndpoint. Use this endpoint to connect to the selected device. Create anNWConnection, passing it both the endpoint and the parameters that you used to create the device picker view. You can then use this connection to send or receive messages to the connected device.
The emphasis above is mine. This is the extent of the documentation on how to actually use the connection to send and receive messages. It turns out that the connection uses classes from the In-Provider Networking that was introduced in iOS 9 specifically for network extensions. In fact, this is still the case according to the documentation:
These APIs have the following key characteristics:
- They aren’t general-purpose APIs; they can only be used in the context of a NetworkExtension provider or hotspot helper.
There is zero documentation on how to use these APIs in the context of Apple TV to iOS / iPadOS / WatchOS communication 🤦🏻♂.
In terms of sending messages, there is only one method aptly named send(content:contentContext:isComplete:completion:). This allows us to send any arbitrary Data such as a JSON-encoded string.
The real problem is how to receive those messages. There is a method named receiveMessage(completion:) which, based on my work with watchOS and iOS extensions, sounds promising. Apple describes it as “schedules a single receive completion handler for a complete message, as opposed to a range of bytes”. Perfect!
Except it isn’t called, at least not when a message is sent. In a somewhat frustrating act, the messages only appear once the connection is terminated either because the tvOS app stops or because I cancel the connection. I tried for multiple hours but could not get that endpoint to fire unless the entire connection was dropped (at which point any messages that were sent during that time would come through as one single piece of data). I can only assume the messages are being cached locally without being delivered yet when the connection drops it suddenly decides to unload them 🤷🏻♂.
It turns out you need to use the more complex receive(minimumIncompleteLength:maximumLength:completion:) which requires you to say how big you want batches of data to be. You also need to resubscribe to this handler every time data appears on it. The problem here is that whilst there is a “completion” flag to tell you if the whole message has arrived this is never true when sending from tvOS, even if you use the corresponding flag on the send method. In the end, I limited the app to 1MB of data at a time as everything I send is well below that. I’ve never run into a problem with only partial data being sent but it is a potential risk to be aware of.
If you were using this for critical data, I’d probably suggest only sending encoded text and providing your own delimiter to look for i.e. for each string that comes in batch them together until one ends in a “|||” at which point you will know that was the end of a message from tvOS.
On the positive side, the connection setup and data sending are near instantaneous and the user facing UI works well. However, as there were already low-level network solutions to send data between devices (including non-Apple devices) it’s incredibly odd to me that Apple went to the effort of creating a beautiful device pairing API and UI for both SwiftUI and UIKit but didn’t extend that to the basics of sending data. Local networking is hard. I have no interest in diving into the minutia of handling UDP packets; I just want to send some basic strings between devices!
In order to get this all working for my own app, I created a class named LocalDeviceManager that handles this all for you along with a SwiftUI demo project for both tvOS and iOS that demonstrates how it works. The call site on tvOS is very simple:
@ObservedObject private var deviceManager = LocalDeviceManager(applicationService: "remote", didReceiveMessage: { data in
    guard let string = String(data: data, encoding: .utf8) else { return }
    NSLog("Message: \(string)")
}, errorHandler: { error in
    NSLog("ERROR: \(error)")
})

@State private var showDevicePicker = false

var body: some View {
    VStack {
        if deviceManager.isConnected {
            Button("Send") {
                deviceManager.send("Hello from tvOS!")
            }

            Button("Disconnect") {
                deviceManager.disconnect()
            }
        } else {
            DevicePicker(.applicationService(name: "remote")) { endpoint in
                deviceManager.connect(to: endpoint)
            } label: {
                Text("Connect to a local device.")
            } fallback: {
                Text("Device browsing is not supported on this device")
            } parameters: {
                .applicationService
            }
        }
    }
    .padding()

}
Similarly, it’s trivial to set up an iOS app to communicate with the tvOS app:
@ObservedObject private var deviceManager = LocalDeviceManager(applicationService: "remote", didReceiveMessage: { data in
    guard let string = String(data: data, encoding: .utf8) else { return }
    NSLog("Message: \(string)")
}, errorHandler: { error in
    NSLog("ERROR: \(error)")
})

var body: some View {
    VStack {
        if deviceManager.isConnected {
            Text("Connected!")
            Button {
                deviceManager.send("Hello from iOS!")
            } label: {
                Text("Send")
            }
            Button {
                deviceManager.disconnect()
            } label: {
                Text("Disconnect")
            }
        } else {
            Text("Not Connected")
        }
    }
    .padding()
    .onAppear {
        try? deviceManager.createListener()
    }
}
There are more details on how this works on GitHub.
Judging by the complete lack of 3rd party apps using this feature or articles detailing how to use this API I’m going to go out on a limb and say it’s unlikely we’ll see any improvements to this system in tvOS 17. Regardless, I’ve filed a few bug reports in the hopes that the documentation can be tidied up a bit. Just be aware that this is not the robust solution I was hoping it would be!
-
I have been unable to divine a way to get the name of the device you are connected to. ↩︎
You can get exclusive updates on my projects and early access to my apps by joining my free newsletter, The Dodo Developer.
Postmortem of the launch of a Top 10 Paid iOS App 14 Mar 2023 7:00 AM (3 years ago)
It’s been 4 weeks since the v2.0 update for Music Library Tracker launched so I thought now was a good time for a retrospective to detail how I promoted the app and how well it performed.
By way of a bit of background, the app originally launched back in January 2016 at a $0.99 price point making $1368 in it’s first month before dropping off significantly to roughly $20 a month. In January 2021, I was accepted into the App Store Small Business Program which meant the amount Apple took from sales fell from 30% to 15%; I had also increased the price and released a few more updates so the average profit for the half year prior to the v2.0 update in February was sitting at around $80 a month1. This is by no means an income (especially as I have to pay corporation tax on it in the UK and then if I want to actually take the money for myself rather than my business I’ll have to pay some more tax) but it was fine for an app that didn’t have any running costs nor require much maintenance.
And then v2.0 happened.
With a new feature set built around Spatial Audio, v2.0 was released on 13th February 2023 after a 9 month development period, 3 months of which was open development via my newsletter. It was reported on by a couple of tech sites (I’ll detail how shortly) and ended up being the #8 Paid app in the US!
So how much money does an app need to make to be in the Top 10 of all paid apps on the App Store?
Not as much as you might think! You can download a full breakdown but the key figures are:
- Profit of $82 on 13th Feb (launch day), $1449 on 14th Feb, $1534 on 15th Feb, and $414 on 16th Feb
- Total profit of $5351 over 28 days
- An average daily profit of $191
- Only a single sale on March 6th 😭
I use Daily Sales Email to find out how much I’ve made each day but the figures typically arrive around lunchtime on the following day. That meant I could see the app in the Top 10 of all paid apps but had no idea what that would translate into2. I’ll confess that whilst I was pleased with the numbers, I was a little disappointed that I’d made less than what I charge for 2 days as a freelance iOS developer.
That said, the app has settled down into making roughly $40 per day which works out at around $1200 per month, not bad for something that will hopefully only need minor maintenance.
With the financial breakdown out of the way, I thought it might be interesting to detail exactly how I promoted the app. I will be completely honest and say it is not my strong suit at all. I hate doing app promotion work; it is abhorrent to me. I’m not sure if it’s the Englishman in me or something else but I absolutely hate having to email people saying “please look at my app” followed by the waiting and hoping that somebody will feature it. However, that’s what I had to do as an app of this nature likely isn’t going to generate enough revenue to make hiring a marketing person cost effective.
Reviews
The key thing for an app like this is for it to be written about by a tech site. I’ve had a couple articles in the past from sites like 9to5mac and MacRumors so my first port of call was to send them an email. As previously mentioned, I hate doing this stuff but I felt on slightly firmer ground with these sites as they’d written about the app before so that seemed like a good “in”:
Hello,
Back in 2016 you were kind enough to review an app of mine, Music Library Tracker (https://9to5mac.com/2016/03/15/music-tracker-large-libraries/).
I’m getting in touch as I’ve just released a large v2.0 update to the app which includes some features around Spatial Audio. In short, the app can quickly scan your library and show you exactly which songs have been upgraded to Spatial Audio and generate a playlist containing just those tracks; it will then run in the background periodically and notify you as and when tracks are upgraded and keep that playlist up to date.
This is all possible due to a database of Dolby Atmos and Dolby Audio tracks I’ve created over the past 9 months to run my Spatial Audio Finder website (https://bendodson.com/projects/spatial-audio-finder/) and the @NewSpatialAudio Twitter account (https://twitter.com/NewSpatialAudio) which tweets whenever a new track is upgraded. This database is sourced from a minor update to the Apple Music API at WWDC 22 - you can see how this all works in a blog post I wrote last year (https://bendodson.com/weblog/2022/06/27/spatial-audio-finder/) but suffice to say I do not believe there is anyone outside of Apple with a dataset such as this.
Apple Music does not yet have a clear strategy for displaying Spatial Audio tracks. Whilst they have some playlists and collections that get updated weekly, the only way to tell which tracks in your own library are upgraded is to play them and see. This is obviously not ideal and not a great way to showcase what is a genuine leap in musical quality and the hundreds of thousands of tracks that have been upgraded. I created this feature as I was determined to find a way to see which tracks had been updated. From the response I’ve received via @NewSpatialAudio it seems I’m not alone!
The app is still a single cost download (25% off for the next week) with no in-app purchases, subscriptions, or adverts so anybody who downloaded the app in the past 7 years will get this new feature for free. I’ve provided a few promo codes below in case you or anyone at the MacRumors team are interested in taking a look:
CODE1
CODE2
CODE3You can see some more information about the app at https://dodoapps.io/music-library-tracker/ and there is a full media kit with screenshots, etc, at https://dodoapps.io/music-library-tracker/media-kit/
The update is available now on the App Store at https://apple.co/3XtdAga
If you have any questions at all about the app, my Spatial Audio database, or anything else relating to Spatial Audio then just let me know.
All the best,
Ben
I sent this email on the 13th February to the reviews@9to5mac.com address (as my previous contact had since moved elsewhere) and a very similar version with a different link directly to the Senior Editor at MacRumors who wrote a previous article. I got a very strange bounceback email from 9to5mac and I didn’t get a reply at all from MacRumors. As the bounceback was so odd, I waited a day and then sent a follow up email to tips@9to5mac.com; it was a good thing I did as Chance Miller got in touch within 30 minutes and shortly afterwards there was an article published. This is undoubtedly what led to the spike in sales on the 14th and afterwards.
In addition to those two outlets, I sent similar emails to:
- TechRadar (via news@techradar.com): their Entertainment Editor replied after a couple of hours and we had a few emails back and forth discussing various aspects of Spatial Audio such as how Apple bans AI upscaling. They published an article the next day but it didn’t show up in their RSS feed and is not visible on their website unless you follow the direct link (which was tweeted but had practically zero engagement)
- AppleInsider (direct to one of their writers who had written a recent article about Spatial Audio): I didn’t get a reply and there hasn’t been an article
- MacStories (direct email to John and Federico): I didn’t get a reply but it was listed in the “App Debuts” section of the Club MacStories newsletter for paid subscribers
The following week I sent an email to iMore as I’d noticed an interesting article relating to Spatial Audio. I couldn’t find an email address for the author, Tammy Rogers, so instead sent an email direct to the Features Editor, Daryl Baxter, who was listed as a contributor:
Hi Daryl,
I came across a recent article you contributed to, “Apple Music is showcasing non-Spatial Audio albums in it’s Spatial Audio page”, and had two things that may be of interest to you and Tammy (I couldn’t find an email address for her so my apologies for not including her as well).
First of all, the reason that those albums are being listed within Apple Music’s Spatial Audio playlists is because they have some tracks on them that are available in Spatial Audio. The referenced No Pressure by Logic has two tracks that have been upgraded (GP4 and Perfect) whilst McCartney (2011) remaster has the first 13 tracks available in Spatial Audio. I know this because I created something called the Spatial Audio Finder which lets you find which tracks have been updated for a particular artist (I’ve got a blog post at https://bendodson.com/weblog/2022/06/27/spatial-audio-finder/ which explains how that all works). I also publish when tracks are upgraded to the @NewSpatialAudio Twitter feed.
You also mentioned in the article that it’s quite hard to find Spatial Audio tracks within Apple Music. This is a huge bugbear of mine and so I recently updated an app of mine, Music Library Tracker, with some new features around Spatial Audio. The app was originally designed to help notify you when Apple changes your music (i.e. if a song is deleted due to licensing changes, etc) but it can now scan your library and show you which tracks you have that are available in Spatial Audio along with creating a playlist in Apple Music containing only those tracks. It can then keep monitoring your library and send you notifications as and when new tracks are updated.
The rest of the email is similar to the initial one above
I received a reply a few days later and then after 2 weeks an article appeared.
In addition to the sites I reached out to, a few sites published articles organically including:
I’d like to give a big thank you to all of the people who did get back to me or wrote about the app - I’m very grateful! However, the experience of doing this is easily the worst part of being an independent app developer. I absolutely hate having to hawk the app around and then have the long period of waiting and hoping for an article to appear. I always try and craft my emails to be very specific to something the site has covered before or to provide some kind of story so it’s a bit easier to form a narrative other than “please talk about my app”. It’s incredibly disappointing when you don’t even get an email back. As I hated doing it, I’d typically send an email and then think “that’ll do” and by the time I realised a site wasn’t going to pick it up then the launch window had passed and it felt even more awkward to email in (especially as it had already been covered by 9to5mac so other sites could have potentially already seen that article and not wanted to cover something which is now old news).
A few things I should have done differently:
-
I should have contacted people before the launch of the app rather than afterward. I don’t like contacting anyone before Apple have approved an app as that can lead to all sorts of problems. I’d already public committed to a date and didn’t give myself much room between approval and release so just sent the messages out post-launch. In an ideal world, I should have had a week or even two with the app approved within which I could have sent out promo codes or TestFlight invites so the app could be reviewed and embargoed. That would lead to a much bigger “splash” and also avoids the issue of sites potentially not wanting to promote an app that has already been promoted elsewhere.
-
I should have written to more sites rather than just the ones I typically read. I did do some research to find sites that had talked about Spatial Audio (as I wanted some kind of an “in” when writing to someone who’d never heard of me before) but I probably should have just gone with a scattergun approach to anybody that is even vaguely app adjacent.
-
I had no idea if the promo codes I was sending out were being used so couldn’t really tell if my emails were getting through. Once you’ve generated a promo code within App Store Connect, the only way to see if it has been redeemed or not is to try and redeem it (which is obviously not a good idea). I could easily just provide a link to my site which, when accessed, gives out a promo code and can then tell me that has happened but it just doesn’t sit right with me and I’d be afraid it would be something that would put people off.
-
I should have followed up with the sites that didn’t reply to me. I did that with 9to5mac which definitely paid off but I felt more comfortable doing that as it seemed clear there was a technical error; sending a “sorry but did you get my email?” shouldn’t really be anxiety inducing but I couldn’t bring myself to do it.
If you are a writer for a tech site with any insight or a developer that has had any success stories with this then I’d absolutely love to hear from you!
Getting Featured on the App Store Form
When you’re looking at ways to promote an app, getting featured by Apple on the App Store is obviously a high priority goal. There have been several articles recently about using the dedicated form on the Apple Developer website with the key takeaway being to submit the form for every app update.
I have never used this form before, mostly because my apps tend to either be very niche or are something like this app which I’m always somewhat surprised makes it through App Review in one piece 😆. However I did it use it and something unexpected happened… I got an email from the Apple Services Performance Partnership Team3:
We are currently recruiting new partners to promote the latest of Apple’s products to join the programme: Apple MusicKit.
MusicKit lets users play Apple Music and their local music library from your app or website. So, when your users provide permission to access their Apple Music account, they can use your app or website to create playlists, add songs to their library, and play any of the millions of songs in the Apple Music catalog! If your app detects that the user is not yet an Apple Music member, you can offer a trial membership from within your app. The Apple Music Affiliate Program allows you to earn a commission on eligible referred Music memberships (new sign-ups only)! You can find more detailed information here as well as in the document attached.
We have noticed that you already use the Apple Music API and we believe adding in MusicKit would be an easy process for you and a great benefit! We offer generous compensation models and would like to talk you through this opportunity in more detail.
Please let us know your avails, so we can go ahead and schedule a call with you. 😊
I did take the call4 and it is effectively outreach to try and get developers to promote Apple Music within their apps in exchange for a commission on any new subscriptions. You can already apply for this directly but I guess Apple saw that I was using MusicKit on the form I filled out and so set this up. Unfortunately it’s not really a good fit for this app (you’re likely not using it if you don’t have Apple Music) but it may be useful for another app I have in the pipeline in which I’d already added the “Subscribe to Apple Music” interstitial that this hooks into.
Going back to the form, the app has not been featured anywhere on the App Store but I had very little expectation of that happening.
App Store Ads
I took a look at promoting the app using Apple Search Ads and found that it was recommending a suggested “Cost-per-Install” of £5.61. This is not ideal bearing in mind the app cost £2.49 at the time 🤣
After I posted that on Twitter the developer of the excellent Marvis Pro music app, Aditya Rajveer, reached out and said “It almost never reached the suggested amount per install for my app, not even close”. That pushed me to give it a try and they were right! I’ve had it running for a few weeks now and have had 22 installs on an average Cost-Per-Install of £0.89. That’s not exactly setting my sales alight but it’s better than nothing. On a more positive note, I’m not actually being charged for these installs as I have a promotional balance apparently. I seem to remember I claimed a free $100 of advertising years and years ago so evidently that is still in use 🤷🏻♂
App Store In-App Events
I created an In-App Event on the App Store to coincide with the release of the update which ran for 1 week:
This had 4700 impressions leading to 9 downloads and 24 app opens. Again, not terribly exciting but extra sales are extra sales.
Other Promotions
I obviously promoted the app on my own Mastodon and Twitter accounts but I also tweeted about it on the @NewSpatialAudio account which I believe led to the article on Tom’s Guide. There’s also my newsletter and my website which mentioned the app. Finally, it was mentioned in both the Indie Dev Monday and SwiftlyRush newsletters.
So what actually worked?
App Store Connect provides a metrics panel which roughly details where your downloads have come from. Rather astonishingly, it turns out that 43.4% of all my downloads in the past month came from “App Store Browse”. This is followed by “Web Referer” at 28.3%, “App Store Search” at 13.4%, and “App Referer” at 12.8%.
If I dig into that a little more I can see that most of the app referer traffic was either Facebook, Google, or Google Chrome (so likely clicking on links from one of the published articles). With web referer, the vast majority is 9to5mac.com followed by my own Dodo Apps website. Everything else is single digits.
My assumption is that the 9to5mac article created enough downloads to catapult the app up the Paid App charts and it was there that it was discovered by those just browsing the App Store who then made up the majority of my sales. This seems incredibly backwards to me as I’d assume the technical readership for whom this app is more likely aimed at would be the majority of downloaders but I suspect that with the billions of iOS devices in the world even a fractional percentage of users browsing the App Store is going to be magnitudes larger than the number of followers that the tech sites have.
In terms of next steps, I’m at a slight loss as to what to do as I don’t have any big splashy features that would merit the coverage that is clearly key to increasing the number of downloads. Having looked at what other developers are doing, it looks like I should try finding an influencer on TikTok but I know absolutely nothing about that world. I could also look at direct advertising on some of the tech sites or podcasts that would be relevant but doing so is likely going to be thousands of pounds worth of investment and feels like a bit of a gamble given this is a low-cost paid app rather than a subscription based service that can recoup large advertising costs over months of later usage.
If you’ve got any thoughts or insights then I’d love to hear from you. I’d also love it if you downloaded the app 😉
-
You can download my historic monthly breakdown if you’re interested. With the change from a 70/30 split to an 85/15 split for the last 2 years, the actual amount I’ve given to Apple over the past 7 years has been around 26% leaving an average monthly profit of $59.83. ↩︎
-
I don’t use any analytics in my apps so I couldn’t see any realtime usage information. ↩︎
-
It definitely came as a result of submitting that form as the email was sent to my personal address which I’d used on the form, not my Apple Developer account email address. ↩︎
-
I nearly didn’t as they inexplicably used Microsoft Teams 🤣 ↩︎
You can get exclusive updates on my projects and early access to my apps by joining my free newsletter, The Dodo Developer.
Side Project: Back Seat Shuffle 17 Jan 2023 7:45 AM (3 years ago)
This is part of a series of blog posts in which I showcase some of the side projects I work on for my own use. As with all of my side projects, I’m not focused on perfect code or UI; it just needs to run!
If I’m going on a long drive with my two young children, I’ll load up an iPad with some videos and stick it in a pouch on the back of a seat to keep them entertained. Initially this started as a few films and a couple of their TV series on a USB-C stick but I’ve gradually started putting a few shows directly onto the iPad so they can be played via VLC. Why? Well, when using an external drive you’re limited to using the Files app which uses Quick View for video playback; this is fine for a film but for TV you have to go and start a new episode after the previous one finishes (and that involves my wife precariously leaning into the back without a seatbelt which isn’t ideal). I moved to using VLC for TV shows as they then play sequentially avoiding that problem but it can’t play from an external drive so I have to put things directly onto the limited storage of the device.
For a couple of weeks I’ve been toying with the idea of whether I could build a better app, one that would let me:
- Plug in an external drive
- Show each series with a nice image
- Play episodes randomly without needing to copy the video to the device
After a 3 hour drive to visit my mother, the priority for this has now increased exponentially 😂
To begin with, I needed to know if it is even possible to view external files within an app on iOS. It is, and has been since the introduction of UIDocumentPickerViewController in iOS 13 however the documentation left me a little confused:
Both the open and export operations grant access to documents outside your app’s sandbox. This access gives users an unprecedented amount of flexibility when working with their documents. However, it also adds a layer of complexity to your file handling. External documents have the following additional requirements:
- The open and move operations provide security-scoped URLs for all external documents. Call the startAccessingSecurityScopedResource() method to access or bookmark these documents, and the stopAccessingSecurityScopedResource() method to release them. If you’re using a UIDocumentsubclass to manage your document, it automatically manages the security-scoped URL for you.
- Always use file coordinators (see NSFileCoordinator) to read and write to external documents.
- Always use a file presenter (see NSFilePresenter) when displaying the contents of an external document.
- Don’t save URLs that the open and move operations provide. You can, however, save a bookmark to these URLs after calling startAccessingSecurityScopedResource() to ensure you have access. Call the bookmarkData(options:includingResourceValuesForKeys:relativeTo:) method and pass in the withSecurityScope option, creating a bookmark that contains a security-scoped URL.
External files can only be accessed via a security-scoped URL and all of the tutorials I’d seen online relating to this were demonstrating how you could access a file and then copy it locally before removing that scope. I was therefore unsure how it would work in terms of streaming video (as it would go out of scope and lose security clearance) nor if I’d be able to retain access after displaying a directory and then wanting to start playback.
It turns out that it is all possible using a system known as “bookmarks”. In practice, a user will be shown their external drive in an OS controlled modal view and can select a folder, the URL of which is returned to my app. I then call the “start accessing security scoped resource” and convert that URL to a bookmark which is stored locally on my device and then close the security scoped resource. That bookmark can be used at any point to gain access to the drive (so long as it hasn’t been disconnected in which case the bookmark tells the app it is “stale” and therefore no longer working) and you can then interact with the URL the bookmark provides in the same way as you would with a local file.
func documentPicker(_ controller: UIDocumentPickerViewController, didPickDocumentsAt urls: [URL]) {
    guard let url = urls.first else { return }

    // make sure we stop accessing the resource once we exit scope (which will be as soon as the video starts playing)
    defer { url.stopAccessingSecurityScopedResource() }

    // we don't care about the return value for this as we'll try to create a bookmark anyway
    _ = url.startAccessingSecurityScopedResource()

    // store the bookmark data locally or silently fail
    bookmark = try? url.bookmarkData()

    // try to play the video; if there is an error, display an alert
    do {
        try playVideos()
    } catch {
        let controller = UIAlertController(title: "Error", message: error.localizedDescription, preferredStyle: .alert)
        controller.addAction(UIAlertAction(title: "OK", style: .default))
        present(controller, animated: true)
    }
}

private func playVideos() throws {
    guard let bookmark else { return }

    // get the local url from our bookmark; if the bookmark is stale (i.e. access has expired), then return
    var stale = false
    let directoryUrl = try URL(resolvingBookmarkData: bookmark, bookmarkDataIsStale: &stale)
    let path = directoryUrl.path
    guard !stale else {
        throw BSSError.staleBookmark
    }

    // get the contents of the folder; only return mp4 and mkv files; if no files, throw an error
    let contents = try FileManager.default.contentsOfDirectory(atPath: path)
    let urls = contents.filter({ $0.hasSuffix("mp4") || $0.hasSuffix("mkv") }).map({ URL(filePath: path + "/" + $0) })
    guard urls.count > 0 else {
        throw BSSError.noFiles
    }

    // present the video player with the videos in a random order
    presentPlayer(urls.shuffled())
}

private func presentPlayer(_ urls: [URL]) {
    // set the audio session so video audio is heard even if device is muted
    try? AVAudioSession.sharedInstance().setCategory(.playback)

    // create a queue of player items from the provided urls
    let items = urls.map { AVPlayerItem(url: $0) }
    player = AVQueuePlayer(items: items)

    // present the player
    let playerController = AVPlayerViewController()
    playerController.player = player
    present(playerController, animated: true) {
        self.player?.play()
    }
}
This would also work in other contexts such as local files or even cloud-based services that work with the Files app such as iCloud or Dropbox.
I had originally planned on reading the contents of the USB stick and using a single .jpg file in each directory to render a nice thumbnail. In the end I abandoned that as it would have meant building the whole interface when in fact it works perfectly well just using UIDocumentPickerViewController to pick the show I’m interested in:
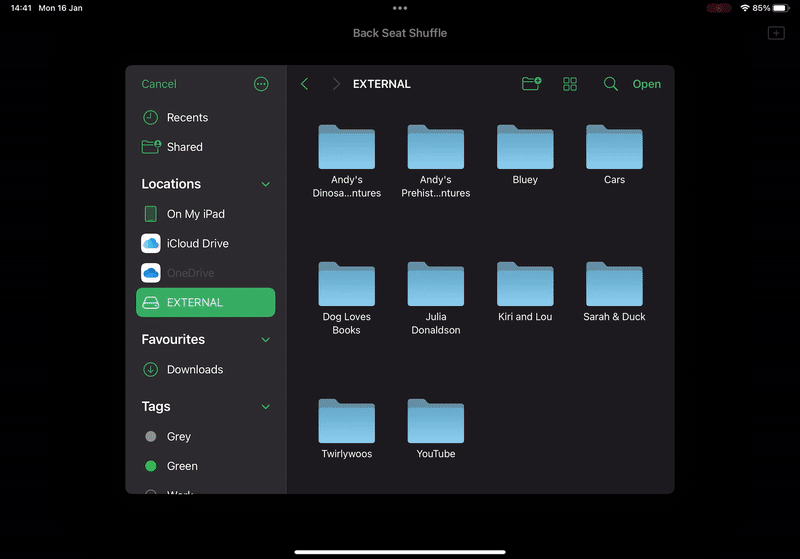
In the end the only extra code I added was to strip out any files that were not in the .mp4 or .mkv format and to have it automatically return to the file selection screen once the full queue of randomised videos had finished.
Whilst I could potentially put it on the App Store, this is one of those weird edge cases that likely wouldn’t get through App Review as they’ll look at it and say “this is just the Files app” and completely miss the point. As this would be a free app, it’s not worth the hassle of doing screenshots, App Store description, etc, only to have it be rejected by App Review.
The full app code is available on GitHub.
You can get exclusive updates on my projects and early access to my apps by joining my free newsletter, The Dodo Developer.
Return to Dark Tower Assistant 15 Dec 2022 6:00 AM (3 years ago)
Return to Dark Tower is a really cool app-driven board game that comes with a physical tower that you connect via Bluetooth to an iPad. The tower lights up, makes sounds, and spins internally to shoot little skulls you place into it over the outlying map.
As much as I love it, there are a ton of cards in the game so you can easily forget what abilities you have available to you or miss crucial triggers at key phases in the game. You can also take most actions in any order so it’s easy to forget what you’ve done in the current turn, especially if you’re playing solo. To that end, I built myself a very niche app to keep track of all of the cards I had and all of the moves I’d made. It’s called Return to Dark Tower Assistant and is optimised for use in an iPad Slide Over panel so you can use it on top of the app you use to run the game:

There’s a very slim chance that any of you reading this have a copy of this board game and even if you do it’s likely a small minority that would find utility in this app. That said, I think it demonstrates what I’ve said for over a decade about making apps for yourself; build things for yourself on the off-chance that somebody else finds it as useful as you do. I spent far too much time matching the colours to the player boards, getting the fonts just right, and doing things like perfectly embedding the right icons for warrior and spirit tokens but I did that because I want it to look good when I’m playing. It will likely only get single-digit downloads, but it’s an app I’m proud of.
The assistant is available now on the App Store. You can also read more about it on my Dodo Apps website.
You can get exclusive updates on my projects and early access to my apps by joining my free newsletter, The Dodo Developer.

Using a Stream Deck for iOS development 8 Dec 2022 12:00 AM (3 years ago)
The Elgato Stream Deck is a fun device with 15 LED buttons that can be programmed to do whatever you want through an app that runs on PC and Mac. It was designed for streamers to be able to quickly switch scenes or present overlays but it has quickly become popular in other areas thanks to its flexible design. I picked one up in 2018 when I was dabbling with streaming but then mostly used it as control box for my Cessna 152 in Flight Simulator 2020 thanks to FlightDeck. I eventually replaced this with a bigger flight sim setup1 so the Stream Deck was sitting idle until I had the idea to integrate it into my app development workflow.
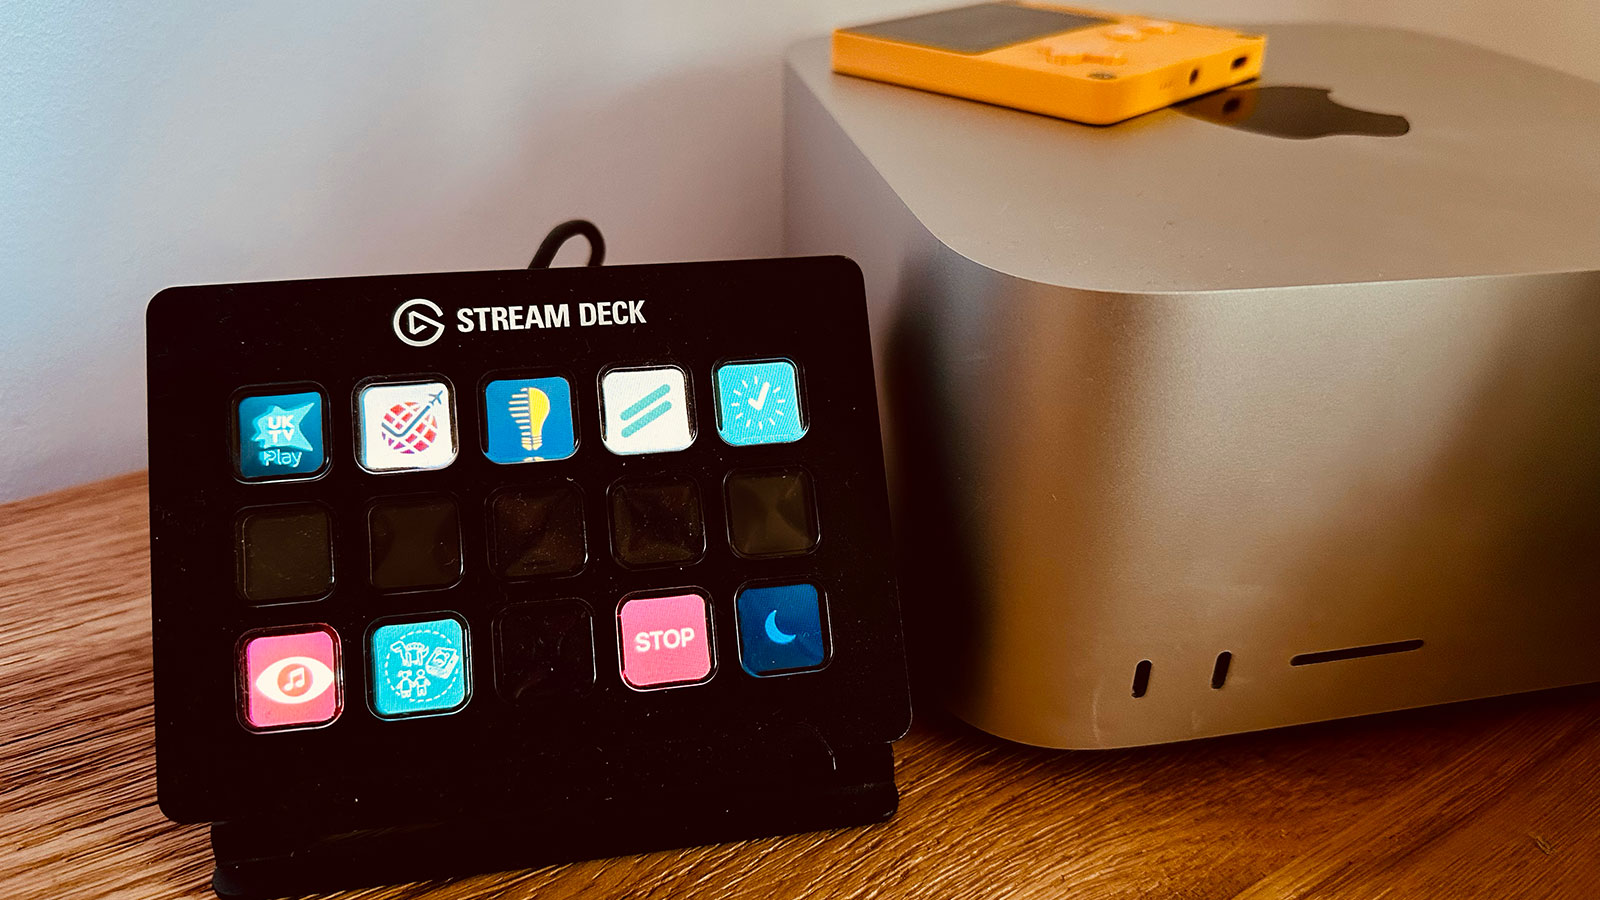
I typically work on multiple projects per day as I have a number of active client projects at any one time along with my own independent apps. This means I often waste time getting set up for each project so my initial idea was to have a single button press to get my workspace configured.
For example, I may want to start a specific Toggl timer, open a Jira board, and open the Xcode project. To do this, I created a single AppleScript file that is opened by the Stream Deck that will look something like this:
tell application "Timery"
	activate
	tell application "System Events" to keystroke "1" using command down
end tell

do shell script "open https://example.com/jira-board/"

tell application "System Events" to tell process "Safari"
	set frontmost to true
	if menu item "Move to DELL P2415Q" of menu 1 of menu bar item "Window" of menu bar 1 exists then
		click menu item "Move to DELL P2415Q" of menu 1 of menu bar item "Window" of menu bar 1
	end if
	set value of attribute "AXFullScreen" of window 1 to true
end tell

do shell script "open ~/Files/Clients/UKTV/iOS/App\\ Files/UKTV.xcodeproj"
In the first block I activate the Timery app and tell it to perform the keyboard shortcut ⌘+n where n is the project as it appears in Timery’s list. This will start a timer going for the project so I can track my time. I typically only use this for clients that I’m working with on a large project or have a regular maintenance contract with; for smaller ad hoc work I’ll instead throw an alert to remind me to start a timer manually.
The second block will open a URL in Safari to any website I might find relevant. This is typically a Jira or Trello board but can sometimes be to some API documentation, a GitHub issue pages, or even a local URL to open up a list in Things.
The third block is very specific to my hardware setup. I have an ultrawide monitor that I use as my primary display and then a 4K Dell monitor in portrait orientation to the side that I typically use for browsing and iOS simulators. This code tells Safari to move to that portrait monitor and then switch to full screen mode.
The final line opens up the Xcode project. I usually work in fullscreen mode on my primary monitor so it’ll typically move to a new space automatically without me needing to program that in.
With this simple script, I can press a single button to get everything configured. It’s probably only saving me 20 seconds of time but psychologically it lets me jump immediately into a project.
Another minor hassle I encounter on a daily basis is opening up the directory where all of a project’s files are stored. I’ll typically do this if I need to look at some artwork I’ve saved or some documentation so I have a very simple script to open up the current project directory:
do shell script "open ~/Files/Clients/UKTV/"This is again a psychological improvement as I hate wasting time digging down through Finder to get to the location I need.
So far I’ve only made minor improvements to my productivity but this last button saves me a huge amount of time; automated building. Whilst many developers will handle this task with some form of Continuous Integration or using the new Xcode Cloud feature, this typically doesn’t work well for me due to the number of projects I’m involved with at any one time. Instead, I use Fastlane to perform a wide array of tasks at once such as increasing build numbers, pushing to GitHub, building, and uploading to TestFlight.
Here is a typical Fastfile2 for one of my client projects:
# Config
xcode_version = "14.1.0"
targets = ["UKTV", "NotificationServiceExtension"]
git_remote = "origin/main"

# Import shared Fastfile
import "~/Files/Scripts/SharedFastfile.rb"

lane :distribute do

  ensure_git_status_clean()

  xcode_select("/Applications/Xcode-" + xcode_version + ".app")

  shared_increase_version(
    targets: targets.join(","),
    push_to: git_remote
  )

  version = File.read("shared-tmp.txt")
  UI.important(version)

  build_app(
    output_directory: "builds",
    output_name: version
  )

  upload_to_testflight(
    ipa: "builds/" + version + ".ipa",
    skip_submission: true,
    skip_waiting_for_build_processing: true,
  )

  upload_symbols_to_crashlytics(dsym_path: "builds/" + version + ".app.dSYM.zip", binary_path: 'scripts/upload-symbols')

end
To start with I specify the Xcode version I want to use, the targets of the project, and the name of the remote git repository. I then import a Ruby file which I’ll come to shortly.
The only lane is distribute and the first check is to ensure the Git repository is clean. If there are any uncommitted changes, the script will exit out and present an error. I then select the correct version of Xcode3.
The next section includes a shared_increase_version() function which comes from the imported Ruby file:
##
# INCREASE_VERSION
#
# Prompts the user for a version number. If new provided, update all targets and reset
# builder number to 1. Otherwise, just bump the build number.

private_lane :shared_increase_version do |options|

  # Fetch all targets as comma-separated string and convert to array
  if !options[:targets]
    UI.user_error!("You must provide at least one target in 'targets'")
  end
  targets = options[:targets].split(",")

  # Fetch current version using default Fastlane action with the first target
  version = get_version_number(target: targets.at(0))

  # Prompt for new marketing version
  new_version = UI.input("New marketing version? <press enter to keep it at v#{version}>")

  if new_version.strip == ""
    # No change to version so just increase build number
    increment_build_number()
  else
    # Loop through each target and increment version number with "versioning" plugin
    # The native 'increment_version_number' action does not work with recent versions of Xcode
    targets.each do |target|
      increment_version_number_in_plist(version_number: new_version, target: target)
    end
    version = new_version

    # Set build number to 1 using default Fastlane action (shows a warning about ${SRCROOT} but it does work)
    if options[:alwaysIncrementBuildNumber]
      increment_build_number()
    else
      increment_build_number(build_number: 1)
    end

  end

  # Fetch build number
  build_number = get_build_number()

  # Write the new version number to the shared-tmp.txt file so calling lane can pick it up
  # This is a limitation of Fastlane not being able to return values in a shared lane
  version_string = "v" + version + "-b" + build_number
  File.write("shared-tmp.txt", version_string)

  # Message to the user to show the new version and build number
  UI.success("App Version Updated: v" + version + " (build " + build_number + ")")

  # If there is no git remote to push to, then exit the lane
  if !options[:push_to] || options[:push_to].strip == ""
    UI.success("Skipping git")
    next
  end

  # Commit the version change
  commit_version_bump(message: "v" + version + " (build " + build_number + ")", force: true)

  # Add a git tag in the format "builds/v1.1-b3"
  add_git_tag(includes_lane: false, prefix: "v" + version + "-b", build_number: build_number)

  # Push to specified remote
  git_remote = options[:push_to].split("/", 2)
  remote = git_remote[0]
  branch = git_remote[1]
  push_to_git_remote(remote: remote, remote_branch: branch)
end
I won’t go through this line by line but the basic idea is that it will prompt me to ask whether this is a new version of the app or a new build; if the former, the version is updated to the one specified and the build number set to 1 across all targets; if the latter, then I just bump the build number. Once that is done, a version string is created that looks something like v1.2.3-b2 which I will use later in the workflow; this string is saved to a temporary file so the original Fastfile can reference it.
With the version and build number updated, the script then commits the changes to Git, tags them, and pushes them to the remote branch if one was specified.
The code resumes in the Fastfile with an Xcode build command (which stores the build and it’s dSYMs in a local directory), an upload to TestFlight, and the uploading of the dSYMs to the Crashlytics service.
With this system in place, I can press one button to have the entire build process execute in the background. This is hugely important to me as I can start work on another project whilst this process plays out; on the Mac Studio I don’t even notice anything is happening as the build process doesn’t come close to maxing out the CPU.
The nice thing about this Fastlane system is that I can make it bespoke for projects that need something a little different. Here, for example, is the file for a Catalyst project I work on:
# Config
xcode_version = "14.1.0"
targets = ["ATPDigital7"]
git_remote = "origin/master"

# Import shared Fastfile
import "~/Files/Scripts/SharedFastfile.rb"

##
# LANES
##

lane :distribute do

  xcode_select("/Applications/Xcode-" + xcode_version + ".app")

  ensure_git_status_clean()

  shared_increase_version(
    targets: targets.join(","),
    push_to: git_remote,
    alwaysIncrementBuildNumber: true
  )

  system("git push helastel HEAD:develop")

  version = File.read("shared-tmp.txt")
  UI.important(version)

  ios_export = "ios-" + version
  mac_export = "mac-" + version

  # Build the macOS app
  build_app(
    catalyst_platform: "macos",
    output_directory: "builds",
    output_name: mac_export
  )

  # Rename the macOS app export to mac-v1.0-b1.app
  FileUtils.mv("../builds/ATPdigital 8.app", "../builds/" + mac_export + ".app")

  # Zip the macOS app and then upload it to S3
  zip(
    path: "builds/" + mac_export + ".app",
    output_path: "builds/" + mac_export + ".zip"
  )
  s3_upload(
    access_key_id: "IMNOTTHATSILLY",
    secret_access_key: "Uhuhuhyoudidntsaythemagicword",
    bucket: "bucketname",
    content_path: "builds/" + mac_export + ".zip",
    name: "clients/bgs/builds/" + mac_export + ".zip"
  )

  # Build the iOS app
  build_app(
    catalyst_platform: "ios",
    output_directory: "builds",
    output_name: ios_export
  )

  upload_symbols_to_crashlytics(dsym_path: "builds/" + mac_export + ".app.dSYM.zip", binary_path: 'scripts/upload-symbols')
  upload_symbols_to_crashlytics(dsym_path: "builds/" + ios_export + ".app.dSYM.zip", binary_path: 'scripts/upload-symbols')

  # Upload macOS app to TestFlight
  upload_to_testflight(
    pkg: "builds/" + mac_export + ".pkg",
    skip_submission: true,
    skip_waiting_for_build_processing: true,
    app_platform: "osx"
  )

  # Upload iOS app to TestFlight
  upload_to_testflight(
    ipa: "builds/" + ios_export + ".ipa",
    skip_submission: true,
    skip_waiting_for_build_processing: true,
  )

end
This one is a lot more involved but the basic steps are very similar:
- Set up the configuration that is needed
- Select Xcode, check the repo is clean, and bump the version number
- Do another Git push to a different repo
- Build the macOS version of the app, zip it, and upload it to an Amazon S3 instance
- Build the iOS version of the app
- Upload the dSYMs to Crashlytics for both versions
- Upload each version to TestFlight
The process typically takes about 20 minutes to run but would take longer if I were doing it manually as there are multiple points that would require user interaction. That I can press one button and have this run seamlessly in the background is of huge benefit to me, especially if I’m doing multiple builds in a single day.
I also have a client that has 6 apps that all come from the same codebase. Again, I can press one button and have all 6 of those apps compiled and uploaded; it also automatically submits each app to the App Store once the builds have finished processing!
I’m planning on extending this further in the future as I create a HTML page for some clients which gives a changelog for each build based on the commit messages. At the moment I do this manually but I could easily automate that with AppleScript and hook it into this process.
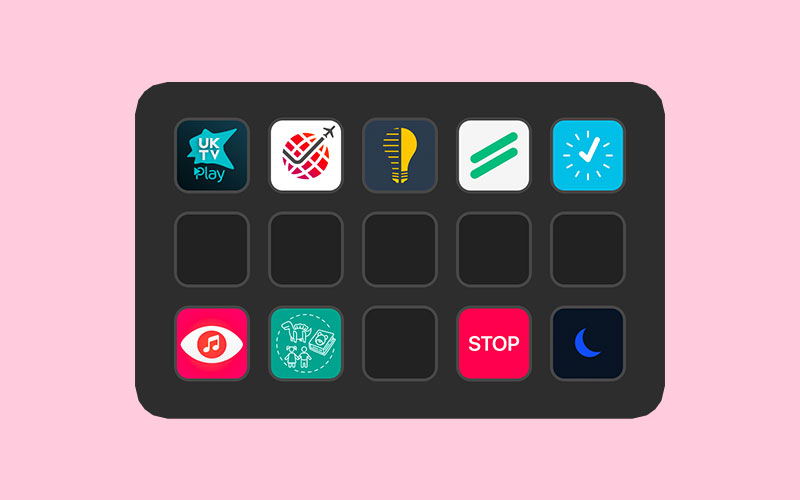
The final thing to mention is the Stream Deck homescreen itself. I have a folder for each project denoted by their app icon which then goes into the start / build commands detailed above. There is also a STOP button will stop any Toggl timer that is currently running and a sleep button that will turn off the Stream Deck display.
I have been incredibly impressed with the Stream Deck as an input device and think it can be an incredibly valuable tool for any app developer that works on multiple projects. All of the above can be achieved by just running an AppleScript file (as that is what the Stream Deck is doing) but I find the tactile nature of the device to be incredibly rewarding and I know there is a ton more I’m going to do with it over time.
-
The Bravo Throttle Quadrant has physical buttons on it for dealing with auto pilot settings and flaps which were my main use cases with FlightDeck. ↩︎
-
All of the magic works in the Fastfile but the Stream Deck still needs to be able to start the command so I use an AppleScript to open Terminal and kick off
fastlane distributein the correct directory. ↩︎ -
I have 3-4 versions of Xcode installed at any one time as different clients will be on different release schedules so I may still need to build something with an older version. I’ll likely change this portion of the script to always use the latest version unless I manually specify one as it’s a pain to edit my script files whenever a new Xcode update comes out. ↩︎
You can get exclusive updates on my projects and early access to my apps by joining my free newsletter, The Dodo Developer.
The Dodo Developer 21 Nov 2022 1:40 PM (3 years ago)
For the past few months I’ve been meaning to start a newsletter; partially as a way of motivating me to finish some of my many projects, partially as a way of building up a mailing list so I can market my own apps better. The priority for this has only increased as the long-term future for Twitter (my main source of referrals to my various apps and websites) has moved to shakier ground1.
Today I finally took that step by creating The Dodo Developer2 on Substack.
I’ve created an initial introductory post going through some of the motivations for this move and listing some of the items on my “To do” list but the aim is to produce a new issue every 2 weeks.
I like to use my main website for either announcing new releases or providing code-level tutorials; the newsletter will be slightly different in that it will be showcasing things way before they are necessarily ready for prime time. This has two main benefits in that working akin to a 2-week sprint cycle will hopefully motivate me to proceed with the numerous app ideas that are half-finished on my hard drive; on the flip side, it will also hopefully generate some much needed feedback during the development process as I’m planning to invite subscribers to early access betas of new apps and major updates to existing apps. This all begins next week when I’ll be going into detail with the Music Library Tracker upgrade that introduces Spatial Audio matching as well as showing off a new dice-based game mechanic I’ve created for a “Choose your own Adventure” style game.
As we head into 2023 I’m determined to try and spend more of my time on my independent projects. By subscribing to the newsletter, you’ll be directly boosting my motivation towards that aim and hopefully getting an insight into how a developer forms an idea into a digital reality.
I’ll be landing in your inbox for the first issue next week!
-
I don’t necessarily share the pessimism of others with regards to Twitter’s future but there is a non-zero chance that it shuts down without warning one night in the near future so best to be prepared. I won’t be moving to any other social media network. ↩︎
-
I can’t remember if I’ve mentioned my affinity for dodos on this blog before but the reason for the name comes from two things: my surname contains the same letters as “dodo” and when I was at school I loved the dodo character in Disney’s Alice in Wonderland (“you there, stop kicking that mackeral”). When I developed my first piece of software, a database system for the management of choral robes (honestly), I used “Dodo Apps” as the name and it’s kind of stuck! ↩︎
You can get exclusive updates on my projects and early access to my apps by joining my free newsletter, The Dodo Developer.
'Chaise Longue to 5K' and porting a tvOS app built with UIKit to iOS, iPadOS, and macOS 12 Jul 2022 1:55 AM (3 years ago)
A little while ago, my chiropractor recommended that I take up the “Couch to 5K” program in order to improve my fitness in a way that wouldn’t see me literally running before I could walk. It was a huge success and I was able to lose a significant amount of weight and improve my overall health. Unfortunately, the 2020 lockdowns and the birth of a new child meant most of that effort was undone and I found myself once again needing to embark on a gradual increase in exercise.
One of the key features of Couch to 5K is that you do intermittent bursts of running and walking; for example, in the first week you’ll do three runs consisting of alternating 60 seconds of running (x8) and 90 seconds of walking (x7) sandwiched between a 5 minute warm up and cool down. To keep track of this, I used the free NHS Couch to 5K app which tells you what to do at each stage via an audio voiceover which also offers encouragement throughout your run. This worked well for me as I listened to music whilst doing my runs, but nowadays I prefer to run whilst watching TV shows or YouTube videos on an Apple TV in front of my treadmill. For this use case, audio interruption wasn’t necessarily what I wanted, especially as I was already vaguely familiar with the different run timings. Instead, I wanted an app on my Apple TV that could show me my run progress in a Picture in Picture window.
Introducing “Chaise Longue to 5K” (after all, couches are so common):

The idea is straightforward enough; you open the app to a grid showing all of the available runs1 and then navigate to a fullscreen running page with a timer and coloured blocks that show what you should be doing. This can then be shrunk down into a Picture in Picture window so you can see the critical information whilst you watch something else.
Originally I’d planned to use the new AVPictureInPictureController.init(contentSource:) API that was introduced with tvOS 15.0 as that would allow me to fairly easily render the UIView of the run screen into the PiP window; unfortunately, there is a bug with tvOS which prevents that from working and is still present in the tvOS 16 betas.
My next plan was to have the app render a video of the run on the fly. Essentially I would display the running UI, snapshot it with UIView.drawHierarchy(in rect: CGRect, afterScreenUpdates afterUpdates: Bool), and then pipe the UIImage into an AVAssetWriter at 1 second intervals to generate a video. Unfortunately that proved too intensive for the Apple TV hardware (especially the non-4K model) with the render taking a couple of minutes for each video. However, as I’d already built the render pipeline, I instead updated the system to generate all of the videos sequentially and store them; I then ran that in the tvOS Simulator to generate the 12 videos2 and then bundled them in the app. Much easier 🤣
The final part was to add a button to the top of the run selector page that would show you your next run. To do this, I store the week and number of the last run that was completed3 within NSUbiquitousKeyValueStore; this is a similar API to UserDefaults with the advantage that it is synced through the user’s iCloud account meaning it’ll survive reinstallations or switching to a new Apple TV without restoring from backup.
However, that led to an interesting idea. Could I port this to other platforms? And if I could, would I be able to do it in a single day?
Yes.
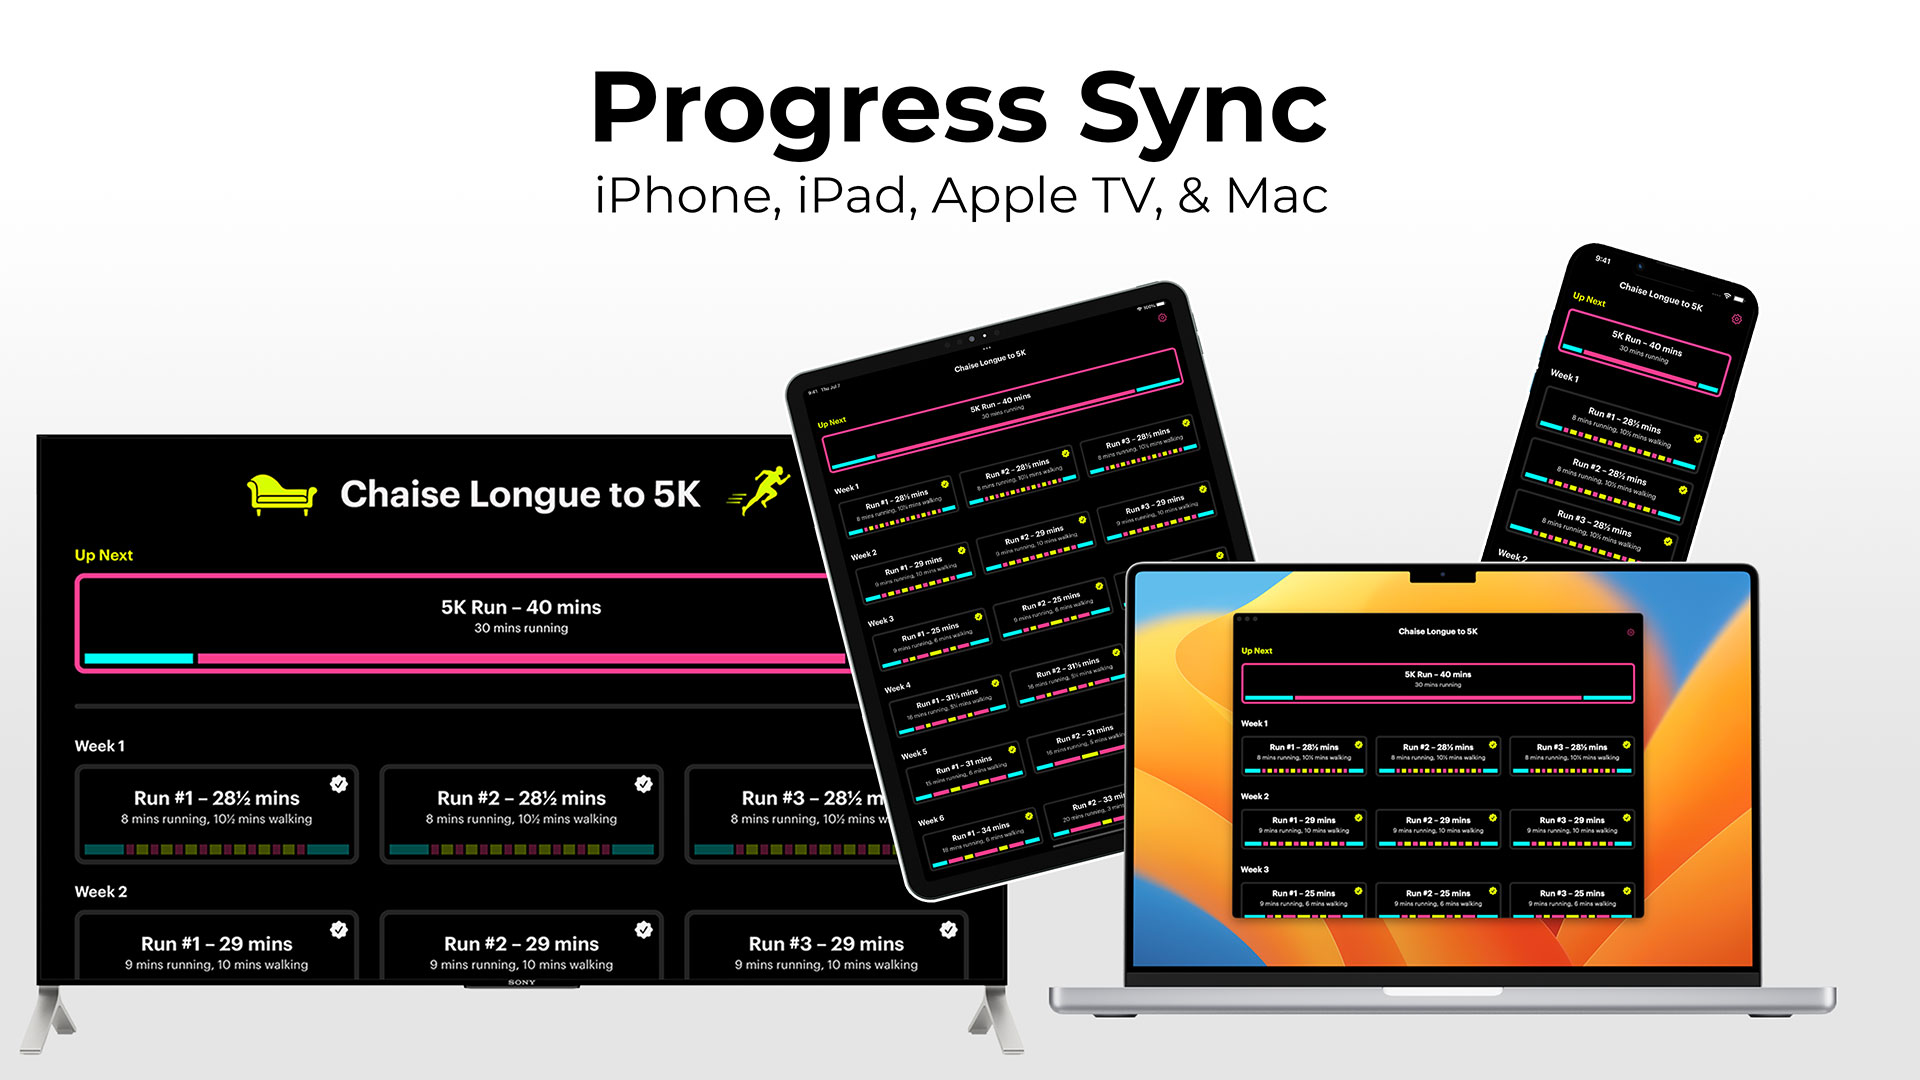
Despite using UIKit rather than SwiftUI, I was able to port everything over to iPhone, iPad, and Mac within 5 hours or so. I started by rejigging the project files so shared code would be separate from the xib files I use for the interface. I then added a new target for iOS and went through the laborious process of recreating the xib files; unfortunately tvOS and iOS xibs are incompatible even so far as you can’t copy and paste standard elements like UILabel between them.
The design was such that it was quite easy to make it work for iPhone. The run page itself just needed some font size adjustments whilst the grid view showing all of the runs had some stack views tweaked so they were shown vertically rather than horizontally.
The next step was to optimise the design for iPad. Again, this mostly worked out of the box as I use AutoLayout for everything. I just needed to monitor trait changes and update the code to render slightly differently depending on whether we were in compact or regular width mode. This had the nice side effect of enabling the three column layout on an iPhone 13 Pro Max in landscape and also working across the various split screen views that are available on iPad.
Finally, I checked the box for Catalyst support for macOS and was surprised to find that everything pretty much worked out of the box. I only needed to add the following code to get the app looking just fine on the Mac:
#if targetEnvironment(macCatalyst)
    if let titlebar = window?.windowScene?.titlebar {
        titlebar.titleVisibility = .hidden
        titlebar.toolbar = nil
    }
    window?.windowScene?.sizeRestrictions?.minimumSize = CGSize(width: 1024, height: 768)
#endif
That code effectively hides the toolbar so the traffic light window management buttons blend into the app view and then restricting the minimum view size to that of a regular iPad so you can’t break the layout4.
With that done, I then went through the app and added a few quality of life improvements such as a native menu bar on the Mac, keyboard shortcuts for Mac and iPad, and adding the ability for PiP to automatically engage when you leave the app during a run on iPhone and iPad.
SwiftUI would undoubtedly have made the UI faster to port, but I still think the platform is too immature for full app development. As Richard Turton put it:
SwiftUI allows you to move so incredibly fast that by the time you realise what you want isn’t yet possible, you’re already off the edge of the cliff, like Wile E Coyote
That certainly matches my experience 🤣. Whilst it can be a phenomenally quick tool for building UI, it can’t quite match the smooth experience that users expect when it comes to the small but crucial details.
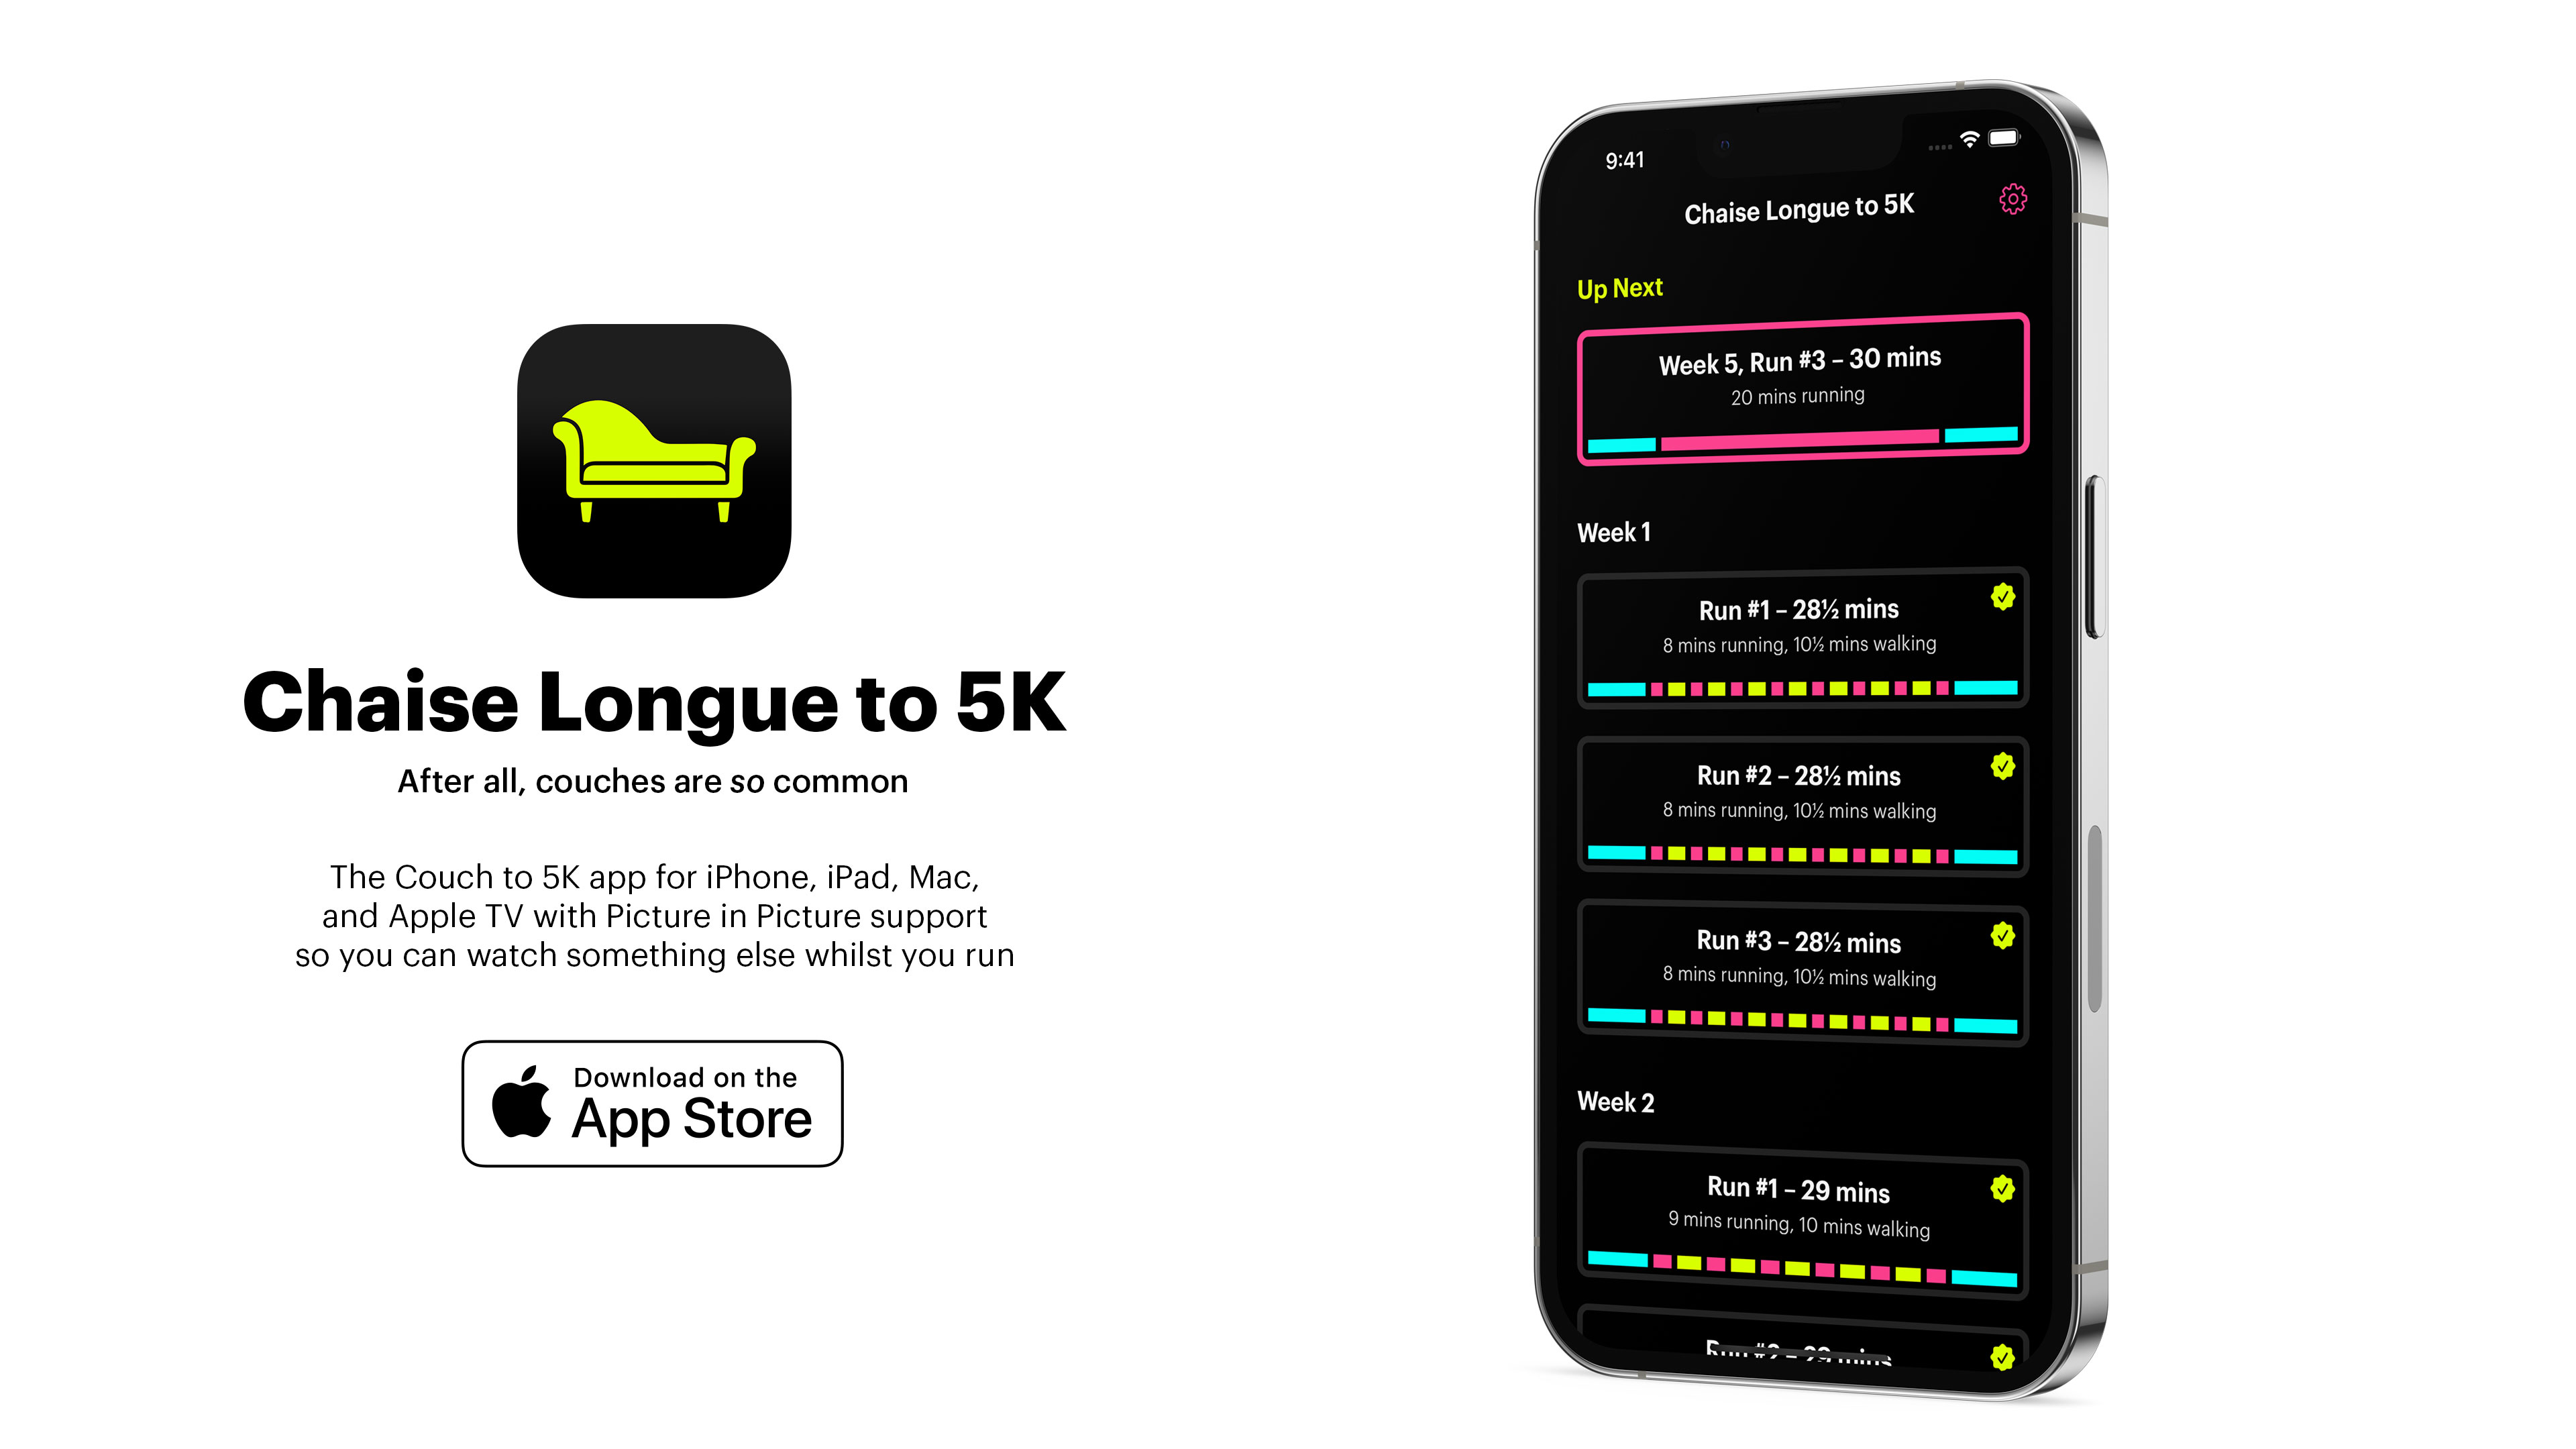
In Conclusion
As I’ve said many times before, one of the great joys of being a software developer is that you can build apps bespoke for your own needs and interests. I’ve massively enjoyed having Chaise Longue to 5K on my Apple TV whilst doing my runs, but I also really enjoyed the challenge of porting the app across to all the other Apple platforms that support Picture in Picture5. As ever, there are a number of small details that I’d like to highlight:
- Whilst adding extra platforms didn’t take that long from a development point of view, it massively increased the amount of time preparing for App Store submission as I had to create a lot more screenshots, text, etc. Trying to work out the best way to show PiP on macOS was an interesting challenge! It was also difficult to work out a way to show it on tvOS without using copyrighted video content.
- A nice side effect of using the same bundle identifier for all three versions of the app (Apple TV, iOS/iPadOS, Mac) is that if you buy it on one platform you get it on all of them! As I’m selling it for £1.79 currently, that makes it a pretty sweet deal…
- I spent quite a lot of time on a little animation effect that happens when you first complete a 5K run. Confetti in front of and behind a real time blur that animates seamlessly. Beautiful.
- I’m really pleased with how the Apple TV app icon came out as I’m always a big fan of the parallax effects you can create. I found a very cheap designer on Fiverr who created a first pass and then I tweaked it to match my needs; I can’t draw to save my life but I can recompose and recolor objects pretty well!
- I was amazed that all of the Picture in Picture stuff just worked across all the platforms; I didn’t have to change any code whatsoever and whilst the videos were rendered from the tvOS app UI they look good on all platforms.
- Thanks to using
NSUbiquitousKeyValueStorecoupled with.didChangeExternallyNotification, completing a run on one device will see the UI automatically update on all other devices within seconds. No 3rd party frameworks or private data collection required!
I’d love it if you would give Chaise Longue to 5K a try. It’s available now on tvOS 14 and above, iOS / iPadOS 14 and above, and macOS Big Sur (11.0) and above. One low price unlocks it across all platforms.
-
Here’s a rough drawing I did in Notes compared with the final product. ↩︎
-
Even though there are 27 runs, that only equates to 12 videos as most weeks the three runs are identical so they can use the same video. Generating those on my M1 Ultra Mac Studio took less than 3 minutes and means I can easily update them should I want to update the UI in future. Each video is rendered at 720p and weighs in at around 3mb leaving the overall app size at under 40mb. ↩︎
-
Which is defined as getting to the cool down section. ↩︎
-
Views in Catalyst always seem to be of the “Regular / Regular” size regardless of what tiny windows you create so it isn’t possible to have the view seamlessly change between iPad and iPhone style sizes when resizing hence the need for a sensible minimum size. ↩︎
-
I did not bother porting the app to Apple Watch as there are loads of Couch to 5K apps that will serve you better on that platform; this app is predominantly about the Picture in Picture experience. ↩︎
You can get exclusive updates on my projects and early access to my apps by joining my free newsletter, The Dodo Developer.
Introducing the Spatial Audio Finder 27 Jun 2022 8:00 AM (3 years ago)
I love Spatial Audio. The sound quality and the balance of the individual audio elements is truly extraordinary and a huge advantage for Apple Music over other streaming services. But the process of finding supported tracks is… well, a bit rubbish.
At the moment, there are 3 ways to discover Spatial Audio tracks:
-
Using Apple’s own curated category which features a number of playlists and a rotating list of songs that have been added to the service. This is only a very small subset of all of the tracks though and requires a lot of scrolling and trying to work out what is new and what isn’t.
-
Going to an album page on Apple Music and seeing if it shows the Dolby Atmos logo. This only works if the entire album is available in Spatial Audio; it can’t tell you if individual tracks are available (something which my Apple Music Artwork Finder can do!)
-
Playing songs in your library; if they have Spatial Audio, it’ll kick in and show a Dolby Atmos logo. This obviously only works on a song-by-song basis and is therefore very slow.
Now there is a better way. Introducing the Spatial Audio Finder, the quickest way to see which tracks by your favourite artists are available in Spatial Audio:
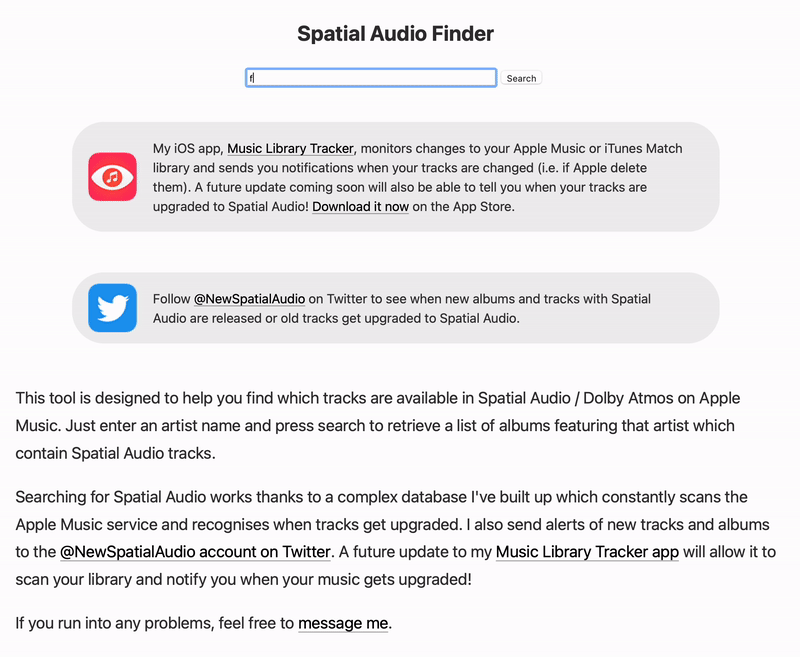
So how does this work? At WWDC 2022, Apple made a small change to the Apple Music API such that it is now possible to request audioVariants as an extended attribute on songs and albums. Within this are such things as Lossless Audio, Dolby Audio, and Dolby Atmos (which denotes Spatial Audio). Whilst I would like to be able to just see Dolby Atmos as a flag on songs within my library, this new API method at least can get me the information via a fairly laborious process. Essentially, I scrape these data points and build up my own database which I can then query very quickly.
To begin with, I built a system which would accept an Apple Music identifier for a song; it would then fetch the album that song belongs to in order to get a full list of all the tracks along with whether they support Spatial Audio or not1. I then store this information in my database along with a “last checked” flag. My script runs continuously and will check to see if there are any songs present that have not been checked in the past 2 weeks and do not have Spatial Audio. If a song or album gains Spatial Audio status, then I tweet it via a new account; @NewSpatialAudio2.
With this in place, it becomes trivial to build up the database as I just need to throw in a load of song identifiers and the script will churn away fetching all of the information and actually expanding it to more songs as it will gather the entire album. I began by importing my entire music library which is relatively simple thanks to my Music Library Tracker app which allowed me to collect all of my song identifiers in a matter of milliseconds. I have 7508 songs in my library but as many of them are single tracks from albums, my script expanded this out to over 16000 tracks (of which around 1000 had support for Spatial Audio).
This is obviously skewed to my musical preferences so the next step was to add the various Spatial Audio playlists that Apple curates. I’ve stored the identifiers of all of their playlists from “Made for Spatial Audio” and “Hits in Spatial Audio” to “Jazz in Spatial Audio” and “Bollywood in Spatial Audio”. These playlists helpfully have a “last updated” flag on them so I check them frequently but only fetch all of their track identifiers if they have changed. This added another 20000 tracks of which most were compatible with Spatial Audio3.
At this point I was able to see which songs in my library were updated to Spatial Audio and also see new releases and when my tracks got upgraded thanks to the @NewSpatialAudio account. As every change thus far had been tweeted, it was possible to search Twitter for specific artists to see what songs or albums were compatible doing something like from:newspatialaudio "avril lavigne"4. Unfortunately, it turned out this was only working when I was logged in as @NewSpatialAudio and results were mixed if searching from different accounts. I don’t know if this is due to spam protection or some form of caching but it meant there was a need for a new tool; Spatial Audio Finder.
Creating the Spatial Audio Finder was relatively easy as I had all the building blocks in place. You enter an artist name and hit search, then I look up all the tracks in my database and list the songs that have been updated. In the end it took a bit longer as I realised I’d want to have the album artwork and track numbers on the page, and I wasn’t currently collecting that information; this would need to be added to my data necessitating a full re-fetch of the nearly 40000 tracks. I also decided that it was likely people might search for an artist that was not in my database. To remedy that, if a search is made and there are zero results, I go and fetch the top 25 songs for that artist on Apple Music and add their identifiers to the database which will typically expand out to their most popular albums which are the likeliest candidates for upgraded audio5. In this way, the more that people use this tool, the more Spatial Audio tracks will be discovered.
I hope that the Spatial Audio Finder will be useful to many people, but this is just a stop gap solution. My ultimate goal is to be able to scan your music library and then show you the tracks that have been updated to Spatial Audio then go a step further and generate a Spatial Audio playlist for you that gets updated automatically as new songs get upgraded on the service. The first step of this will be happening very soon as I release a new version of my Music Library Tracker app that will allow you to opt-in to upload your library to the Spatial Audio database; the next step after that will be showing you what tracks in your library have been updated! This will in turn expand the musical variety being placed into the database and showcase more Spatial Audio tracks. Eventually, I should have the most complete record of Spatial Audio tracks outside of Apple and also the fastest and most useful ways of accessing that data.
If you run into any issues, please do contact me so I can improve the service as much as I can.
-
For example, if I fetch the song “This Love” by Maroon 5 (which has the identifier
1440851719), then that will give me the full album (identifier1440851650) along with all the tracks so I don’t need to check each track individually. ↩︎ -
The account will differentiate between individual tracks on an album and full albums that support Spatial Audio. I also distinguish between old tracks being upgraded to Spatial Audio versus new releases by checking if the release date was in the past 2 weeks or not. ↩︎
-
They aren’t all compatible as there might be a single song in a playlist which is the only Spatial Audio song on an album; I fetch the entire album so I can monitor if other tracks get added over time. ↩︎
-
Yes, “Sk8er Boi” is available in Spatial Audio. ↩︎
-
I can’t believe there isn’t a single Michael Jackson song rendered in Spatial Audio yet (although you can get I Want You Back and ABC by the Jackson 5). ↩︎
You can get exclusive updates on my projects and early access to my apps by joining my free newsletter, The Dodo Developer.
Unlisted App Distribution on the App Store 17 May 2022 1:30 PM (3 years ago)
Back in 2015 I was commissioned to rebuild an iOS app for models1, the leading modelling agency in Europe. The app performed double duty acting as a personal portfolio for models within the agency and a collection of all of the portfolios for the agents. As it was only for staff and models, the app was distributed via an Enterprise certificate which allowed me to generate a single .ipa and produce a website where users could download the app directly to their devices. Over the years, this process became slightly more arduous as the user would need to manually approve the enterprise certificate within their device settings but it worked.
A little while later I also built a small app that allowed talent scouts to choose multiple photos and fill out some details in a form which was then compiled into an email. This, again, was distributed via an Enterprise account.
Fast forward to 2022 and my client had allowed their developer account to lapse. Upon trying to renew, they were told by Apple that they no longer met the current program requirements and that they should seek to distribute via Apple Business Manager, Ad Hoc Distribution, TestFlight, or the App Store. The Apple Business Manager would not have worked well as that is essentially a full MDM system whereby the client would need to manage all devices (which would not be suitable for the models). Similarly, Ad Hoc Distribution would be a pain as we’d need UDIDs for every device we want to distribute to and TestFlight would require sending out new builds every 90 days; the App Store being public would not be an option given the niche aspect of the app.
Luckily I’d remembered that Apple had announced a new “unlisted” status back in January which would allow you to upload your app to the App Store but make it available only via a direct link, kind of like the public link system within TestFlight1. I browsed around App Store Connect but could find no mention of it within the “Pricing and Availability” tab which only allowed me to go down the business route. It turns out you have to apply for unlisted status via a form:
You’ll need to submit a request to receive a link to your unlisted app. If your app hasn’t been submitted for review or was already approved for public download on the App Store, simply complete the request form. If your app was already approved for private download on Apple Business Manager or Apple School Manager, you’ll need to create a new app record in App Store Connect, upload your binary, and set the distribution method to Public before completing the request form.
To start with, I uploaded a build and filled out all of the metadata on App Store Connect including screenshots, description, review notes, etc. I then attempted to fill out the form but was denied access, despite being an admin, as it is only available to the account holder. For reference, the questions they ask are:
- App Name
- Apple ID of App
- Describe in detail the business problem your app solves
- Why do you prefer to distribute this app unlisted on the App Store instead of privately to specific organizations on Apple Business Manager or Apple School Manager?
- What is the estimated size of your app’s user base?
- Who is the audience for your app?
- In what regions will your app be available?
My client filled this out and within 24 hours they had a reply:
After careful review, we regret that we’re unable to approve your request for unlisted app distribution at this time.
In order to evaluate your app, please complete all the required metadata in App Store Connect, including app name, description, keywords, and screenshots and submit for review.
This was a surprise as everything was set up on App Store Connect. After another email back and forth, Apple replied with:
I will reiterate the note below, and say that all unlisted apps must be submitted for App Store review.
So it turns out you do need to still submit the app via App Store Connect but also fill in a request form. Obviously we did not want the app to go live publicly so I set everything to “Manual release” and then added an extra line to the review notes that read:
IMPORTANT: We will request “unlisted” status for this app, it is not for general release but we were told by unlistedapp_request@apple.com that we needed to submit this to App Review before requesting this status.
I submitted the app and my client filled out the request form again. The next day, I received notification that both apps had been rejected by App Review for Guideline 2.1 - Information Needed:
We need more information about your business model and your users to help you find the best distribution option for your app
Please review the following questions and provide as much detailed information as you can for each question.
- Is your app restricted to users who are part of a single company? This may include users of the company’s partners, employees, and contractors.
- Is your app designed for use by a limited or specific group of companies?
- If yes, which companies use this app?
- If not, can any company become a client and utilize this app?
- What features in the app, if any, are intended for use by the general public?
- Identify the specific countries or regions where you plan to distribute your app.
- How do users obtain an account?
- Is there are any paid content in the app? For example, do users pay for opening an account or using certain features in the app?
- Who pays for the paid content and how do users access it?
You’ll note that a lot of this is similar to the form that was already filled out 🤔
I was out of the office for the day so had not gotten around to replying to these questions when out of the blue I got two notifications to say the apps had been approved for the App Store! It looks like App Review had rejected the app as they were not suitable for App Store release (hence the questions above) but had completely ignored my note about the unlisted status. Then, later that day, the team that deals with unlisted apps looked at them and approved them.
When I went back to App Store Connect, it now showed a new “Unlisted App URL” within the “App Distribution Methods” on the Pricing and Availability page2.
A few thoughts:
- This process is not great and I’m not sure why they’ve decided to split it across two separate systems. It would surely make more sense to have “Unlisted” be an option within App Store Connect and then App Review can have the correct team contact you to ask whatever questions they need, especially as the distribution is done through App Store Connect.
- The documentation clearly says you only need to fill out the form if the app hasn’t been submitted for review. I’m not sure why we needed to submit the app only for it to be rejected by a different team?
- The “Unlisted App URL” you get is actually the same as what the public URL would be. This strikes me as odd, especially as you can convert an already public app into an unlisted one (though you can’t go back to being public). Those URLs are going to be cached by search engines, etc, so seems like a bit of a flaw. This wasn’t an issue for us but worth mentioning.
- Viewing the app on the App Store is exactly the same as if you’d shared any public URL; the store page is identical with screenshots, description, ratings, App Privacy, etc. There is no indication whatsoever that this is a private page.
Overall I like that this system exists and that there is a way to get apps to a very specific small audience without paying 3x the cost for an enterprise account or going through the Apple Business Manager. I was also pleasantly surprised that the very basic app for talent scouts was approved as I did not think it would be; it looks like the App Store Guidelines are much less strictly enforced than they are for a public release3. However, there are clearly some teething problems that need to be ironed out.
In any case, if you’re looking to get an unlisted app on the App Store, just be aware that a rejection may not necessarily be all it seems!
-
Similar, but App Store apps don’t typically expire so a single build would be enough until iOS changes necessitate another build. ↩︎
-
As the app was still set to “Manual release” I had to press the release button. I was a bit nervous of this as the language is still “Are you sure you want to release this to the App Store” but it did not make it publicly available; once you have the unlisted URL there is no way to make the app public. ↩︎
-
Or we got lucky 😂 ↩︎
You can get exclusive updates on my projects and early access to my apps by joining my free newsletter, The Dodo Developer.
Web Inspector on iOS devices and Simulators 13 Apr 2022 12:00 AM (3 years ago)
Over the past few weeks I’ve worked on a number of projects that have necessitated me working with HTML and JavaScript be that via Safari on iOS, an SFSafariViewController, or in an embedded WKWebView. In all of these cases, I’ve needed to dive into the DOM to see what styles are being applied to certain elements or dig into a JavaScript Console to work out why some code isn’t working. On desktop, this is trivial as Safari has a Web Inspector panel built in similar to other browsers. It turns out it is also trivial on mobile as the exact same tool can be used with both iOS simulators and physical devices.
If you select the ‘Develop’ tab from the menu bar of Safari on macOS, you’ll see a list of all of your connected devices and actively running simulators1. Drilling into this will then show all of the active web instances you can interact with; notice how the content within Safari has highlighted blue within the Simulator as I’ve moused over the twitter.com web instance above. When you click, a web inspector panel is then produced which allows you to make all the usual interrogations and changes you can within desktop Safari such as interacting with the console or changing CSS values of elements to see how they would look in realtime.
Here’s an example using a WKWebView within one of my client projects, Yabla Spanish:
Discovering that simulators and devices could be interacted with in this way has been a huge timesaver for me. Whilst developing Browser Note, I was constantly needing to tweak CSS values and investigate the current state of the DOM as websites have various tricks to try and make ads or cookie notices appear on top of all content (and the note needed to be on top at all times - you should totally take a look at Browser Note whilst you’re here). In doing this, I was then able to put this knowledge to use on no less than 3 client projects in the past month; this validates my theory that by working on your own side projects you can improve your efficiency when it comes to work projects.
There are a few caveats to be aware of when using the Web Inspector with an iOS device or simulator:
- If you want to use this on an actual device you’ll first need to enable the Web Inspector on iOS. To do this, go to the Settings app and then Safari > Advanced and toggle the Web Inspector on.
- Whilst the Web Inspector can interrogate WKWebView, it can only do this for apps you are running via Xcode. You cannot look at the WKWebView of apps you did not create nor of your own apps from TestFlight / the App Store. However, you can inspect debug builds installed via Xcode even if the debugger is not active (i.e. you build to the device then quit Xcode).
- Conversely, you can use the Web Inspector with any SFSafariViewController even if it is not in your own app.
- Whilst it is still possible to submit apps that use UIWebView, the web inspector will not work with them; it needs to be WKWebView.
- This also works for AppKit, SwiftUI, and Catalyst apps on macOS.
-
I use an “iDod” naming prefix for all of my devices; a throwback pun to my first Apple product, the iPod. ↩︎
You can get exclusive updates on my projects and early access to my apps by joining my free newsletter, The Dodo Developer.
.%3C/figure%3E%0A%3C/div%3E%0A%0A%3Cp%3EDiscovering%20that%20simulators%20and%20devices%20could%20be%20interacted%20with%20in%20this%20way%20has%20been%20a%20huge%20timesaver%20for%20me.%20Whilst%20%3Ca%20href%3D%22https://bendodson.com/weblog/2022/03/11/browser-note/%22%3Edeveloping%20Browser%20Note%3C/a%3E,%20I%20was%20constantly%20needing%20to%20tweak%20CSS%20values%20and%20investigate%20the%20current%20state%20of%20the%20DOM%20as%20websites%20have%20various%20tricks%20to%20try%20and%20make%20ads%20or%20cookie%20notices%20appear%20on%20top%20of%20all%20content%20(and%20the%20note%20needed%20to%20be%20on%20top%20at%20all%20times%20-%20you%20should%20totally%20take%20a%20look%20at%20%3Ca%20href%3D%22https://apps.apple.com/us/app/browser-note/id1613527249%22%3EBrowser%20Note%3C/a%3E%20whilst%20you%E2%80%99re%20here).%20In%20doing%20this,%20I%20was%20then%20able%20to%20put%20this%20knowledge%20to%20use%20on%20no%20less%20than%203%20client%20projects%20in%20the%20past%20month;%20this%20validates%20my%20theory%20that%20by%20working%20on%20your%20own%20%3Ca%20href%3D%22https://bendodson.com/sideprojects/%22%3Eside%20projects%3C/a%3E%20you%20can%20improve%20your%20efficiency%20when%20it%20comes%20to%20work%20projects.%3C/p%3E%0A%0A%3Cp%3EThere%20are%20a%20few%20caveats%20to%20be%20aware%20of%20when%20using%20the%20Web%20Inspector%20with%20an%20iOS%20device%20or%20simulator:%3C/p%3E%0A%0A%3Cul%3E%0A%20%20%3Cli%3EIf%20you%20want%20to%20use%20this%20on%20an%20actual%20device%20you%E2%80%99ll%20first%20need%20to%20enable%20the%20Web%20Inspector%20on%20iOS.%20To%20do%20this,%20go%20to%20the%20Settings%20app%20and%20then%20Safari%20%26gt;%20Advanced%20and%20toggle%20the%20Web%20Inspector%20on.%3C/li%3E%0A%20%20%3Cli%3EWhilst%20the%20Web%20Inspector%20can%20interrogate%20WKWebView,%20it%20can%20only%20do%20this%20for%20apps%20you%20are%20running%20via%20Xcode.%20You%20cannot%20look%20at%20the%20WKWebView%20of%20apps%20you%20did%20not%20create%20nor%20of%20your%20own%20apps%20from%20TestFlight%20/%20the%20App%20Store.%20However,%20you%20can%20inspect%20debug%20builds%20installed%20via%20Xcode%20even%20if%20the%20debugger%20is%20not%20active%20(i.e.%20you%20build%20to%20the%20device%20then%20quit%20Xcode).%3C/li%3E%0A%20%20%3Cli%3EConversely,%20you%20can%20use%20the%20Web%20Inspector%20with%20any%20SFSafariViewController%20even%20if%20it%20is%20not%20in%20your%20own%20app.%3C/li%3E%0A%20%20%3Cli%3EWhilst%20it%20is%20still%20possible%20to%20submit%20apps%20that%20use%20UIWebView,%20the%20web%20inspector%20will%20not%20work%20with%20them;%20%3Ca%20href%3D%22https://bendodson.s3-eu-west-1.amazonaws.com/weblog/2022/wkwebview.jpg%22%3Eit%20needs%20to%20be%20WKWebView%3C/a%3E.%3C/li%3E%0A%20%20%3Cli%3EThis%20also%20works%20for%20AppKit,%20SwiftUI,%20and%20Catalyst%20apps%20on%20macOS.%3C/li%3E%0A%3C/ul%3E%0A%0A%3Cdiv%20role%3D%22doc-endnotes%22%3E%0A%20%20%3Col%3E%0A%20%20%20%20%3Cli%20role%3D%22doc-endnote%22%3E%0A%20%20%20%20%20%20%3Cp%3EI%20use%20an%20%E2%80%9CiDod%E2%80%9D%20naming%20prefix%20for%20all%20of%20my%20devices;%20a%20throwback%20pun%20to%20my%20first%20Apple%20product,%20the%20iPod.%C2%A0%3Ca%20href%3D%22https://bendodson.com/%23fnref:naming%22%20role%3D%22doc-backlink%22%3E%26%238617;%26%23xfe0e;%3C/a%3E%3C/p%3E%0A%20%20%20%20%3C/li%3E%0A%20%20%3C/ol%3E%0A%3C/div%3E%0A%3Cp%3EYou%20can%20get%20exclusive%20updates%20on%20my%20projects%20and%20early%20access%20to%20my%20apps%20by%20joining%20my%20free%20newsletter,%20%3Ca%20href%3D%22https://www.thedododeveloper.com/%22%3EThe%20Dodo%20Developer%3C/a%3E.%3C/p%3E)
Browser Note and the process of building an iOS 15 Safari Extension 10 Mar 2022 11:00 PM (4 years ago)
I order a Chinese takeaway most weeks and my regular order is half a crispy aromatic duck. This is a bit excessive and so I’ve been aiming to reduce this to a quarter. The problem is that it’s too easy to hit reorder at the end of a long day and whilst I could add a reminder in Things or an alert in my calendar these are very easy to ignore. My solution was to use the new support for browser extensions in iOS 15 to throw up a fullscreen prompt when I go to the takeaway website:
After using this solution for a week or two, I quickly found myself wanting to use it in on other sites such as BBC News and Twitter to prevent me from habitually visiting them. I developed the extension further so I could add notes directly within Safari and instantly saw my phone usage drop by several hours a week. It turns out that adding a short “are you sure” dialogue before visiting a website is a great way to break the habit1.
Whilst I make a lot of apps for my own personal use, this seemed like something that could be beneficial for everybody, particularly as I could not find any apps that already do this. Therefore, I’m very happy to release my first self-published app in over 5 years: Browser Note.
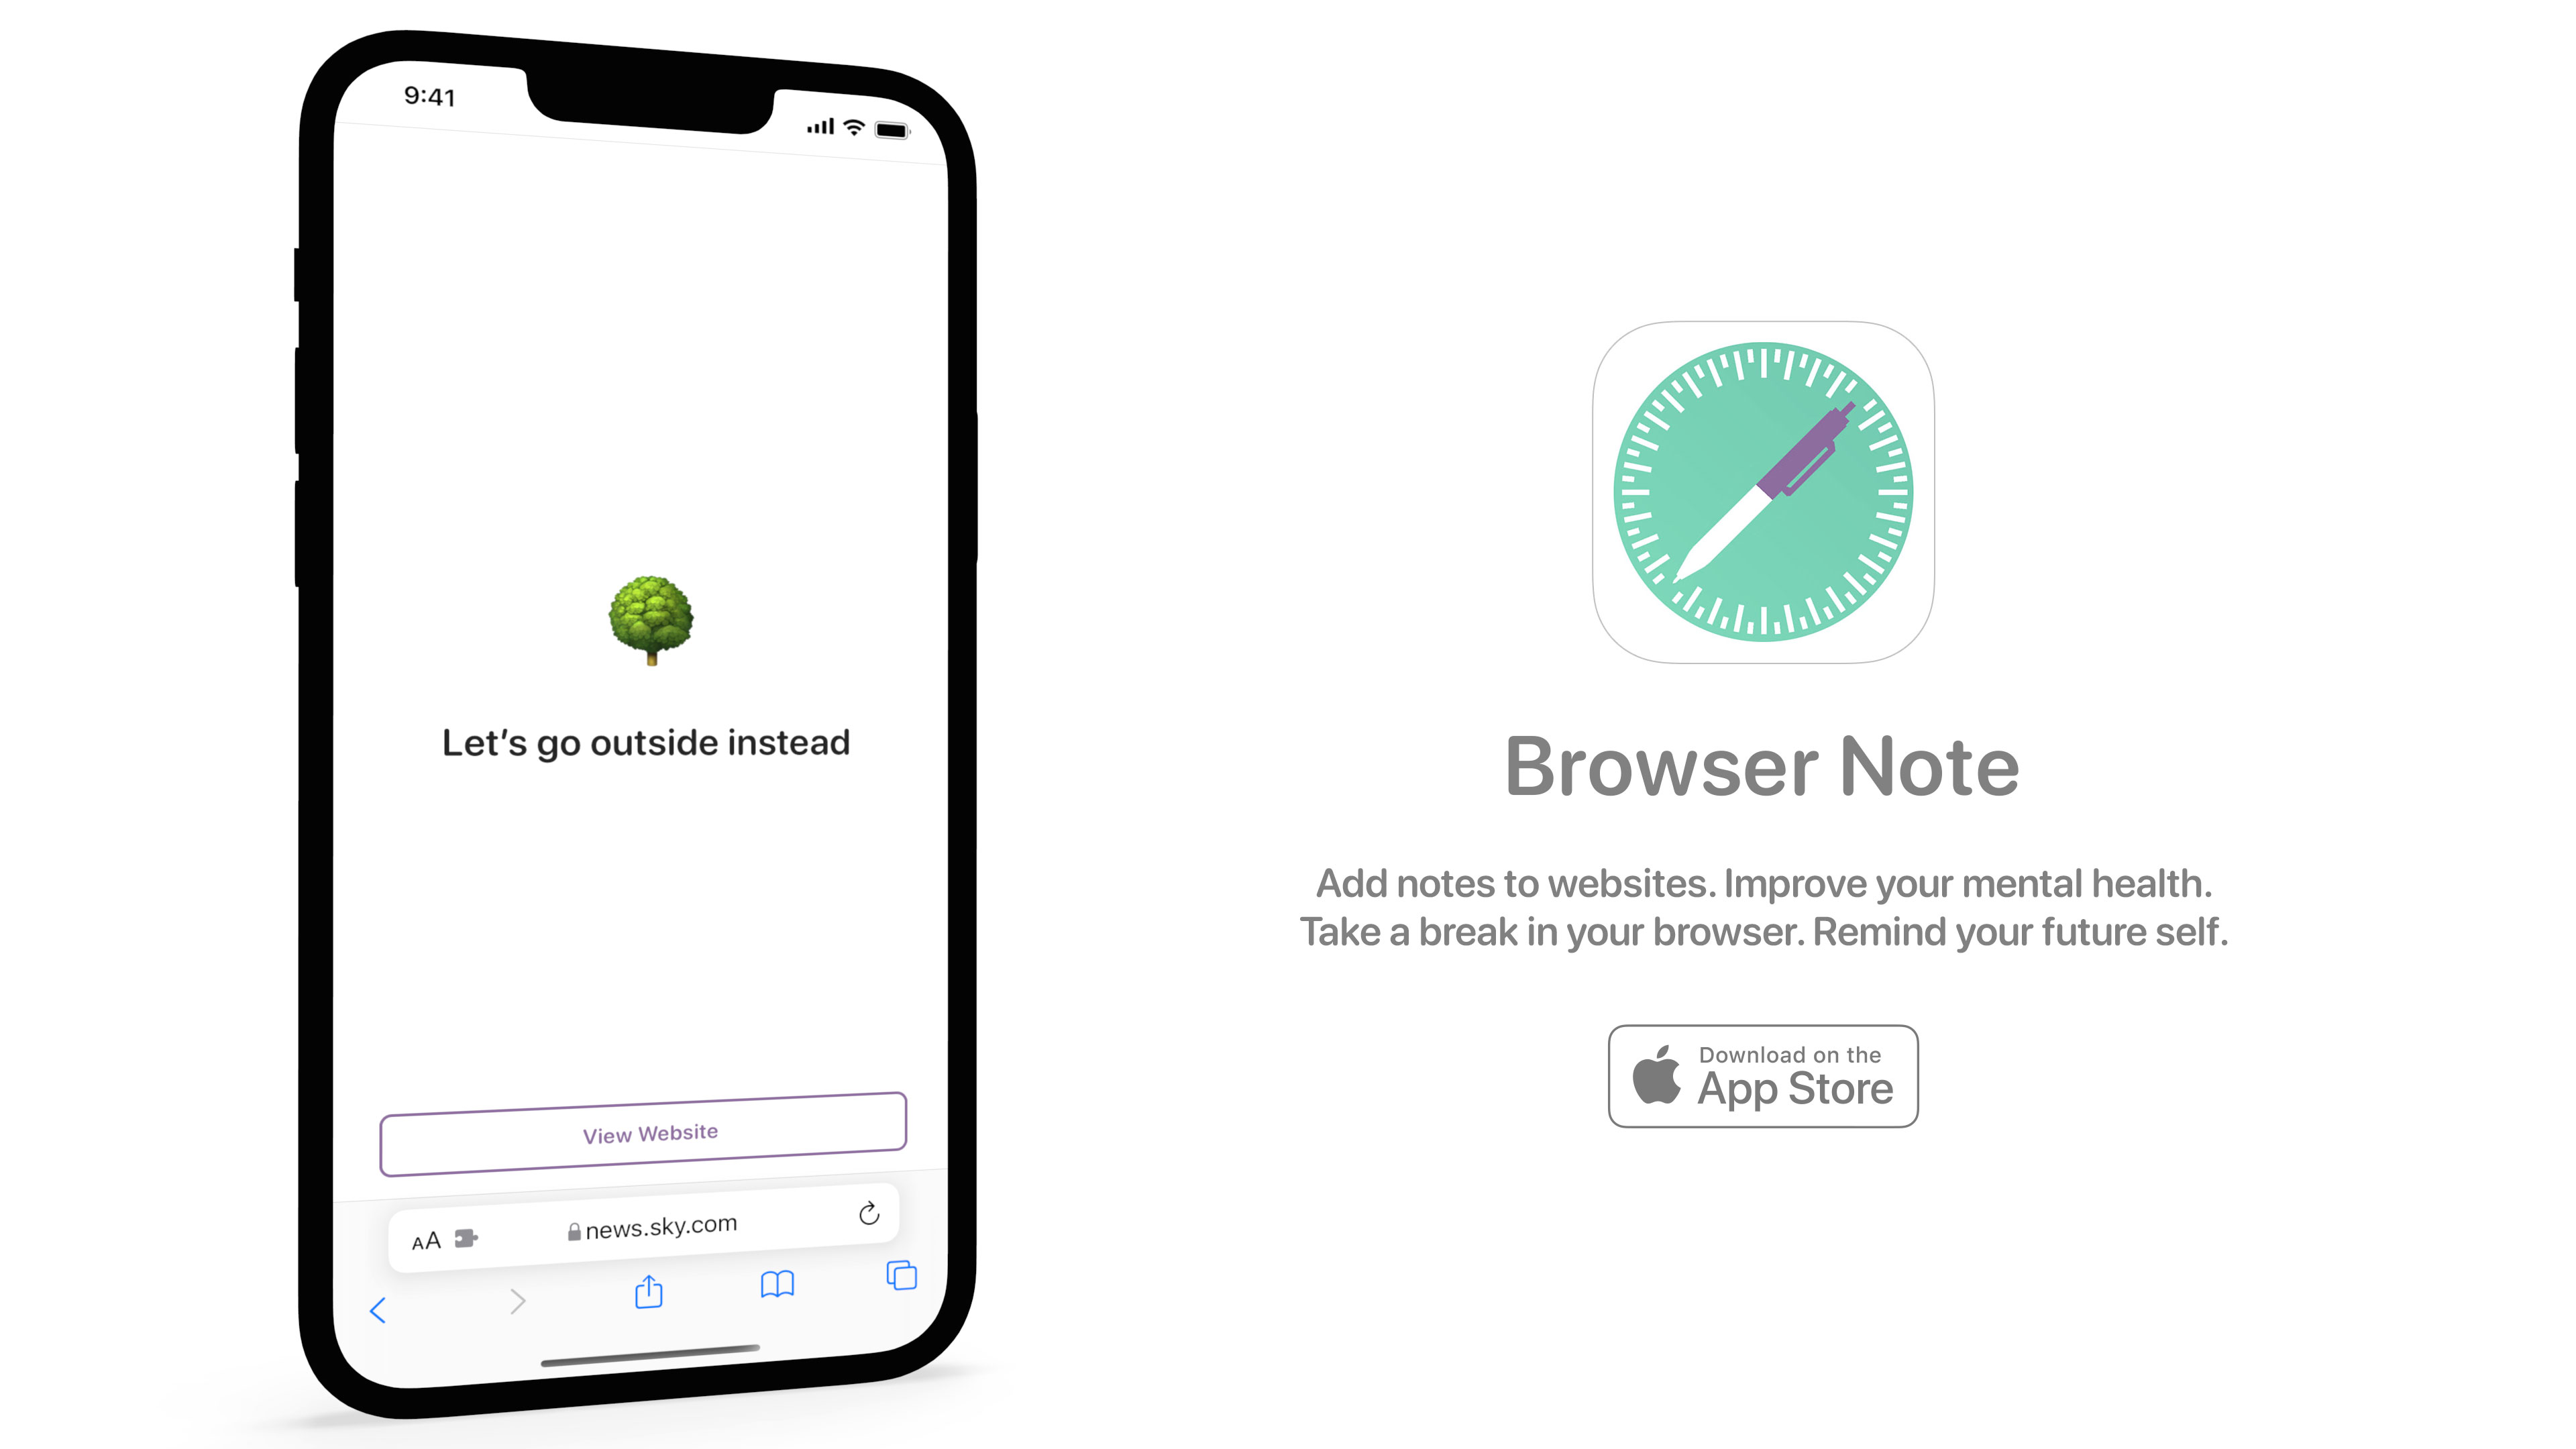
Browser Note is an app that does one thing incredibly well; it adds fullscreen notes to webpages. It does this by making use of an iOS 15 Safari Extension that you can activate within Safari to add your note and later update or delete it. When a note is displayed on a page, a “View Website” button is available to let you continue into the site; when tapped, the note is snoozed for a period of time at which point it will appear again on any subsequent reloads (the snooze period is 15 minutes but you can change this within the app).
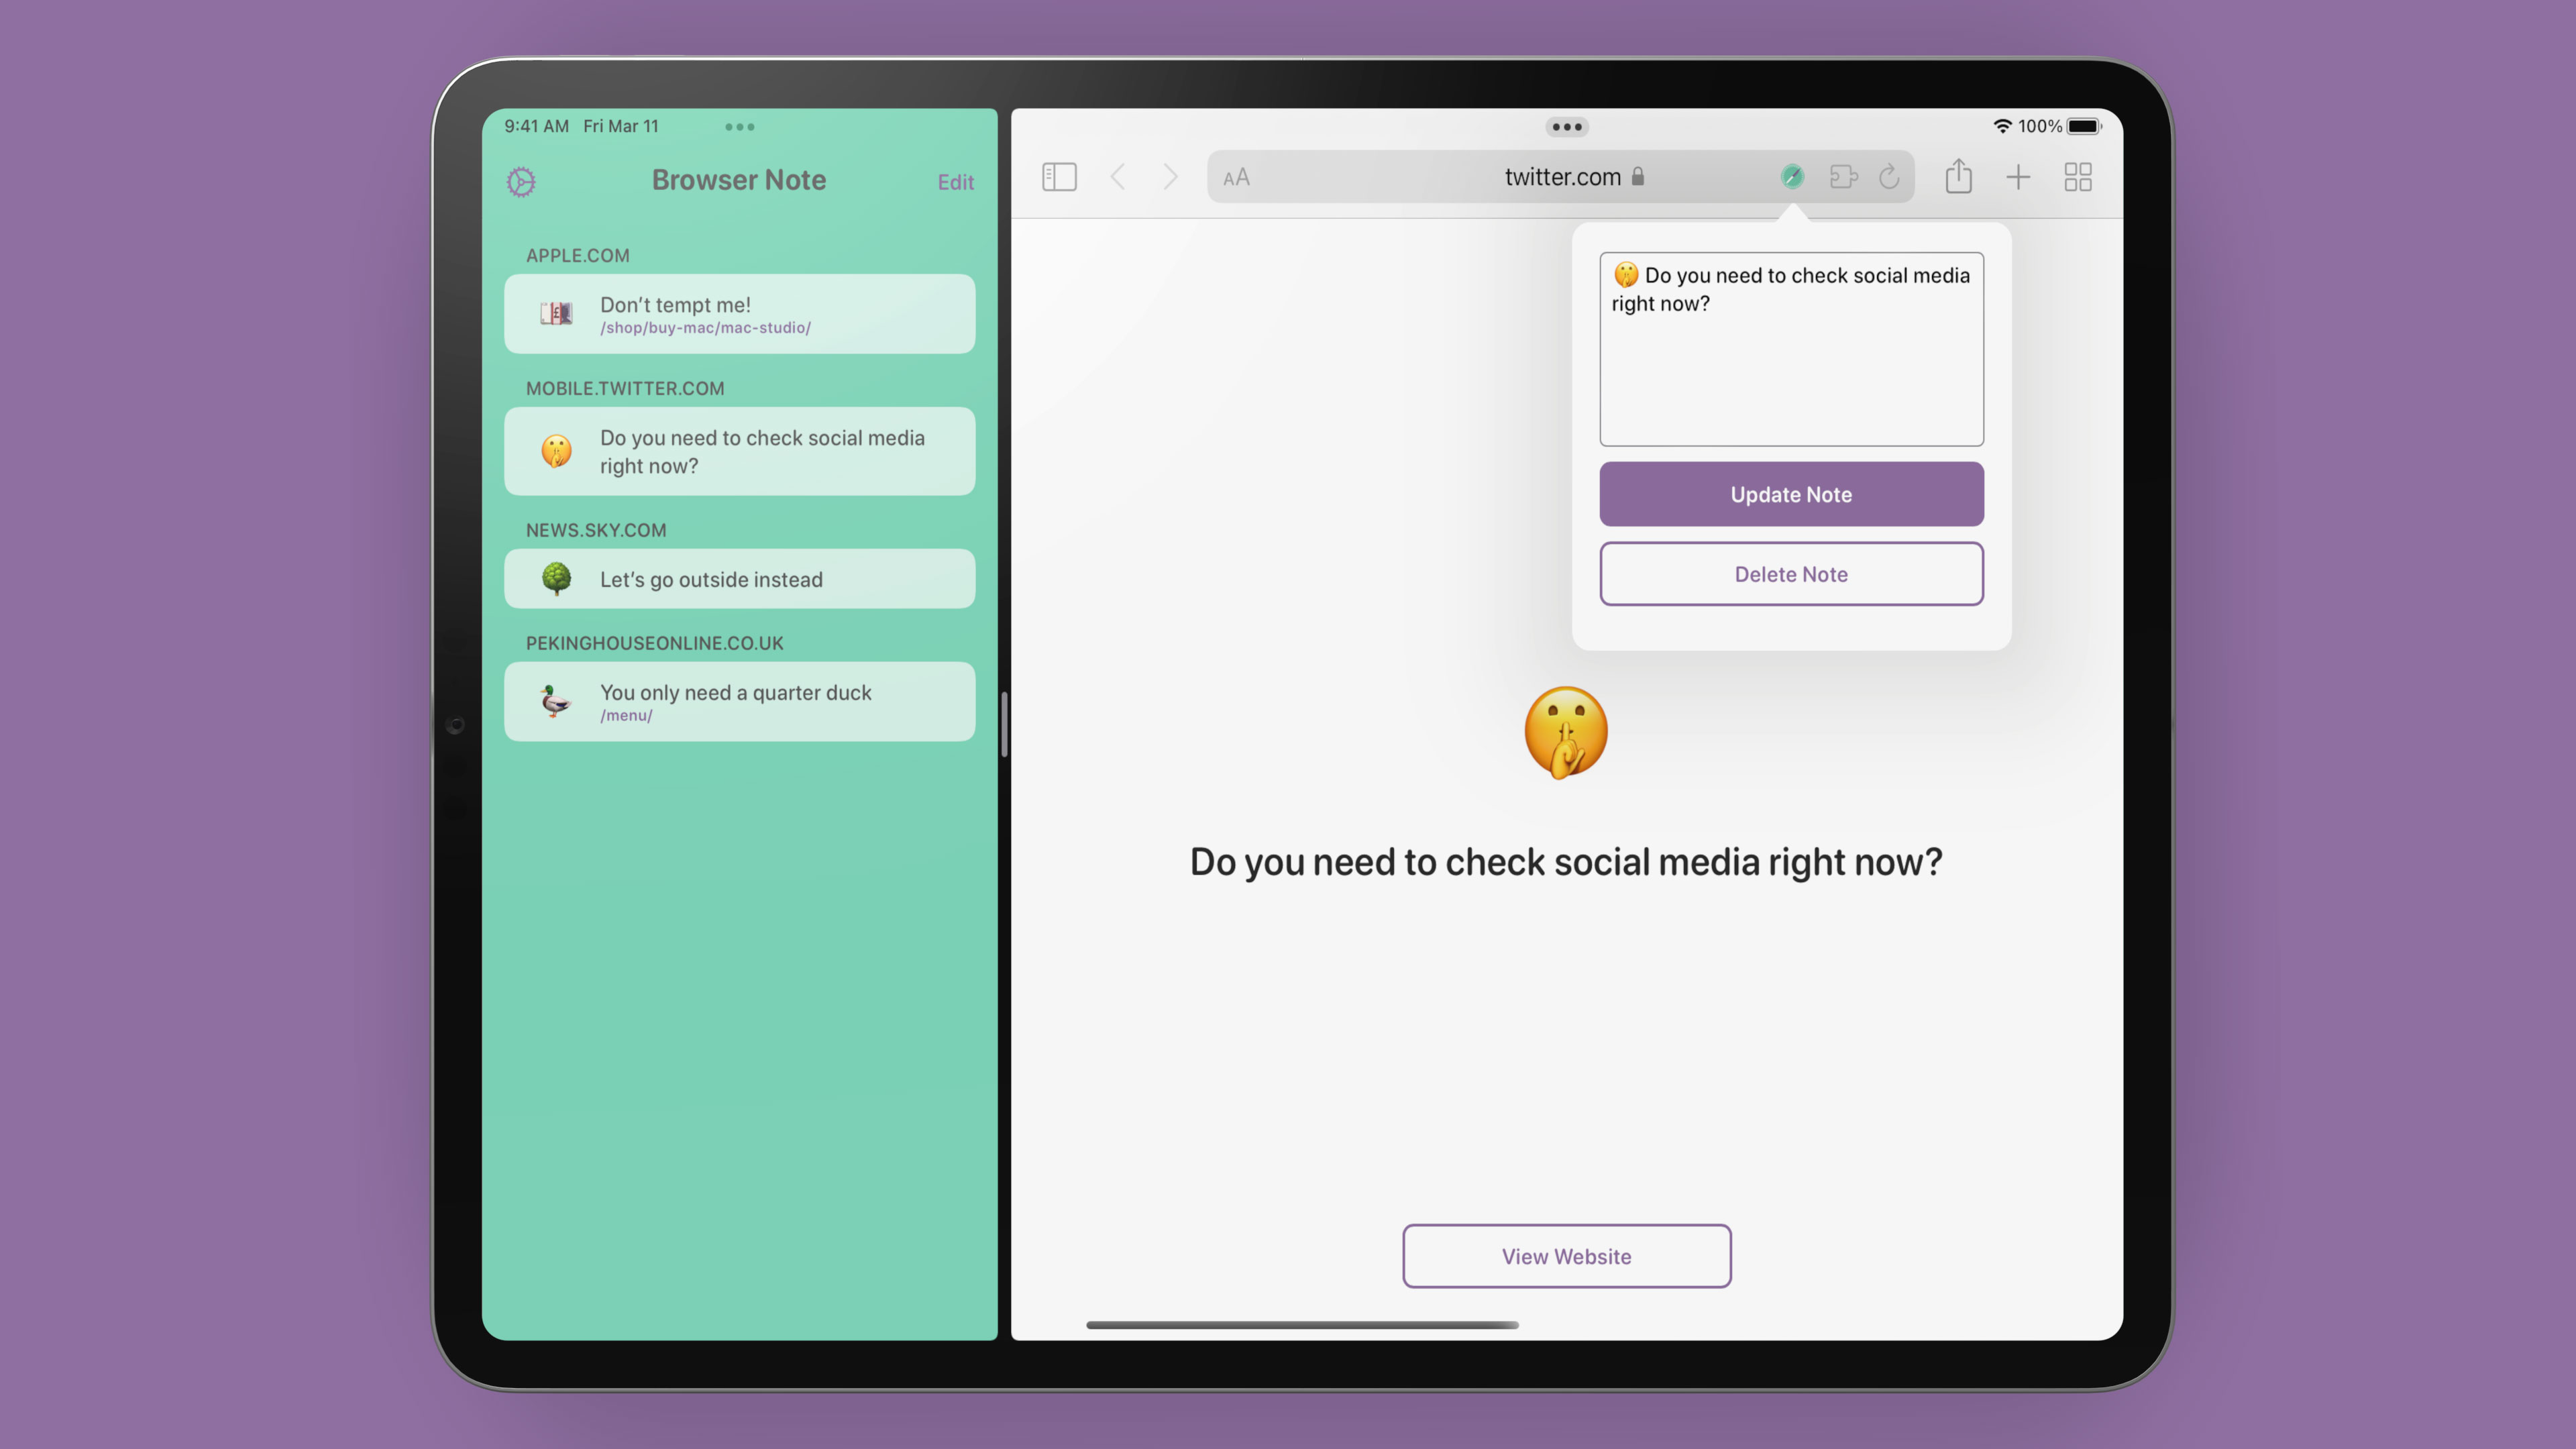
There is no App Store just for Safari Extensions so instead they have to come bundled within an app. From a development perspective, Safari Extensions are very similar to those made for Chrome and Firefox; Apple even provide a converter to migrate any extensions you’ve built for other browsers. Xcode has a template for Safari Extension based-apps which I used to get started but after that you’re on your own; whilst there is documentation from Apple, it’s predominantly for Safari Extensions on macOS which are very different. The most frustrating aspect is that the documentation does not say which platforms it supports and as many of the APIs are the same it was easy to spend a couple of hours wondering why something doesn’t work only to find it doesn’t apply to iOS2.
My initial thought was to use the Web Storage API to store notes as then everything would be wrapped up in a tidy extension. However, there isn’t a way for the app to access that data so if I wanted to add syncing in future (i.e. between iPad and iPhone) then this was not going to be a viable solution. Most apps that have extensions just give you a tutorial on how to enable them but I wanted to go a bit further and add some functionality within there as well, so again I wanted the app to be able to access the notes that were created.
In the end, I came up with a model whereby the app is in control of all of the notes data within a local Realm database situated in an App Group so both the app and extension can communicate with it. When you load a website, the extension wakes up the app which checks whether there is a note matching the current URL; if there is, it responds with the data and the extension removes all of the HTML from the page and replaces it with it’s own note UI. Similarly, when you invoke the popup sheet to add a note or edit one, the commands are sent through to the app to perform those actions on the database. Within the iOS simulator this is quite slow – it would take a few seconds after visiting a page before the note would appear – but on a device it’s practically instantaneous.
In order to communicate between the extension and the app, there are a number of hoops to jump through. First of all we have the content.js file which is loaded on each page request:
browser.runtime.sendMessage(JSON.stringify({"request": "check", "url": window.location.href})).then((response) => {
    switch(response.type) {
        case "message":
            if (!response.isSnoozed) {
                createContentView(response.id, response.emoji, response.displayText);
            }
            break;
        case "ignore":
            break;
    }
});
This sends a message to the background.js file with the current url and also the request type (there is check, add, update, delete, and snooze - in this case we’re just checking to see if there is a note). If a response comes back with a type of message then we’ll make sure the note isn’t currently snoozed and then throw up the note UI. But how does the response get generated?
browser.runtime.onMessage.addListener((request, sender, sendResponse) => {
    browser.runtime.sendNativeMessage("application.id", request, function(response) {
        sendResponse(response);
    });
    return true;
});
This is the background.js file in its entirety. Not much there 🤣. In order to communicate with the native app, we have to use a sendNativeMessage API but this cannot be used from content.js, it has to be invoked by background.js, hence this background file just acts as a middleman taking any messages from the content and sending them to the native app before shuttling back the response. One important item to note here is that you must return true when you are responding to a message from the content otherwise the connection is closed instantly (i.e. it will not wait for the native app to respond).
Now that we’ve sent a message to the app, it’s time to look at the Swift code that is responding to these events. This is all handled by a SafariWebExtensionHandler:
import SafariServices

class SafariWebExtensionHandler: NSObject, NSExtensionRequestHandling {

    func beginRequest(with context: NSExtensionContext) {
        guard let item = context.inputItems.first as? NSExtensionItem, let userInfo = item.userInfo else { return }
        guard let arg = userInfo[SFExtensionMessageKey] as? CVarArg else { return }
        let message = String(format: "%@", arg)
        guard let data = message.data(using: .utf8), let request = try? JSONDecoder().decode(ExtensionRequest.self, from: data) else { return }

        guard let requestType = request.requestType else { return }

        DispatchQueue.main.async {
            var response: Any = ["type": "ignore"]
            switch requestType {
            case .check:
                guard let url = request.url else { return }
                let device = UIDevice.current.userInterfaceIdiom == .pad ? "ipad" : "iphone"
                if let reminder = DataStore.shared.fetch(with: url) {
                    response = ["type": "message", "id": reminder.id, "displayText": reminder.displayText.replacingOccurrences(of: "\n", with: "<br>"), "emoji": reminder.emoji, "text": reminder.text, "isSnoozed": reminder.isSnoozed, "device": device]
                } else {
                    response = ["type": "ignore", "host": url.host ?? "", "device": device]
                }
            case .add:
                guard let url = request.url, let text = request.text else { return }
                let blockHost = request.blockHost ?? true
                let reminder = Reminder(url: url, text: text, matchExactPath: !blockHost)
                DataStore.shared.add(reminder)
                response = ["type": "reload"]
            case .update:
                guard let id = request.id, let text = request.text else { return }
                DataStore.shared.updateText(id: id, text: text)
                response = ["type": "reload"]
            case .delete:
                guard let id = request.id else { return }
                DataStore.shared.delete(id: id)
                response = ["type": "reload"]
            case .snooze:
                guard let id = request.id, let reminder = DataStore.shared.fetch(with: id) else { return }
                reminder.snooze()
                response = ["type": "reload"]
            }
            let responseItem = NSExtensionItem()
            responseItem.userInfo = [SFExtensionMessageKey: response]
            context.completeRequest(returningItems: [responseItem], completionHandler: nil)
        }
    }

}
The data comes through as a string within the user info dictionary of an NSExtensionItem. I send JSON from the extension via this mechanism as then I can use the Codable protocol in Swift to unpack it into a native struct. I then look at the request type and perform what actions are needed on the database before responding with a dictionary of my own; if there is a note then that data is sent back, otherwise the response will tell the extension to either do nothing or reload the page. In the end, we have an extension that can talk with the native app and store all the data in the Swift world allowing me to display the notes and allow them to be deleted from within the app:
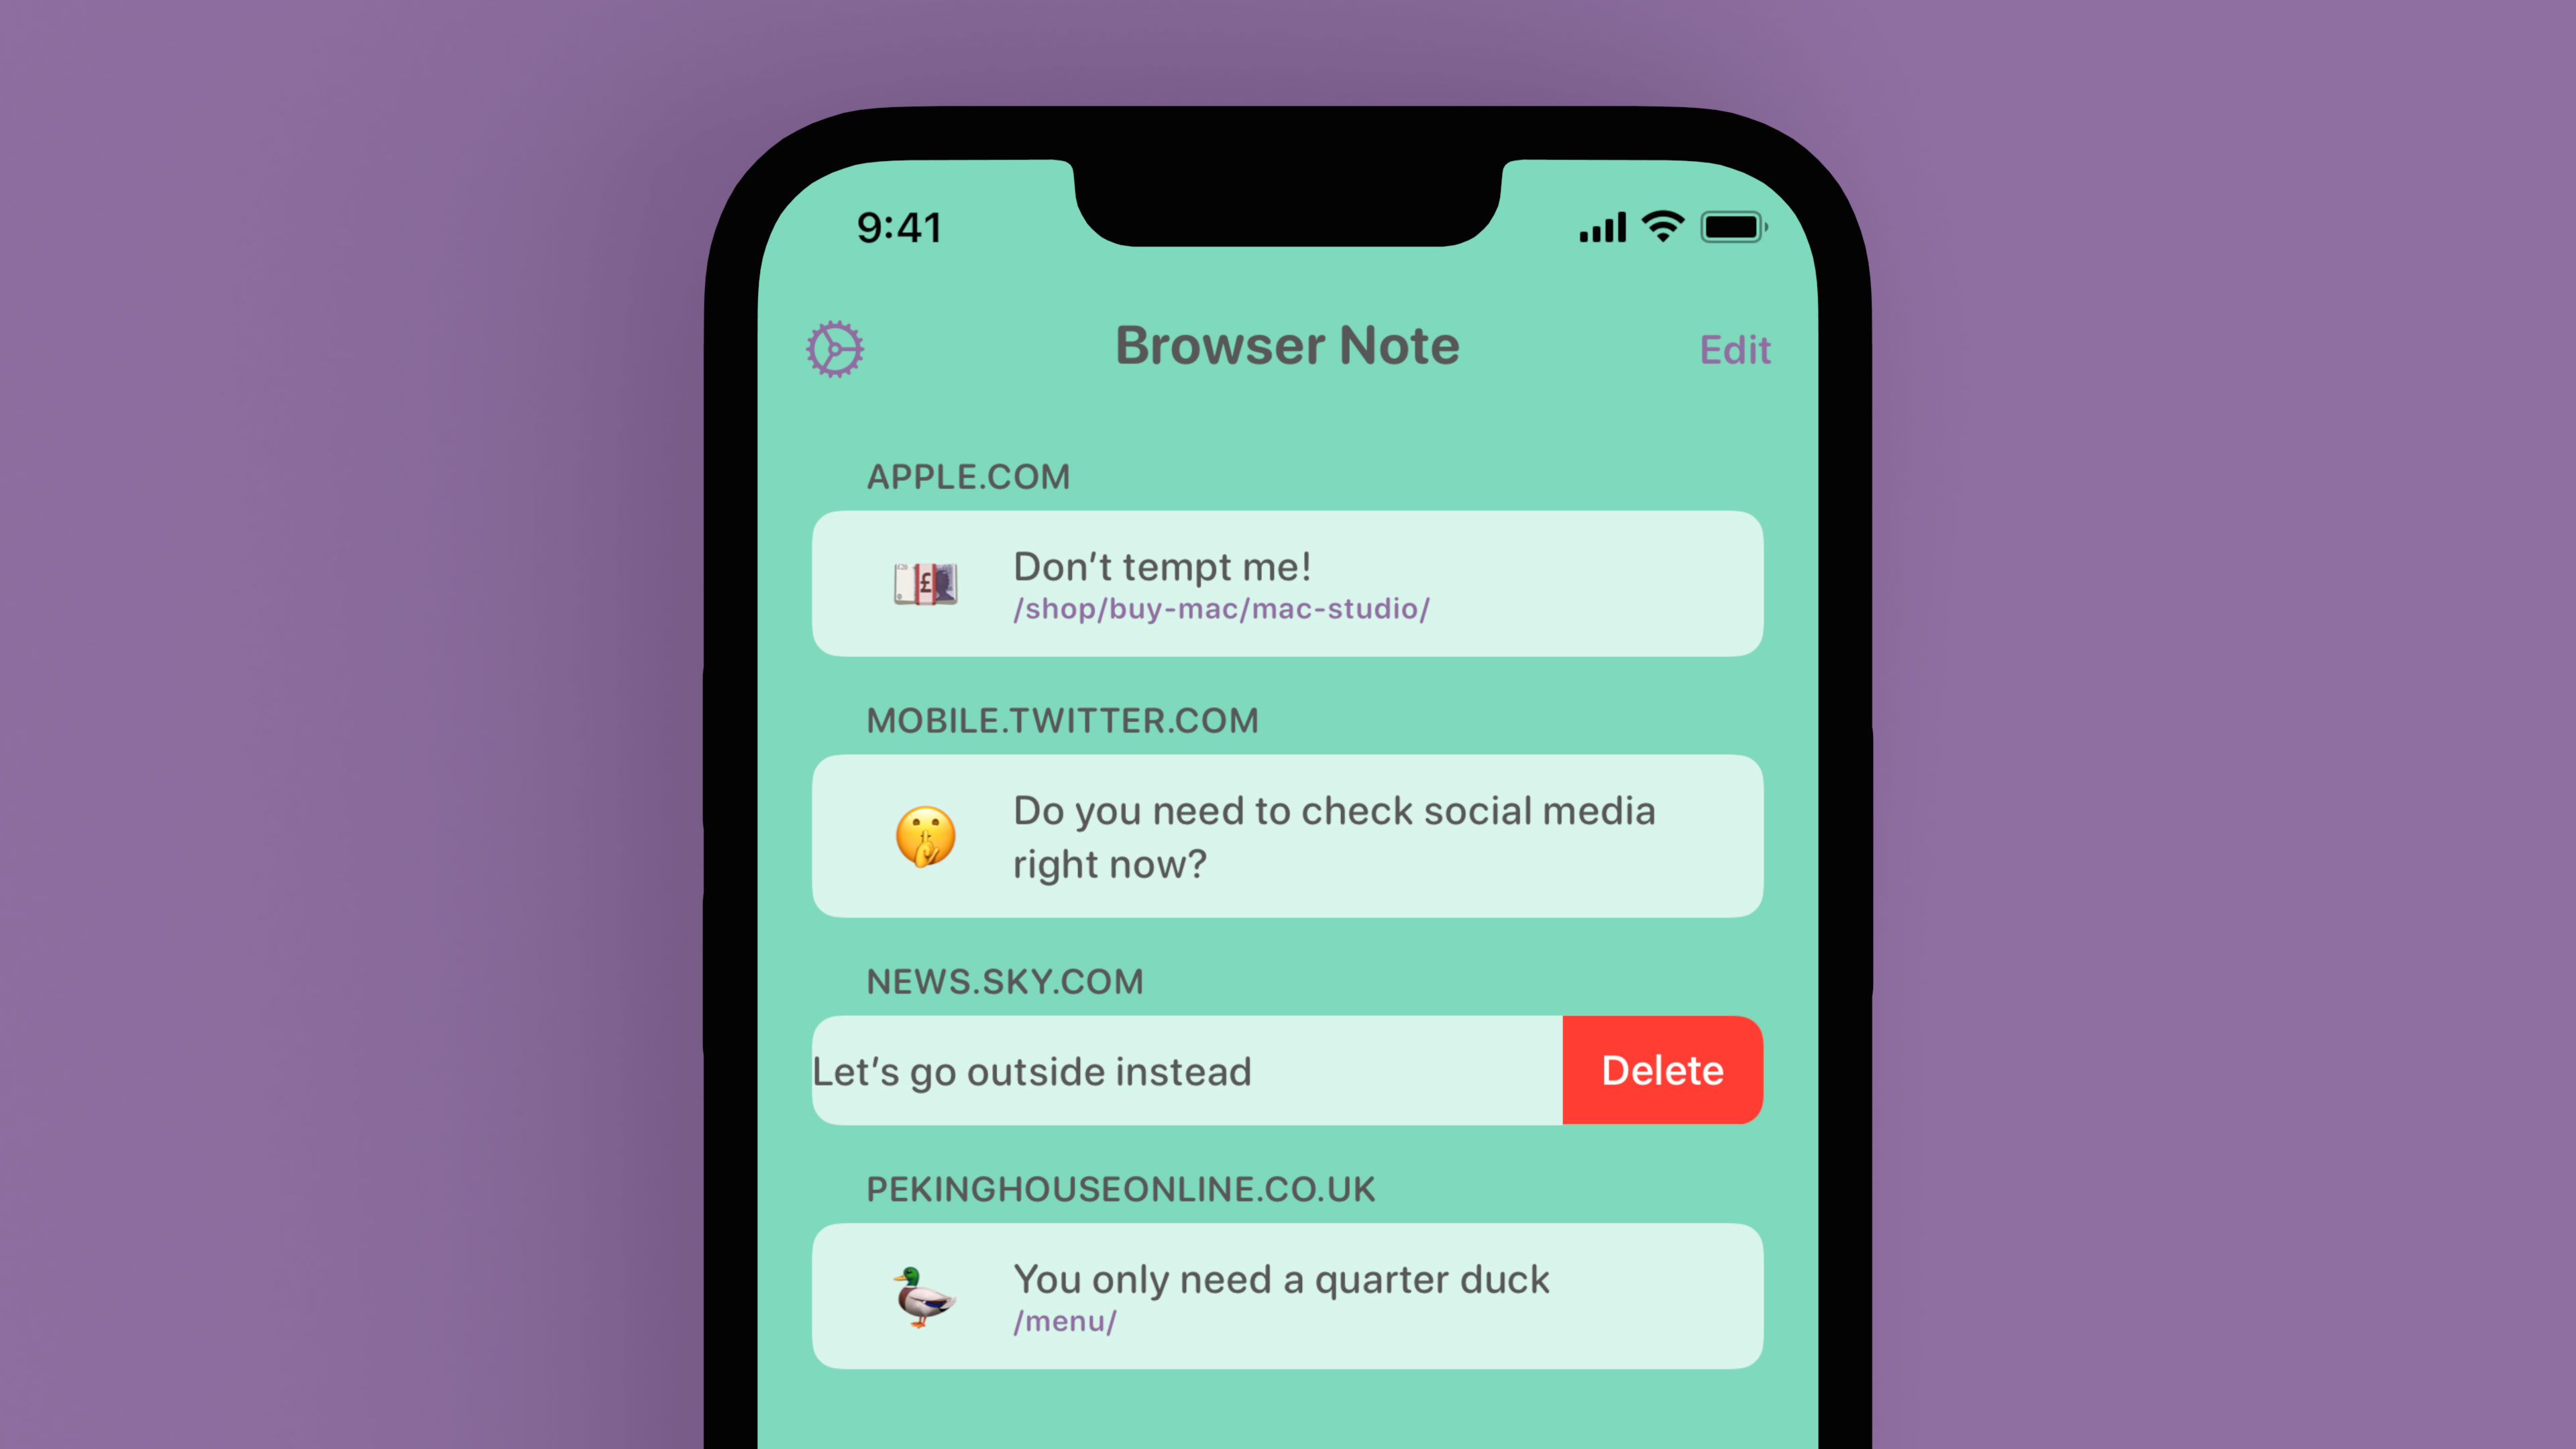
As I mentioned, I would like to add note syncing in a future version that would allow the iPhone and iPad apps to remain in sync. I’m also intrigued as to whether a Catalyst version of the app would get this working on macOS but after over 30 hours of development I decided it was best to get an initial version launched before adding additional features.
Conclusion
This project started as a simple alert for a single webpage but has quickly become a labor of love for me as the benefits of a pause in web browsing became apparent. I’ve spent far too much time tweaking aspects of the app and haven’t bought up a number of tiny details I’m very proud of:
- I used SwiftUI via a UIHostingController to create the tutorial panels shown on app launch. These were able to be reused really easily within the settings page.
- There are videos to show how to install the extension and use the app. I used data within an Asset Catalogue for the first time so I could have a different video depending on whether the app is installed on iPhone or iPad (and due to App Thinning it means the app doesn’t even include the other device video thus reducing download and install size).
- I’m really pleased with the app icon I designed and am slightly surprised it got through App Review; it’s the Safari logo in green but using a pen for the compass arrow.
- Speaking of App Review, I’m amazed this screenshot was allowed 🤣
- The app resizes beautifully on iPad and all of it’s various multitasking window sizes. This also goes for the HTML within the extension which is in a modal popup on compact sizes but a floating panel on regular sizes.
- Dark mode is fully supported so your note will reflect the system theme.
I’d love it if you would give Browser Note a try. It’s available on all devices running iOS 15 and above and is available worldwide3 now.
-
I have attempted to do this in the past using Screen Time but it’s a blunt instrument. It can only apply to an entire domain and you can’t personalise the text that appears so it’s only really useful as a block; you don’t get the positive reinforcement from a message you’ve written. ↩︎
-
I’m looking at you SFSafariExtensionManager; there is no way for your app to know if the extension is installed correctly on iOS. ↩︎
-
Well, almost worldwide.
🇷🇺🇧🇾↩︎
You can get exclusive updates on my projects and early access to my apps by joining my free newsletter, The Dodo Developer.
Side Project: Stoutness 9 Mar 2021 11:00 PM (5 years ago)
This is part of a series of blog posts in which I showcase some of the side projects I work on for my own use. As with all of my side projects, I’m not focused on perfect code or UI; it just needs to run!
Over the years I’ve been slowly tinkering with an idea I liked to call “The Morning Briefing”, a simple way to give me the information I want in the mornings such as the news, weather, and a list of my upcoming tasks. Originally this would have been read to me by Siri1 but in mid-2020 I decided instead it would be more fun to have it as a printed page; a personalised newspaper just for me2. It would have consisted of weather icons for the next 7 days, a list of my tasks I could physically check off, and then maybe some personal data from Health such as Apple Watch rings, heart rate data, and sleep averages.
I did make a start on this idea but then late last year my chiropractor told me that I desperately needed to improve my activity level. I also needed to perform the stretches I’d been assigned back in 2017 every day as I’d fallen out of the habit. The video I use for my stretches is by Straighten Up UK and whilst it’s very good there are several bits that can be fast forwarded through once you know the routine. It was also affecting my recommended videos on YouTube as I’d watch it every morning which meant YouTube kept assuming I wanted more and more stretch videos. Eventually I decided that I’d just download the video, remove the extraneous bits, and put it in a basic tvOS app. I then realised that my Morning Briefing idea might work better if it was paired along with the stretching video and thus Stoutness was born.
Tangent: Name and App Icon
As any good developer knows, half the battle is what to name your side project. Originally this was "Morning Briefing" and then became "Hummingbird" after one of the sillier stretches which you'll see shortly. The final name was eventually hit on when my wife remarked (rather cruelly) that I looked like Winnie-the-Pooh doing his stoutness exercise.
One of my favourite things about working on tvOS is the way in which parallax is used to convey focus. Naturally I wanted to have a nice icon if I was going to use it every day and so I decided to take Pooh Bear and let him move around a little. The icon is made of three layers; Pooh on top, the room (with a hole where the mirror is) in the middle, and then the reflection at the back. The result is that both of the Pooh's move opposingly as the icon is highlighted. The whole thing was taken from a very low-res screenshot and then I made judicious use of the "content aware fill" tool in Photoshop to fill in the extra bits of image I'd need such as the space behind Pooh and extending the reflection cut out. You can download a zip of the three individual layers if you're curious to see exactly how it works.
As with all of my side projects, I generally like to use them as an excuse to learn some new code technique. In this case, I mainly focused on how to mix-and-match SwiftUI with UIKit (as that seems like it may prove useful in the coming years) but I also dabbled in some Combine and with using Swift Package Manager over CocoaPods for the limited number of dependencies I use. In the end, I also needed to dabble with AppleScript, Shortcuts, and writing a couple of iOS and macOS apps to help power everything…
Weather
On opening the app the current date is shown along with a loading spinner whilst the five different data sources are called and cached; two of my own APIs, YouTube, Pocket, and OpenWeather. Only once they are all loaded does the “Get Started” button appear.
The weather icons are displayed as soon as the OpenWeather API response is received and show the weather for the next 7 days along with the high and low temperatures. This entire row is powered by SwiftUI with each day rendered like this:
struct DailyWeatherView: View {

    var weather: DailyWeather

    var body: some View {
        VStack(spacing: 30) {
            Text(weather.day)
                .font(.subheadline)
                .fontWeight(.bold)
                .multilineTextAlignment(.center)

            VStack {
                Image(systemName: weather.icon)
                    .font(.system(size: 80))
                Spacer()
            }.frame(maxHeight: 120)

            Text("\(weather.low)↓ \(weather.high)↑")
                .font(.subheadline)
                .fontWeight(.bold)
                .multilineTextAlignment(.center)
                .opacity(0.7)
        }
        .frame(width: 220, height: 300, alignment: .center)
    }
}
I love how quick and easy it is to prototype something with SwiftUI and with the new Apple Silicon Macs it’s actually feasible to use the realtime preview in Xcode. The icons for each weather type are pulled from SF Symbols and you may notice I had to lock the VStack they appear in to 120pt high with a Spacer underneath; this is because the icons are all different sizes and so cloud would be misaligned when placed next to cloud.rain.
Newspapers
In my original idea for “Morning Briefing” I had wanted to get the news headlines along with an excerpt. This is relatively easy to do via something like BBC News with screenscraping but the recent pandemic meant that nearly all of the “top read” stories were pandemic related which I didn’t really care to read about. I have a subscription to The Times so thought about scraping that site somehow but there was no easy way to get the same content as the newspaper so it ended up being whatever was breaking right now which I also didn’t want3. Perhaps I could hook into Apple News now that I’ve got a subscription with Apple One? Nope, Apple News has no APIs or SDK and one look at the network requests with Charles Proxy made me think I didn’t want to go down that rabbit hole. In the end, I opted for a much simpler solution of having a carousel of the front pages of today’s newspapers. This lets me see the main topics of the day without getting bogged down in article excerpts which are often a bit click-baity to get you to the actual article.
I tried a few ways to get front pages (originally from the BBC and Sky News websites) but in the end I wrote a very simple PHP script to scrape tomorrowspapers.co.uk every few hours:
require_once('simplehtmldom/HtmlWeb.php');
use simplehtmldom\HtmlWeb;
$client = new HtmlWeb();
$html = $client->load('https://www.tomorrowspapers.co.uk');

$images = [];
foreach ($html->find('img.size-full') as $imgTag) {
    if (strpos($imgTag->src, 'DESIGNFORM-Logo') !== false) {
        continue;
    }
    $images[] = $imgTag->src;
}

shuffle($images);

$json = json_encode($images);
file_put_contents('newspapers.txt', $json);
echo $json;
The front pages themselves are image views within a UIPageViewController. This has the nice side benefit that they are automatically placed into an endless carousel that can be swiped through with the Siri Remote. I randomise the pages each day so that I see each newspaper in a different order.
Tangent: Page Layout
There are 12 stretches in my chiropractic video which I've trimmed from the original downloaded video and saved as individual files. I then typed up the narration for each exercise and placed it in a JSON file.
The newspaper page and all the subsequent pages are all the same UIViewController which use the data in the JSON file to display the appropriate video, stretch name, and instructions. They then load a child view controller on the right hand side of the page; this was a UIPageViewController for the newspapers but is a UIHostingController with a SwiftUI view in it for all of the following stretches.
Tasks
I’ve been a long time user of Things, the task manager based on the Getting Things Done methodology. I have several repeating tasks in intervals along with ad hoc tasks I create throughout the day, all sorted into areas and projects prefixed with an emoji so they don’t look quite so dull. Unfortunately, there is no online component with Things4 and thus no public API as there is with something like Todoist. Whilst there is some support for Siri Shortcuts they are for opening the app rather than extracting data out of it. However, the macOS app does have comprehensive support for AppleScript and so that offered me a way to get at the data:
on zero_pad(value, string_length)
    set string_zeroes to ""
    set digits_to_pad to string_length - (length of (value as string))
    if digits_to_pad > 0 then
        repeat digits_to_pad times
            set string_zeroes to string_zeroes & "0" as string
        end repeat
    end if
    set padded_value to string_zeroes & value as string
    return padded_value
end zero_pad

set now to (current date)
set today to (year of now as integer) as string
set today to result & "-"
set today to result & zero_pad(month of now as integer, 2)
set today to result & "-"
set today to result & zero_pad(day of now as integer, 2)

tell application "Things3"

    set todayIdentifiers to {}
    repeat with task in to dos of list "Today"
        set props to properties of task
        copy id of props to the end of todayIdentifiers
    end repeat
    set taggedTasks to {}
    repeat with toDo in to dos of list "Anytime"
        if tag names of toDo is "One A Day" then
            set props to properties of toDo
            if todayIdentifiers does not contain id of props then
                copy toDo to the end of taggedTasks
            end if
        end if
    end repeat
    set listSize to count of taggedTasks
    if listSize > 0 then
        set randomNumber to (random number from 1 to listSize)
        set toDo to item randomNumber of taggedTasks
        move toDo to list "Today"
    end if


    set listOfProjects to {}
    repeat with proj in projects
        set props to properties of proj
        set projectId to id of props
        set projectName to name of props
        set object to {projectName:projectName, projectId:projectId}
        copy object to the end of listOfProjects
    end repeat

    set listOfTasks to {}

    set tasks to to dos of list "Inbox"
    repeat with task in tasks
        set props to properties of task
        set projectName to "Inbox"
        set taskName to name of props
        set object to {|name|:taskName, |project|:projectName}
        copy object to the end of listOfTasks
    end repeat

    set tasks to to dos of list "Today"
    repeat with task in tasks
        set props to properties of task
        set projectName to ""
        if exists project of props then
            set projectId to id of project of props
            repeat with proj in listOfProjects
                if projectId in proj is projectId then
                    set projectName to projectName in proj
                end if
            end repeat
        end if

        set taskName to name of props

        set object to {|name|:taskName, |project|:projectName}

        copy object to the end of listOfTasks
    end repeat
end tell


set exportPath to "~/Dropbox/Apps/Morning Briefing/things.plist"
tell application "System Events"
    set plistData to {|date|:today, tasks:listOfTasks}
    set rootDictionary to make new property list item with properties {kind:record, value:plistData}
    set export to make new property list file with properties {contents:rootDictionary, name:exportPath}
end tell
There’s quite a lot there but essentially it boils down to going through my Today list and sorting each task by its project. These all then get added to a plist (as easier to deal with in AppleScript than JSON) as an array of dictionaries containing the task name and project name which is then saved to my Dropbox where a PHP script on my server can access it and return it through my own API.
One habit I’ve gotten into over the years is to create a number of short tasks that need to be done at some point and then tagging them “One A Day” with the aim being to do one of them every day. In this way, small jobs around the house or minor tweaks to projects slowly get done over time rather than lingering around. To help with that, the script above will find all of my tasks tagged in such a way, pick one at random, and then move it to Today before the list is exported.
On the app side, this plist is fetched and then parsed in order to make it more palatable to the app by grouping the tasks into their projects and fixing a few minor issues i.e. tasks in Things marked as “This Evening” still show up in the AppleScript as their project name so I rename their project to “🌘 This Evening” mimicking the waning crescent moon icon Things uses in its apps. I could likely do this within the AppleScript file but it’s just easier to do it in Swift!
In an ideal world this script would run automatically first thing in the morning so everything is synced up when I open the Apple TV app. Unfortunately this isn’t possible for me at the moment as I’m exclusively using an Apple Silicon MacBook Pro and I don’t leave it running continuously as I used to with my Mac Pro. For now, I need to run the script manually each morning (which is as simple as double clicking an exported app from Script Editor) but this will change once the Apple Silicon desktop machines launch!
Schedule
Another habit I’ve gotten into recently is scheduling my week in advance. I do this for my client work but also for things like what exercises I’m going to do or what meals I’m going to eat5. Whilst I could have just typed it into a database to get it out of the API easily, it isn’t much fun manually entering data into an SQL client. Instead, I decided to use the calendar app on my mac and sync the data using Shortcuts on iOS. This is far easier as I can quickly type up my schedule on a Sunday and then sync it each day prior to starting the app.
Tangent: Shortcuts
Shortcuts née Workflow is a powerful system app that allows you to join data from various apps together. I use it extensively for this app, mostly to get otherwise inaccessible data out of my iPhone and into my database so my API can send it to the app. For example:
- Fetching my calendar entries for the day and formatting them into a JSON array
- Retrieving my exercise minutes and step count from a custom HealthKit app I wrote
- Getting the amount of water I drank yesterday from Health
- Fetching my sleep stats from the AutoSleep app
All of this data can then be packaged up in JSON and posted to my server using the poorly named "Get contents of" network action.
The only downside is that I do have to trigger this manually as no app, not even Shortcuts, can access your Health database when your iPhone is locked so a shortcut set to run at a specific time won't work unless I'm using my phone. This hasn't proved too annoying though as I'm now in the habit of running the shortcut directly from a widget on my home screen before I launch the Apple TV app.
I divide the day up into five sections; Anytime (all-day tasks), Morning (before midday), Lunchtime (midday - 2pm), Afternoon (2pm - 5pm), and Evening (after 5pm). If there are items at a specific time then that time is displayed but mostly items will be from my Schedule calendar which is comprised of tasks tagged in a specific way. For example, for dinner I will create an all-day task named “[food:dinner] Penne Bolognese” and the app will know to use the correct prefix and colour. Once again, SwiftUI becomes a joy to use for short interfaces like this:
struct ScheduleView: View {

    var schedule: MorningBriefingResponse.Schedule

    var body: some View {

        VStack() {

            Text("Schedule")
                .font(.title)
                .padding(.bottom, 50.0)

            VStack(alignment: .leading, spacing: 10) {

                ForEach(schedule.formatted, id: \.self) { section in

                    VStack(alignment: .leading, spacing: 2) {
                        Text(section.heading)
                            .font(.headline)
                        Divider()
                            .background(Color.primary)
                    }
                        .padding(.bottom, 10)
                        .padding(.leading, 210)

                    ForEach(section.entries, id: \.self) { entry in
                        HStack(spacing: 10) {
                            Text(entry.label.uppercased())
                                .font(.caption2)
                                .bold()
                                .multilineTextAlignment(.leading)
                                .foregroundColor(Color(entry.color ?? UIColor.label))
                                .frame(width: 200, alignment: .trailing)

                            Text(entry.title)
                                .font(.body)
                                .multilineTextAlignment(.leading)
                            Spacer()
                        }.opacity(0.7)
                    }
                    Spacer()
                        .frame(height: 40)
                }
            }
            Spacer()
        }
    }
}
The entire interface took less than 5 minutes to create and avoided the usual need to create either a reusable cell in a table view or a custom view to be added to a stack view dynamically.
Sleep
Getting more sleep is usually the simplest way you can improve your life. If you’re getting less than 8 hours a day then sleeping more will improve your mood, cognition, memory, and help with weight loss and food cravings. I used to be terrible for sleep, typically getting 5 hours or less a day, but a concerted effort this year had me at an 8 hour average for most of January and February.
I use the excellent AutoSleep app on Apple Watch to track my sleep. The counterpart iOS app can reply to a Siri Shortcut by pasting a dictionary of your sleep data to the clipboard making it trivial to export and use as part of a workflow (although it also saves to HealthKit so you could just export it from there as well depending on what stats you are after).
The interface above is about to become fairly familiar as I use it for a number of metrics within the app. It comprises of 3 rings in an Apple Activity style giving me the sleep duration for last night, the nightly average over the last week, and the nightly average for the current year. Each ring is aiming to hit the 8 hour target and I write the duration as both time and percentage within each ring.
Tangent: Rings
The rings themselves are provided by MKRingProgressView which are Swift views for use within UIKit apps. To get them to work in SwiftUI was relatively straightforward requiring only that I write a small class conform to UIViewRepresentable:
import SwiftUI
import MKRingProgressView

struct ProgressRingView: UIViewRepresentable {
    var progress: Double
    var ringWidth: CGFloat = 30
    var startColor: UIColor
    var endColor: UIColor

    func makeUIView(context: Context) -> RingProgressView {
        let view = RingProgressView()
        view.ringWidth = ringWidth
        return view
    }

    func updateUIView(_ uiView: RingProgressView, context: Context) {
        uiView.progress = progress
        uiView.startColor = startColor
        uiView.endColor = endColor
    }
}
Each ring can then be created in SwiftUI as simply as:
ProgressRingView(progress: progress, ringWidth: size.ringWidth, startColor: startColor, endColor: endColor)The only issue with this is that it's slow, especially on the Apple TV hardware which is several chip cycles behind modern iPhones. It may be the MKRingProgressView class itself is quite heavy going but I get the feeling translating it to work with SwiftUI and then pushing the whole SwiftUI view back to UIKit via UIHostingController might also be adding some lag. Overall it isn't a problem but it does mean that the view takes a half second to load.
Alcohol
As part of a concerted effort to improve my health, the amount of alcohol I was drinking had to come down fairly significantly. I’ve tried many habit tracking apps in the past mostly in the form of maintaining a chain; the problem I have with them is that once the chain is broken I tend to go all out (i.e. if I’m going to get a black mark to say “drank alcohol” for having a glass of wine I may as well have a bottle of wine). To remedy that I take the idea of chaining but also pair it with the government guidelines for alcohol consumption which is 14 units a week for men.
The data for this is manually input into my SQL database for now but I have other apps I’m working on that interact with those tables. For now, I add what I’ve drank and how many units along with a date and the API then returns the data you see above; how many units I drank yesterday, how many days since I last had something alcoholic (if yesterday was 0 units), the number of units I’ve drank in the last 7 days, and a weekly average for the past 3 months. This differs slightly from the other ring-based metrics in the app as rather than a daily average over 7 days I needed to fetch a cumulative sum to ensure I wasn’t going over 14 units in a 7 day period. The weekly average is also interesting as I needed to go through each Monday-Sunday period of the past 3 months and get a cumulative total before averaging that.
This system has worked very well for me with the result being an average of 1 glass of wine and 1 beer a week which is down significantly from what was likely around 4 bottles of wine and several beers a week. I also had a dry spell of over 2 weeks which is likely the longest duration in around 10 years. I have a lot more thoughts around alcohol tracking and logging which I’ll come back to in a future side project.
The one update I might make to this page is to show how much water I’m drinking a day. I track my water intake via WaterMinder and already sync the data to my server using the Shortcut I’ve mentioned previously. Originally I had a whole page for showing this data but I dropped it in favour of some more important metrics as I found my water levels were pretty consistent once I’d gotten into the habit of drinking more. It looks like it’s not something I need to keep an eye on quite so much but if I do bring it back I think it will be on this page.
Steps
Along with doing my morning stretches, my chiropractor was also very adamant that I needed to increase my physical exercise as my step count was a rather woeful average of 6000 steps per day in 20206. To that end I’ve started running again on my treadmill and going for multiple walks each day.
Whilst the data above is rendered in much the same way as the sleep data, getting it is far tricker than you might think due to the complication of having an Apple Watch and an iPhone. If you use Shortcuts to fetch your data from Health, then it isn’t possible to deduplicate properly and so you’ll end up with a total number of steps from both your Apple Watch and iPhone which is bad if you ever walk around with both devices at the same time which I obviously do. You can limit the fetch to a single device but then you run into problems as you won’t be recording any steps whilst your watch is charging for instance. I don’t know how this error has been allowed to continue for so long in Shortcuts but the solution is rather simple for iOS apps: you use a HKStatisticsQuery along with the .cumulativeSum and .separateBySource options. Unfortunately this meant I needed to write an iOS app to fetch my steps data along with an Intent Extension to allow that to then be exported via Siri Shortcuts.
class StepsService: NSObject {

    let store = HKHealthStore()

    func authorize() {
        guard let quantityType = HKObjectType.quantityType(forIdentifier: HKQuantityTypeIdentifier.stepCount) else {
            return
        }

        store.requestAuthorization(toShare: [], read: [quantityType]) { (success, error) in
            DispatchQueue.main.async {
                print("Authorized")
            }
        }
    }

    func fetch(for date: Date, onCompletion completionHandler: @escaping (Int) -> Void) {
        guard let quantityType = HKObjectType.quantityType(forIdentifier: HKQuantityTypeIdentifier.stepCount) else {
            fatalError("StepCount quantity doesn't exist")
        }

        let start = Calendar.current.startOfDay(for: date)

        var dayComponent = DateComponents()
        dayComponent.day = 1
        guard let tomorrow = Calendar.current.date(byAdding: dayComponent, to: date) else { return }
        let end = Date(timeIntervalSince1970: Calendar.current.startOfDay(for: tomorrow).timeIntervalSince1970 - 1)

        let predicate = HKQuery.predicateForSamples(withStart: start, end: end, options: [.strictStartDate, .strictEndDate])
        let query = HKStatisticsQuery(quantityType: quantityType, quantitySamplePredicate: predicate, options: [.cumulativeSum, .separateBySource]) { _, result, _ in
            DispatchQueue.main.async {
                guard let result = result, let sum = result.sumQuantity() else {
                    completionHandler(0)
                    return
                }

                let count = Int(sum.doubleValue(for: HKUnit.count()))
                completionHandler(count)
            }
        }
        store.execute(query)
    }
}
class StepsIntentHandler: NSObject, StepsIntentHandling {
func handle(intent: StepsIntent, completion: @escaping (StepsIntentResponse) -> Void) {
guard let components = intent.date, let date = Calendar.current.date(from: components) else {
let response = StepsIntentResponse(code: .failure, userActivity: nil)
completion(response)
return
}
let stepsService = StepsService()
let exerciseService = ExerciseService()
stepsService.fetch(for: date) { (steps) in
exerciseService.fetch(for: date) { (minutes) in
let response = StepsIntentResponse(code: .success, userActivity: nil)
var activity = [String: Int]()
activity["steps"] = steps
activity["exercise"] = minutes
guard let data = try? JSONEncoder().encode(activity), let output = String(data: data, encoding: .utf8) else {
completion(StepsIntentResponse(code: .failure, userActivity: nil))
return
}
response.output = output
completion(response)
}
}
}
}After opening the app and authorising it for read access on my HealthKit store, it now sits hidden in the App Library and is woken each morning as my sync shortcut requests the data and sends it to my server. It’s a long winded solution but it works!
Exercise
The exercise view is pretty much identical to the steps view previously only with different data input, colour, and a goal of 30 minutes. Originally I used the native Health actions within Shortcuts to extract the exercise minutes but then I ran into similar duplication issues if I wore my Apple Watch whilst doing a work out on my Peleton bike as that too would add an exercise. To make things simple I added exercise minutes to the same exporter app I mentioned above.
YouTube
Whilst I’m on my treadmill I’ll typically watch a variety of videos I’ve saved on YouTube. This screen shows me the number of videos left in my “To Watch” playlist along with the total runtime7. I then show the details of five videos; the most recently added, the two oldest, and then two random ones from those that are left. In this way I get to know which videos have been sat a while and that I should really watch whilst also seeing something that is likely more exciting to me right now as I added it most recently. I’m not forced to watch these particular videos but I find I usually do choose them as it’s one less thing to think about when I get onto the treadmill.
Fetching the videos is relatively easy using the YouTube API as a single request can give you all the video details for a single playlist. Unfortunately, and for reasons I don’t understand, YouTube doesn’t provide access to the default “Watch Later” playlist even with an authenticated request so I had to create a public playlist named “To Watch” and then remember to add all of my videos to that. It’s a bit of a pain as I nearly always want to just click the “Watch Later” button on YouTube but I’m slowly getting used to adding to the playlist instead.
In a similar vein to the YouTube page, I do something very similar to show me the articles I currently have to read in Pocket8. I connect directly to the Pocket API and return the number of articles remaining, the estimated reading time of them all, and then 5 articles as a mixture of newest, oldest, and random entries.
Coding
I mentioned previously that I like to have a couple of “One A Day” tasks so I can make slow and steady progress on items over time. This is also true of my own personal projects such as this app which will often remain nothing but ideas unless time is carved out to work on them. To help with that, I maintain a list of the projects I’m working on and then have the API pick one at random each day to show me; the idea then is that I will work on that app for at least 18 minutes9 during the day. It’s a system that has worked well for me and gets around the issue of the current favourite project getting all of my attention.
Tangent: Choices Choices
There is a theory that "Overchoice" or "Choice Overload" occurs when we are presented with too many options and that it causes us stress and slows down our process of choosing whilst also sapping our energy reserves. The original studies of this from the '70s have since been called into question but I personally find that oftentimes if I'm given the freedom to do anything I'll end up doing nothing as I can't choose between the numerous options available to me. This is true of what I should watch, read, play, and work on in my spare time. My solution, as briefly alluded to above with YouTube videos and Pocket articles, is to take a subsection and return them randomly so that I don't have to pick.
This is something I also use with my personal projects, books, and games; rather than have all the options available to me, I take the items that are currently active and then the app will return a single result each day. This avoids any decision making on my part as if I want to do some coding I already know what project it will be on or if I'm going to read I know which of my current books it will be. The only rules I set myself are that if I really want to do something else, I must meet the minimum requirement for the day on the original choice first (i.e. lets say I want to work on my Lord of the Rings LCG app but I've been assigned Pocket Rocket, then I work on Pocket Rocket for the 18 minutes to fulfill my daily goal and then I'm free to work on whatever I like).
The one thing I'm particularly mindful of with this approach is that I may need to tweak how random it actually is. With true randomness, I could get the same result every day for a week and generally I'll want to mix things up a bit. It's also the case that I don't necessarily have time for my hobbies every day so I might have 2 days reading the same book and then go 3 days without reading anything; when I get to the 6th day the same book is randomly returned and I've missed out on the other books on the previous days. The only way around this is likely to remove results if my database sees I've spent concurrent days on the same item. I've also started restricting these choices to just 3 active items at a time as otherwise there are a few too many for the randomness to work nicely.
For logging time on projects, I have written a small app named “Time Well Spent” which I’ll be covering in a future side projects article. This data is then stored in my database where my API returns it for rendering the three activity rings in a similar way to the steps or exercise rings covered earlier.
Reading
I’m a big believer in the power of Idea Sex, the notion that by juggling several different thoughts together you’ll trigger more creative thinking. One way to do this is to read multiple books at the same time rather than reading in a linear fashion. As you may be able to guess from the tangent box above, I do this with books by having the app tell me what book I’m going to read today from the pool of books I’m currently reading. Beneath that I render the familiar three activity rings based on data I’ve logged via my “Time Well Spent” app and a 30 minute daily goal. I might also add a tally of how many books I’ve completed this year at some point but for now this is working well.
I listen to an audiobook on most of my evening walks and have recently begun tracking that data as well. It’s likely that I may try juggling multiple audiobooks and use a similar system to the above to pick one for me each day.
Games

The final screen was originally intended to be a bit of a sweetener to force me to do my stoutness routine every day; it tells me what video game I can play today. However, the amount of time I’m spending on video games has dropped fairly dramatically this year taken up by an increase in exercise and board games and (soon) a newborn baby. It’s no longer quite the pull it once was but I’ve managed to go through this routine every day so far this year so I’m not too concerned!
I’ve long tracked my gaming hobby as I used to run a website where I’d output my currently logged time and write reviews. I have a dedicated app for this purpose which I’m currently migrating into “Time Well Spent” but I also have some automated scripts to fetch my play time from services such as Steam and Xbox Live. In addition, I have a number of game collections which I can query such as “Currently Playing” and “To Play”. Using these, it was very easy to render the above page showing which game I’m allowed to play today but also giving me a secondary choice should I complete that game10.
I don’t use the activity rings to render the average data as I don’t have a goal for how much time I want to play for whereas steps, exercise, projects, and reading are all things I want to do a certain minimum of (or maximum in the case of alcohol).
Conclusion
As of the time of writing, I’ve spent 24.4 hours working on the Stoutness app from its origins as a printed daily report to the Apple TV app it is now complete with its suite of data providers from AppleScript apps to Shortcut workflows. Since using it daily from the start of the year I’ve had huge improvements in nearly all of the metrics I track; I’m sleeping longer, drinking less, exercising more, and reading more. I’ve also noticed big improvements in my health with my daily stretching leading to more flexibility11 and less aches and my average resting heart rate falling from ~70bpm to ~50bpm. Finally, I’ve lost over 22lbs since using the app which is just over 10% of my starting weight; that isn’t all attributable to this app but it has definitely helped by encouraging me to keep working on the various rings that I see every morning.
With a lot of side project apps I often think about how they can be adapted so others can make use of them but in this case what I have is a highly specialised app bespoke to me… and that’s OK! One of the great joys of being a developer is that you can take seemingly disparate data and merge it together into something just for you. Hopefully this article will inspire you to do likewise and learn some new coding skills whilst building something to help you in your own life.
-
Originally I would have done this using text-to-voice within an app but obviously it’s far easier to do it with Siri Shortcuts nowadays such as this Morning Routine by MacStories. Also, with HomePod update 14.2 it is now possible to say “What’s my update” and get something similar. ↩︎
-
I’d envisioned it being a little like the Personal Navigator that used to get printed on Disney Cruises showing you the schedule for the next day along with weather and other pertinent information. ↩︎
-
I despise rolling news and the culture of “information now” which is why I subscribe to a newspaper. I like to get a clear picture of the days news after the dust has settled rather than the incessant guessing at what is happening, about to happen, and the reaction of what just happened. Don’t get me started on “[public figure] is expected to say” with announcement previews. ↩︎
-
Well that’s not strictly true. There is a private API as data is synced to Things Cloud but I don’t fancy reverse engineering that! ↩︎
-
I used a meal planning app for a while but it was too much hassle to peck everything in on an iPad; now I just create an all-day event in a dedicated calendar. Why plan meals? Mostly because I’m terrible with letting food expire especially at the moment where recent food shortages at supermarkets have led to shorter shelf lives on several products. ↩︎
-
The real average was likely lower as there were 2 weeks in Walt Disney World where I was over 20k steps every day which would skew the averages. ↩︎
-
Rather than returning something normal like seconds, YouTube returns video durations in a format like PT24M49S which required an extra bit of working around. ↩︎
-
Obligatory “go check out my Pocket app” comment. ↩︎
-
18 minutes is a bit specific you might very well think but there’s a (sort of) good reason. My database first started logging games and these were done in a decimal format of hours to one decimal place as that’s how they came from Steam thus all of my gaming time is broken down into 6 minute chunks. When I added other items to the tracking system I kept the same format and this persisted when I started tracking how much time I was spending on personal projects; whilst I’d probably prefer it to be a goal of 15 or 20 minutes a day, it’s 18 so it can be represented cleanly as 0.3 hours in the database. I could make the ring show 20 minutes but then it would always be not quite full or over full and that seems messy. ↩︎
-
This is something I’ve also thought about adding for books but it’s slightly different as I know how long it will take me to finish a book — you can see how many pages are left — but it isn’t always obvious how much you have left of a game hence the need for a backup if I sit down and finish the current one in short order. ↩︎
-
At the start of the year I used to struggle to touch my knees with my elbows for the “Twisting Star” exercise as I just couldn’t bend that well; now I can do it with no problems. Hooray for basic levels of fitness! ↩︎
You can get exclusive updates on my projects and early access to my apps by joining my free newsletter, The Dodo Developer.
Exorbitantcy and the fight against the App Store 13 Aug 2020 1:00 PM (5 years ago)
Last month, outspoken CEO of Epic Games Tim Sweeney ranted about the App Store in an interview with CNBC:
Apple has locked down and crippled the ecosystem by inventing an absolute monopoly on the distribution of software, on the monetization of software. They are preventing an entire category of businesses and applications from being engulfed in their ecosystem by virtue of excluding competitors from each aspect of their business that they’re protecting.
If every developer could accept their own payments and avoid the 30% tax by Apple and Google we could pass the savings along to all our consumers and players would get a better deal on items. And you’d have economic competition.
Today, the rhetoric turned into action as Epic announced “direct payment on mobile”:
Today, we’re also introducing a new way to pay on iOS and Android: Epic direct payment. When you choose to use Epic direct payments, you save up to 20% as Epic passes along payment processing savings to you.
Currently, when using Apple and Google payment options, Apple and Google collect a 30% fee, and the up to 20% price drop does not apply. If Apple or Google lower their fees on payments in the future, Epic will pass along the savings to you.
Here’s how it looks in the UK version of the game1.
This is obviously in clear contravention of the App Store Review Guidelines2, specifically 3.1.1 In-App Purchase:
If you want to unlock features or functionality within your app, (by way of example: subscriptions, in-game currencies, game levels, access to premium content, or unlocking a full version), you must use in-app purchase. Apps may not use their own mechanisms to unlock content or functionality, such as license keys, augmented reality markers, QR codes, etc. Apps and their metadata may not include buttons, external links, or other calls to action that direct customers to purchasing mechanisms other than in-app purchase.
There isn’t a scenario where Epic doesn’t know this and it’s also highly unlikely that Apple accidentally approved an app update which made these changes. It’s probably the case that the code for this was included in the app binary but was disabled via a server switch until today. This means that Apple reviewed the app update, approved it, and then Epic changed the functionality which is also against the rules. This is more likely when you consider that the “what’s new” text for the update which is meant to outline what changed in the version doesn’t mention anything about these new payment options.
Regardless of where you stand on the issue of Apple’s payment cut, the action taken by Epic here is in clear violation of the platform guidelines leaving Apple with a difficult choice; remove Fortnite from the App Store or try and resolve this directly with Epic which will likely lead to every other aggrieved developer trying something similar.
Of course, within a few hours Apple had removed Fortnite from the App Store. This isn’t that much of a big deal as it is likely installed on millions of devices already and I doubt there are many more users flocking to the game at this stage. The app isn’t being forcibly removed from user’s devices and if you’ve ever downloaded it in the past you can still redownload it right now and get the current version. That said, it’s quite a striking image to see Apple remove what is undoubtedly one of the biggest, if not the biggest, games from their store especially when they were likely making millions of dollars from it thanks to their 30% cut of in-app purchases.
Now clearly Epic knew this was going to happen as minutes after the app was removed they were advertising a short film called “Nineteen Eighty-Fortnite3” (a clear callback to Apple’s famous Ridley Scott directed 1984 advert) and had filed a complaint for injunctive relief. In short, this is a well executed publicity stunt in which Epic knew they could goad Apple into removing them from the App Store.
From here on out it’s likely to be an escalating war between the two companies as Apple tries to explain that their rules have been broken and Epic tries to get them to completely change their rules. I don’t see a situation in which either company comes out looking particularly good nor do I see Apple suddenly doing an about turn on a business practice they’ve maintained since the App Store was launched back in 2008. And why should they? It’s their platform and the rules are clear and unambiguous; you can’t circumvent App Store review and you can’t offer your own payment system for these types of transactions. If Epic doesn’t like that, then they don’t have to sell their products on Apple devices. Nobody is entitled to run on any platform they want at the price that they want.
The thing that irks me most about this is that Epic are choosing to call Apple’s take an “exhorbitant [sic] 30% fee on all payments”. It can’t really be described as exorbitant when it’s been the industry standard for over a decade on multiple platforms including Google Play on Android and Steam on PC.
What I find exorbitant is the selling of costumes in a game for upwards of £20. I find it exorbitant that to purchase anything within Fortnite you first have to purchase an intermediary currency whereby you can’t ever get the exact amount you need. For example, here are the current prices on Fortnite today including the new 20% price drop they’ve added if you purchase direct from Epic:

And here are some of the items available for purchase:
Note that there is no equality between the two. If you want to buy a 1200 V-Buck “The Brat” outfit you’ll need to either pay £12.98 to buy two packs of 1000 V-Bucks (leaving you 800 spare) or pay £3.01 more to buy 2800 V-Bucks (leaving you 1600 spare). This is nothing new of course4 and is a well trodden psychological trick designed to give you a form of credit so purchases have less friction; I can thoroughly recommend Jamie Madigan’s excellent website “The psychology of video games” and his article on “The perils of in-game currency” if you want to find out more.
These kind of spending tricks are the worst aspects of the App Store along with the £99 gem bundles that are frequently seen in Match-3 timer games. Worse yet are the loot boxes that are there merely to get children hooked on gambling and which governments around the world are now starting to investigate. Fortnite isn’t as bad as these, but the fact that Epic was able to reduce it’s 30% cut to 12% on it’s PC storefront due to the huge profit they’d made on selling kids overpriced cosmetics in Fortnite isn’t exactly laudable.
Apple are by no means blameless in any of this either. They’ve created the store that allowed these high-price consumables to be commonplace and whilst they could easily improve developers lives by reducing the 30% fee they’ve chosen not to. I’ve long thought a good compromise would be some form of sliding scale along the lines of £0-10k is free, £10k-100k is 30%, then £100k+ is 15%. Of course, doing that means taking a huge financial hit to a multi-billion dollar business5.
For my part, I’d be glad to see a reduction in the 30% fee but I don’t want to see multiple store fronts being allowed on iOS; that there is only once place to get apps is a huge benefit to most users and developers. Whilst I doubt it will happen, I would dearly love for Apple to fight back by banning the selling of intermediary currencies in apps and instead only allowing direct purchases (i.e. that “The Brat” outfit would be clearly labelled as a £7.99 purchase). That sort of change would make genuine shock-waves through the industry and actually let something good come of this entire situation. It’s far more likely however that this is just going to end in endless courtroom battles and some form of App Store regulation.
-
I don’t know whether it’s A/B testing or a change since the update was released but in all of the promo shots of this on Epic’s blog the Apple payment system comes first but in the app Epic’s payment system is on top. ↩︎
-
They’re called guidelines but they’re rules. They really should be named as such. ↩︎
-
It even has today’s date on the screen within the video so this was clearly very well planned. ↩︎
-
And it’s something I’m guilty of myself. I ran a popular freemium game called WallaBee back in 2011 which had it’s own intermediate currency known as honeycombs. Of course, we provided plenty of ways for players to get these for free (usually by doing more exercise by travelling outside long before Pokémon Go came along) and the cheapest pack at £0.99 would be more than enough to buy any of the items in the game. If somebody spent over a certain amount within a certain time period, we’d reach out to them to make sure there weren’t any issues (in one case somebody was frequently gifted App Store cards from their work so they spent them all on our game). I had a blueprint for a more ethical in-app purchasing system for the long worked on v2 of the game but I ended up selling the company before I could put that in action. ↩︎
-
Whilst the App Store is small fry compared to the money Apple rakes in from hardware it is still a significant business. It’s very well to say “they’ve got so much money, they can reduce their fees” but, again, why should they? Part of being a successful business is not giving your money away! ↩︎
You can get exclusive updates on my projects and early access to my apps by joining my free newsletter, The Dodo Developer.
Side Project: (Feed Me) Seymour 28 Feb 2020 10:00 AM (6 years ago)
This is part of a series of blog posts in which I showcase some of the side projects I work on for my own use. As with all of my side projects, I’m not focused on perfect code or UI; it just needs to run!
I’ve cheated slightly this month by working on two side projects; a simple iOS app and a SwiftUI watchOS app. The Apple Watch app isn’t quite ready yet so instead I’m going to show you “Seymour”, an app that sends me push notifications when relevant articles are posted online.
The Problem
I’m travelling to The Happiest Place On Earth™ next week and as I’m staying in a Disney hotel I was able to book fastpasses for rides 60 days in advance. The issue is that a new ride, Mickey & Minnie’s Runaway Railway, is due to open whilst I’m there but fastpasses were not yet available to be booked as the opening date hadn’t been formally announced. When the announcement finally came, I didn’t see it for 5 hours as I was busy and hadn’t been checking my numerous theme park RSS feeds1. Fortunately I was still able to grab one of the remaining fastpasses for later in my holiday but I was determined that this shouldn’t happen again…
I use the excellent Feedbin service2 to keep up with my feeds and it turns out they have an app called Feedbin Notifier, but it doesn’t seem to work. It only supports one search term and the examples all use single words which didn’t give me total faith that the phrase “rise of the resistence OR space 220 OR fastpass” would parse correctly. There was also no detail on how regularly the checking was done and whilst I managed to get a notification for the term “apple” I couldn’t get it to work for much else. As I couldn’t trust it would do what I needed it to, I decided it was quicker and easier to just build it myself.
“Couldn’t you just use Google News notifications?”. I already do for some things3 but it’s far too slow for my use case. The types of articles I’m interested in require me to act within around 15 minutes so too slow for Google News which typically takes 12-24 hours to send a notification.
The Name
Like most other developers, I start a side project with the most important decision; choosing a name. Sometimes this can be a days long process but for this app it was relatively quick. I wanted to do some kind of play on words with Feedbin and was looking at things like “Feed Trash Can” or “Feed Trough” but I didn’t really like any of them. I was saying them out loud in bed whilst working on the app and my wife instinctively said “Feed Me Seymour”. I shortened it down to just “Seymour” and decided this was a perfect name as it was letting me “See More” of the things I wanted to see.
As the app isn’t going to be released publicly I did a Google Image Search for “Feed Me Seymour” in the hope of finding some sort of silhouetted version of the singing plant. Instead I found this Mario crossover at Snorgtees which was perfect.
Feed Me
The iOS app is ridiculous simple so I’m not going to spend too much time describing that. It consists of a table view listing my search terms and each row can be swiped to delete the term. The + button in the top right presents a UIAlertController with a text field for adding a search term. The fetch, add, and delete commands are all sent to an incredibly basic PHP API I wrote which syncs to my MySQL database.
The real work is to fetch the latest feeds from my Feedbin account and then search each article for any matching text strings:
$pdo = new PDO("mysql:charset=utf8mb4;host=" . $db_host . ";dbname=" . $db_name, $db_user, $db_pass);
$pdo->setAttribute(PDO::ATTR_ERRMODE, PDO::ERRMODE_EXCEPTION);
$pdo->setAttribute(PDO::ATTR_DEFAULT_FETCH_MODE, PDO::FETCH_ASSOC);

$headers = [];
$url = 'https://api.feedbin.com/v2/entries.json';
$ch = curl_init($url);
curl_setopt($ch, CURLOPT_FOLLOWLOCATION, true);
curl_setopt($ch, CURLOPT_RETURNTRANSFER, true);
curl_setopt($ch, CURLOPT_SSL_VERIFYPEER, false);
curl_setopt($ch, CURLOPT_TIMEOUT, 30);
curl_setopt($ch, CURLOPT_USERPWD, 'ben@bendodson.com:keepitsecretkeepitsafe');
curl_setopt($ch, CURLOPT_HTTPHEADER, ['If-None-Match: \''.file_get_contents('etag.txt').'\'']);
curl_setopt($ch, CURLOPT_HEADERFUNCTION,
  function($curl, $header) use (&$headers)
  {
    $len = strlen($header);
    $header = explode(':', $header, 2);
    if (count($header) < 2) // ignore invalid headers
      return $len;

    $headers[strtolower(trim($header[0]))][] = trim($header[1]);

    return $len;
  }
);
$json = curl_exec($ch);
$info = curl_getinfo($ch);
curl_close($ch);

file_put_contents('etag.txt', $headers['etag'][0]);

$stmt = $pdo->prepare('select * from keywords');
$stmt->execute();
$keywords = array_column($stmt->fetchAll(), 'phrase');

$ids = [];
$entries = [];
$array = json_decode($json);
$countStmt = $pdo->prepare('select count(id) as total from entries where id = :id');
foreach ($array as $entry) {
    $countStmt->execute(['id' => $entry->id]);
    $count = (int)$countStmt->fetch()['total'];
    if ($count) {
        continue;
    }

    foreach ($keywords as $keyword) {
        if (stripos($entry->title, $keyword) !== false || stripos($entry->content, $keyword) !== false) {
            $entries[] = $entry;
            break;
        }
    }

    $ids[] = $entry->id;
}

$notificationStmt = $pdo->prepare('insert into notifications (title, message, url, created_at) values (:title, :message, :url, :created)');
$idStmt = $pdo->prepare('insert into entries (id) values (:id)');

$pdo->beginTransaction();
foreach ($ids as $id) {
    $idStmt->execute(['id' => $id]);
}
$pdo->commit();

foreach ($entries as $entry) {
    $notificationStmt->execute(['title' => $entry->title, 'message' => $entry->summary, 'url' => $entry->url, 'created' => date('Y-m-d H:i:s')]);

    $data = ["app_id" => "my-onesignal-app-id", "contents" => ["en" => $entry->summary], "headings" => ["en" => $entry->title], "included_segments" => ["All"], "data" => ["url" => $entry->url]];
    $ch = curl_init('https://onesignal.com/api/v1/notifications');
    curl_setopt($ch, CURLOPT_CUSTOMREQUEST, "POST");
    curl_setopt($ch, CURLOPT_POSTFIELDS, json_encode($data));
    curl_setopt($ch, CURLOPT_RETURNTRANSFER, true);
    curl_setopt($ch, CURLOPT_HTTPHEADER, ['Content-Type: application/json', 'Authorization: Basic [OBFUSCATED]']);
    $response = curl_exec($ch);
    curl_close($ch);

}
Feedbin provide an API for fetching the latest articles from all of your feeds. It has support for ETag caching so I store the latest tag to avoid unnecessary loading on their end as this script will run every 60 seconds.
Once the articles are fetched, I ignore any that I’ve already seen before (worked out by storing the ids in my database after each run) and then proceed to do a case insensitive check for my keywords against both the title and content of the article. If there are any matches, these get added to an array which is later looped over in order to send a push notification via OneSignal containing the title, article summary, and the URL.
This runs on a 1 minute CRON job so in theory I should get alerted of any matching articles within 60 seconds of them being published. I don’t know how often Feedbin polls the various RSS feeds I track but in practice I have found that I’m getting notified almost immediately so evidently they’re doing some form of dark magic.
Viewing the content
Once the notification is delivered, I thought it would be a nice bonus to be able to tap to open up the article in a browser. It turns out that the OneSignal SDK can do this automatically if you send a “url” parameter as part of your Push Notification request but it has a few issues; there’s a short lag between the app opening and the browser being shown, the controller is within a modal dialogue that can only be dismissed by swiping at the top of the page (tricky on a big phone), and it’s using either a UIWebView or a WKWebView which means there is no support for content blockers, no Reader View, and no easy way to open the page in Safari or other apps. The solution is to send the URL as part of the data payload and parse it myself within the app to open an SFSafariViewController:
Can you see the difference in the image above? With the webview provided by OneSignal we can just see the start of the title of the article4 obscured by the home indicator, and this is on the Max-sized iPhone! The SFSafariViewController in Reader View is far superior showing the full title, the first paragraph, and an image. It also loaded faster thanks to the support for content blockers and I have easy access to open this in Safari or share it along with controls for changing fonts, etc.
Conclusion
This whole thing took about 2 hours of which the majority was fiddling around with ETags. At the moment I have only two search terms set up:
-
Rise of the Resistance: Quite possibly the best theme park attraction ever made, Rise of the Resistance opened in December 2019 and since then has been using a virtual queueing system which typically gets booked out for the day within an hour. Whilst I don’t expect this is going to be moved to FastPass any time soon, I keep this notification just in case!
-
Space 220: This is a new restaurant in Epcot that was supposed to be open last year and was then rumoured to be opening in February. That still hasn’t happened but it’s feasible the opening will happen whilst I’m there and I definitely want to be one of the first to book a reservation.
Whilst I could have set up a screen scraper of some sort to monitor these pages for changes5, I much prefer operating on top of RSS as it tends to be that the feeds I follow will post updates ridiculously quickly and are likely more reliable than tracking HTML changes. It’s also more flexible as I’m sure there will be things in future that I’ll want to monitor in this way. For example, I tested the app a few weeks ago to get notified when Pokémon HOME was released on the App Store.
As ever, I hope this will inspire you to work on your own side projects! Next month I’ll be talking about the watch app that has ended up taking a lot longer than I’d originally anticipated…
-
I’ve blogged about this before but RSS is how I consume nearly everything I read online. Twitter doesn’t even come close. With RSS you can subscribe to nearly any website that publishes articles and get them all in a nice app with no ads, no Javascript, and no other superfluous crap. At the time of writing, I subscribe to around 500 different feeds encompassing everything from theme park news and video game updates to Swift developer blogs and philosophy articles. ↩︎
-
In conjunction with the Reeder apps on iOS and macOS. ↩︎
-
I use Google News Notifier to see if my name comes up anywhere and also to keep tabs on a court case I sat on as part of Jury Duty. ↩︎
-
Disney Food Blog is one of the best theme park sites I follow but their website is very hard to view on mobile hence the need for Reader View. Whilst it’s more of a necessity for that page, I find myself using Reader View for most websites as it is nearly always far better. ↩︎
-
I did do this when the AirPods were first announced; fetch the HTML of the store page every five minutes and then send a notification when it changed so I could jump in and buy a pair. ↩︎
You can get exclusive updates on my projects and early access to my apps by joining my free newsletter, The Dodo Developer.
Side Project: Sealed 1 Feb 2020 2:00 AM (6 years ago)
This is part of a series of blog posts in which I showcase some of the side projects I work on for my own use. As with all of my side projects, I’m not focused on perfect code or UI; it just needs to run!
I am a huge advocate of side projects, small apps that let you test an idea in isolation usually for your own personal use. Over the course of my 14 year career as a software developer I’ve always tried to encourage new developers to work on side projects as a way of honing their craft. There are three reasons for this: firstly, building something for yourself is far more rewarding than building something for a client; secondly, it gives you an excuse to try out new technologies or methodologies that can then improve future client work without running the risk of derailing a major project1; and thirdly, it’s a great way of building up a portfolio if you’re starting out. I’ve always built bizarre little side projects and apps ranging from an iPad app to manage my wine collection to various PHP scripts that extract my time playing video games on Steam. Sometimes these side projects turn into full apps such as Music Library Tracker and Pocket Rocket but usually they are highly bespoke utilities for me that nobody else gets to see. Until now…
This year I’ve decided to start a new series of articles where I’ll show a side project I’ve built over the past month. Today’s article is all about “Sealed”, an iPad app I build in January 2020 to simulate the opening of Magic the Gathering booster packs.
I’m assuming that most people reading this article have little to no interest in Magic The Gathering and so I’m not going to explain that side of it in much detail. Suffice to say that the game consists of you opening blind packs containing 15 cards that you can play with. In sealed play, you open 6 of these blind packs (named “boosters”) and then build a 40 card deck out of the cards you opened. The idea for this app is that it will simulate this process allowing me and my good friend John (who lives in Sweden) to open 6 packs each and build a deck with the random contents within. We can then export them to the game Tabletop Simulator so we can play with them in a realistic 3D physics-based environment…
Tabletop Simulator even supports VR so we can simulate playing a few rounds in the same room even though we’re around 870 miles apart.
As with all of the side projects I’m going to be working on I’m not focused on perfect code or UI; it just needs to work. That said, I did spend a bit more time prettying this one up as I wasn’t the sole user.
A brief tour
The iPad app first does a brief download of data before opening on a selection screen that allows you to pick which expansion you want to play2. You can also choose to load one of your previously created decks.
Each physical booster pack has a specific breakdown of cards based on rarity usually comprising of 10 commons, 3 uncommons, 1 rare or mythic rare, and 1 basic land. The mythic rare is the tricky piece as there is a 1:8 chance it will replace the rare card. As I wanted things to be more “fair” in this app, I’ve fudged the numbers such that you’ll always get 5 rare cards and 1 mythic rare card; this avoids the issue (which could happen in a completely random system) of somebody ending up with far more mythic rares.
As these rare cards are usually the best of the bunch, these are shown immediately after the contents of the packs have been decided by the app:
Once you press continue, you are taken into the deck building interface with those 6 cards automatically added to your deck:
The bulk of the interface is dedicated to showing the cards you’ve opened with a number of diamonds above to show how many copies you have available; these fill in when the cards are added to the deck on the right hand side and will fade to 50% opacity if you’ve used every copy available. The top right hand section shows a “mana curve” (which is just a graph for showing the various costs of the cards in the game) along with a break down of the various types of card you’ve selected (as typically you want more creatures than anything else). Underneath is your deck in a scrollable list with a design mimicking the top of each card showing both the name and mana cost.
If you tap on an item in the deck list or long press on a card in the card picker then you’ll get a blown up version of the card which is easier to read. You’ll also be able to use the plus and minus buttons to add or remove the card from your deck (although if you only have one copy you can just tap to add them and remove them directly from the card picker as this is nearly always quicker).
The final two items are the sample hand and export; the former shows you a random draw of 7 cards from your deck to simulate the first action you take in the game3 whilst the latter generates the tiled image you’ll use to import the deck into Tabletop Simulator.
Reusing code
In total this app took around 6 hours to build mostly thanks to a huge amount of reusable code I could make use of from previous side projects.
I’m a big fan of Magic The Gathering and so last year I built myself a private app called “Gatherer” that gives me access to lots of information about each card thanks to the Scryfall API. For that app I wanted everything to work offline so I duplicated the data into my own hosted database and then made a single request when online to download all of the data and store it on the device in a Realm database. I used the exact same system here with the only new functionality being a new database table to list which expansions I wanted to be available within the app4. Within a few minutes of starting I had a local database and access to all of the card information I needed.
The next major piece of reused code was the design of the card cells in the deck creator. I wanted to mimic the headings of the cards in a similar way to Magic The Gathering Arena, an online version of the card game. The heading should show the title of the card (which will shrink as necessary to avoid word wrapping), the mana cost, and the border should be the colour of the card using a gradient if necessary:

Fortunately I had already built this exact design for another side project of mine, an iPad app to control the overlay for my Twitch stream:
Nearly everything in the above screenshot aside from the game and webcam is powered by an iPad app plugged into my PC capture card via HDMI. It was a fun experience to play with the external window APIs but it also allowed me to do animations to show off the deck list I’m currently playing with on MTG Arena; the sidebar scrolls every minute or so to reveal the full list and I can trigger certain animations from my iPad to show off a particular card in more detail. In any case, you’ll notice the deck list table cells on the right hand side are identical to the ones in this Sealed app. They are fairly straightforward with the most complex piece being some string replacement to convert a mana cost such as {1}{U}{U} into the icons you see.
The lesson here is that huge chunks of UI or functionality can be reused from side projects into your client projects saving you development time and speeding up your learning. As a practical example, I’m currently working on an app which requires a Tinder-style card swiping system; whilst I could embed an unknown 3rd party component which may have bugs and not be updated in future, I can instead use a card swiping system I built for a music-based side project a year ago. This saved me a significant amount of time and resulted in me being able to give a better price to my client than I might otherwise have been able to.
Random Aside
One of the areas I had a lot of fun with in this project was putting together the randomisation for opening packs. There are very specific rules when it comes to Magic packs with a set number of cards in specific rarity slots, no duplication unless there is a foil card5, and some weird edge cases for certain expansions. Here is the full code for this particular feature:
func sealTheDeal(set: String) -> Deck {
    guard let expansion = realm.object(ofType: Expansion.self, forPrimaryKey: set) else { abort() }
    let locations = expansion.locations.sorted(by: { Int($0.key) ?? 0 < Int($1.key) ?? 0})
    let max = Int(locations.first?.key ?? "0") ?? 0
    let cardsInSet = realm.objects(Card.self).filter("set = %@ and number <= %d", set, max)

    var mythics = cardsInSet.filter("rarity = %@", "mythic")
    var rares = cardsInSet.filter("rarity = %@", "rare")
    var uncommons = cardsInSet.filter("rarity = %@", "uncommon")
    var commons = cardsInSet.filter("rarity = %@ AND NOT (typeLine CONTAINS[c] %@)", "common", "basic land")

    switch set {
    case "dom":
        uncommons = uncommons.filter("NOT (typeLine CONTAINS[c] %@)", "legendary")
    case "grn", "rna":
        commons = commons.filter("NOT (name CONTAINS[c] %@)", "guildgate")
    case "war":
        mythics = mythics.filter("NOT (typeLine CONTAINS[c] %@)", "planeswalker")
        rares = rares.filter("NOT (typeLine CONTAINS[c] %@)", "planeswalker")
        uncommons = uncommons.filter("NOT (typeLine CONTAINS[c] %@)", "planeswalker")
    default:
        break
    }


    let mythicIndex = Int.random(in: 0..<6)

    var boosters = [[Card]]()
    for boosterIndex in 0..<6 {
        var cards = [Card]()
        var commonPool = Array(commons.map { $0 })
        for _ in 0..<10 {
            guard let card = commonPool.randomElement(), let index = commonPool.firstIndex(of: card) else { continue }
            cards.append(card)
            commonPool.remove(at: index)
        }

        var uncommonPool = Array(uncommons.map { $0 })
        for _ in 0..<3 {
            guard let card = uncommonPool.randomElement(), let index = uncommonPool.firstIndex(of: card) else { continue }
            cards.append(card)
            uncommonPool.remove(at: index)
        }

        let rareAndMythicRarePool = boosterIndex == mythicIndex ? mythics : rares
        if let card = rareAndMythicRarePool.randomElement() {
            cards.append(card)
        }

        switch set {
        case "dom":
            if let card = cardsInSet.filter("rarity = %@ AND (typeLine CONTAINS[c] %@)", "uncommon", "legendary").randomElement() {
                cards[cards.count - 2] = card
            }
        case "grn", "rna":
            if let card = cardsInSet.filter("name CONTAINS[c] %@", "guildgate").randomElement() {
                cards.append(card)
            }
        case "war":
            let uncommonChance = boosterIndex == mythicIndex ? 92 : 78
            if Int.random(in: 1...100) <= uncommonChance {
                if let card = cardsInSet.filter("rarity = %@ AND (typeLine CONTAINS[c] %@)", "uncommon", "planeswalker").randomElement() {
                    cards[cards.count - 2] = card
                }
            } else {
                if let card = cardsInSet.filter("rarity = %@ AND (typeLine CONTAINS[c] %@)", boosterIndex == mythicIndex ? "mythic" : "rare", "planeswalker").randomElement() {
                    cards[cards.count - 1] = card
                }
            }
        default:
            break
        }

        boosters.append(cards)
    }

    let boosterCards = boosters.flatMap({$0})
    let topCards = boosterCards.filter { return $0.rarity == "rare" || $0.rarity == "mythic" }

    let deck = Deck()
    deck.id = NSUUID().uuidString
    deck.expansion = expansion
    deck.topCards.append(objectsIn: topCards)

    let cards = boosterCards.sorted(by:{ $0.number < $1.number })
    var currentCard: Card?
    var quantity = 0
    for card in cards {
        if card != currentCard && currentCard != nil {
            let deckCard = DeckCard()
            deckCard.card = currentCard
            deckCard.quantityAvailable = quantity
            deck.allCards.append(deckCard)
            quantity = 0
        }

        currentCard = card
        quantity += 1
    }

    let deckCard = DeckCard()
    deckCard.card = currentCard
    deckCard.quantityAvailable = quantity
    deck.allCards.append(deckCard)

    deck.allCards.append(objectsIn: expansion.lands())

    let topIdentifiers = Array(deck.topCards.map({$0.id}))
    for index in 0..<deck.allCards.count {
        let card = deck.allCards[index]
        if topIdentifiers.contains(card.card?.id ?? "") {
            for _ in 0..<card.quantityAvailable {
                deck.add(card)
            }
        }
    }

    return deck
}
Essentially I take the following steps:
- Build an array containing the cards at each rarity level
- Remove any edge cases for specific expansions (i.e. removing Guildgates from Guilds of Ravnica)
- For each booster pack, loop through each array randomly selecting a card and removing it from the pool to avoid duplication
- For Dominaria (“dom”), change one of the uncommon cards to be a Legendary card
- For Guilds of Ravnica (“grn”) and Ravnica Allegiance (“rna”) add a random Guildgate card.
- For War of the Spark (“war”), replace one of the uncommon, rare, or mythic rare cards with a random Planeswalker card of the same rarity
- Once the cards for each booster are known, group the 6 rare / mythic rare cards into their own array for UI simplicity and then bundle everything together in a nice object that groups any duplicates found across the packs
There is nothing particularly difficult about the above but it was still fun the first time I got it working to see my console filling up with cards as if I’d opened a physical pack!
Exporting
The “killer feature” of the app is the ability to export cards to Tabletop Simulator, a task that is surprisingly easy. To import custom cards, all you need to do is supply a 4096x3994px image that comprises of 10 columns and 7 rows. Here’s an example image of a 40 card deck that was exported from Sealed which uses the top 4 rows and leaves the remaining 3 blank (although it will use them if you build a deck larger than 40 cards although this isn’t usually recommended for sealed play).
In order to generate the large image I simply render UIImageViews onto a UIView that is the correct size, loop through each image and download it, and then use the snapshotting APIs to capture the view as a UIImage ready for exporting as a JPEG that usually weighs in at around 3MB. Here’s the full code:
import UIKit
import SDWebImage

class TabletopSimulatorDeck: UIView {

    static let cardWidth = 410
    static let cardHeight = 571
    static let maxColumns = 10

    var cards = [Card]()
    private var imageViews = [UIImageView]()
    private var downloadedImageCount = 0

    class func instanceFromNib() -> TabletopSimulatorDeck {
        return Bundle.main.loadNibNamed("TabletopSimulatorDeck", owner: nil, options: nil)?.first as! TabletopSimulatorDeck
    }

    static var fileURL: URL {
        return FileManager.default.urls(for: .documentDirectory, in: .userDomainMask).first!.appendingPathComponent("deck.jpg")
    }

    func export(onCompletion completionHandler: @escaping (Data?) -> Void) {
        downloadedImageCount = 0
        var row = 0
        var column = 0
        for _ in cards {
            let rect = CGRect(x: column * TabletopSimulatorDeck.cardWidth, y: row * TabletopSimulatorDeck.cardHeight, width: TabletopSimulatorDeck.cardWidth, height: TabletopSimulatorDeck.cardHeight)
            let imageView = UIImageView(frame: rect)
            imageViews.append(imageView)
            addSubview(imageView)

            column += 1
            if column == TabletopSimulatorDeck.maxColumns {
                column = 0
                row += 1
            }
        }

        for index in 0..<cards.count {
            let card = cards[index]
            let imageView = imageViews[index]
            imageView.sd_setImage(with: card.url(for: .card), placeholderImage: nil, options: .retryFailed) { (_, _, _, _) in
                self.downloadedImageCount += 1
                self.render(onCompletion: completionHandler)
            }
        }
    }

    func render(onCompletion completionHandler: @escaping (Data?) -> Void) {
        if downloadedImageCount != cards.count {
            return
        }

        DispatchQueue.main.async {
            UIGraphicsBeginImageContextWithOptions(self.bounds.size, true, 1.0)
            self.layer.render(in: UIGraphicsGetCurrentContext()!)
            let image = UIGraphicsGetImageFromCurrentImageContext()
            UIGraphicsEndImageContext()

            if let image = image, let data = image.jpegData(compressionQuality: 0.75) {
                try? data.write(to: TabletopSimulatorDeck.fileURL, options: .atomicWrite)
                completionHandler(data)
                return
            }

            completionHandler(nil)
        }
    }
}
It’s a dirty solution and it could possibly cause some memory issues on a really old iPad, but I don’t need to worry about that for this project where both devices that will use the app are more than capable of rendering all of this in milliseconds.
Once the image is generated, I use a standard UIActivityViewController to allow for simple sharing. One annoying gotcha that catches me every time is that the controller will provide a “save image” button that you can use to save to your photo library but the app will crash when this is pressed unless you’ve added a NSPhotoLibraryAddUsageDescription key to your info.plist. I’m not sure why Xcode can’t flag this in advance or why this requirement can’t be removed bearing in mind the user is making an informed action.
Conclusion
John and I have played three games of sealed using this app so far and I’m really pleased with how it’s turned out. I can build a deck in around 10 minutes whereas usually it would take 30-45 minutes using real packs. The exports work great in Tabletop Simulator and I can see us using this for a long time to come. I’ll likely add some extra functionality over time such as the ability to duplicate decks or updating the artwork to use the new showcase variants that are super rare but for now this app is definitely a success.
Whilst on the face of it this would be easy to publish to the App Store, the legal and moral implications prevent me from doing so. I’ve spent literally thousands of pounds on this game both in physical cards and digital ones on MTG Arena so I don’t have any qualms about using the artwork to play with a friend I otherwise wouldn’t be able to play with. That said, it’s very different doing something like this for your own private use than it is to publish it and enable it for others who may not have made the same investment in the real world product. For that reason it’s unlikely this will ever be available for wider consumption.
For February’s side project I’m working on something a bit different that will work as a form of learning for me; a standalone watchOS app built with SwiftUI! Be sure to check back next month to learn more about that project and to see how it ended up…
-
“Oh that new framework looks good, I’ll try that in my next project” - Nope! I’ve learned the hard way that you do not want to use your clients as a guinea pig for the latest thing. By way of example, look at SwiftUI announced at WWDC 2019. You should not be using that in a client project, but it would be perfect in a side project. ↩︎
-
There are around 3 expansions each year and you typically play sealed within one expansion i.e. you’ll get 6 packs of Guilds of Ravnica or 6 packs of Throne of Eldraine but you wouldn’t build a deck with 3 packs from each. This is all due to the careful balancing the games creators do to ensure that things stay relatively fair within these sealed games. ↩︎
-
This is an important tool as it allows you to very quickly perform a few draws to see if the cards you are getting are balanced, especially when it comes to mana costs, lands, and colours. ↩︎
-
My database is updated every morning in order to get the latest pricing information but that means I often get partial expansions if a new one is in the middle of being unveiled. This can last a few weeks so I needed the ability to hide certain expansions until they were ready for playing. ↩︎
-
Although I made things easier by ignoring foil cards. Usually they replace a common card to give you a random card from the set with a shiny foil treatment but again this can lead to an imbalance as my opponent might end up with 3 mythic rare cards if they get lucky with the randomiser. ↩︎
You can get exclusive updates on my projects and early access to my apps by joining my free newsletter, The Dodo Developer.
Revival 25 Oct 2019 3:00 AM (6 years ago)
I’m pleased to announce the release of a new client app I’ve been working on over the past few months: Revival, truly uncomplicated task planning for everyone:
I was originally contacted by Wonderboy Media with the intention of working on updating their existing reminders app which was looking a little dated and had some issues with broken functionality. After a detailed examination, it was determined that a complete rebuild was needed in order to make a sustainable v2.0 which would last as a solid foundation for many years to come. I worked as the sole iOS developer on the project over many months1 as I got to grips with what was a deceptively complex project including such things as local notifications (with snoozing), timezones, locations, subtasks, priorities, lists, tags, notes, files, contacts, subscriptions, integration with the iOS Reminders app, and Siri support! In addition, I completely redesigned the app giving it a far more modern look and feel complete with fluid gestures, sounds, and haptics. I even redesigned the app icon!2 It should also go without saying that the app was built entirely in Swift 5 using AutoLayout to ensure a flexible design from the 4.7” iPhone SE right up to the 12.9” iPad Pro including the various adaptations that can occur when multitasking on iPadOS.
One of the most complicated pieces was a desire for syncing not only between devices but also via sharing and sending tasks between users. I’m particularly proud of the seamless and accountless syncing system within the app which uses your CloudKit identifier along with Firebase in order to provide real time syncing between devices – you can literally complete a task on your iPhone and see it update in milliseconds on your iPad! In addition, everything is stored locally on device using Realm in order to keep things incredibly fast and to provide advanced searching capabilities. When it came to sharing a task with another user, I removed the old system which required creating user accounts and sending codes back and forth and instead created a system which provides a simple URL; when opened, the app pulls all of the information you need quickly and securely to either create a copy or grant access to the shared task.
Another complex piece revolved around theming in that users can change both the overall colour of the app and also switch between a light and dark mode. This required a custom solution for being able to change all of the UI on a whim whilst also recognising that iOS 13 was around the corner and would likely include a dark mode. The work I put in paid off and I was able to easily add an “automatic” mode that would change the theme between light and dark based on the iOS preferences3 when iOS 13 was launched.
Whilst there are many aspects to this project that provided additional complications4, one of the most satisfying to work on was the localisation of the app to eight additional languages. We worked with Babble-on in order to get the required translation files which were easily loaded into the app but I also wanted to improve the experience on the App Store. The previous versions of the app had custom artwork for each language with translated text above but showed the same English interface. I wanted to automate this and improve it, especially as Apple required screenshots for four devices across nine languages. The solution was to use the XCTest framework (along with a custom data loader) to open the app at various pages and take snapshots; these were then used by the deliver and snapshot parts of Fastlane to wrap them in a device frame and add the localised text. The result is 180 screenshots each with localised text, the correct frame for the targeted device, and a localised screenshot.
I really enjoyed working with Wonderboy Media on this project and having the opportunity to work on such a complex project. I’m incredibly pleased with both the design and development work that I’ve put into this project and I’m excited to see how it grows in future.
You can download Revival on the App Store for free and subscriptions are available to gain access to advanced features.
-
Another developer has now been added to the team to help with a number of exciting new updates which will be rolling out over the next few months. ↩︎
-
As a reminders app it’s almost law that you have to use a tick but I wanted to have a homage to the skeuomorphic clock-based interface of the old app as well. My solution was to make a clock face with the tick rendered from the hands. ↩︎
-
This is far more complex than it seems as if you choose to have iOS change between light and dark automatically based on the time of day then it is possible for the theme to change whilst you are in the middle of using the app; every view needed to be able to handle the possibility that the underlying theme could change at any second rather than just occurring from the settings panel. ↩︎
-
Auto renewable subscriptions and supporting promoted in-app purchases, getting around the 64-notification limits of the UNUserNotificationCentre when you have 300 notifications to load in, how to efficiently deal with syncing contact information when it could be different on each device, etc. Don’t even talk to me about recreating the entirety of the custom repeat options from the iOS Reminders app! ↩︎
You can get exclusive updates on my projects and early access to my apps by joining my free newsletter, The Dodo Developer.
Gyfted 15 Sep 2019 3:00 AM (6 years ago)
I’m pleased to announce the release of a new client app I’ve been working on recently: Gyfted, the free universal wishlist.
I worked as the only iOS developer on the project working remotely from the UK. The app provides a free and easy way for users to create their own wishlists and populate them with items from a data driven explore page or by manually entering details. It is also possible to add an item via a web link (including via a system wide share sheet) which is then used to automatically add metadata including images, descriptions, and more.
Whilst I originally started building the app using Cloud Firestore from Firebase, this quickly proved to be insufficient for the ways in which we wanted to generate the various social feeds and explore pages. To remedy this, I built a custom server backend and API including such features as feed generation, friend requests, likes, shares, and profile data collection.
The beautiful design was provided by Gyfted but I did need to make a number of adjustments to ensure it would scale correctly on all devices from the iPhone 4 up to the iPhone 11 Pro Max. The app is written entirely in Swift 5 and there are several pieces of swiping interactivity and subtle animated bounces to make the app feel right at home in the modern iOS ecosystem. Other Apple technologies used include push notifications, accessing the address book1, and a full sharing suite powered by Universal Links allowing the app to be opened directly to specific sections of the app or redirecting a user to the App Store if they don’t have the app installed.
I really enjoyed working with Gyfted on this project and having a chance to build both an interesting wishlist app and the server infrastructure to support it. You can download Gyfted on the App Store for free and learn more about it at gyfted.it.
-
Done in a secure and privacy-focussed way. The user doesn’t need to give full access to their contacts or provide access permissions. ↩︎
You can get exclusive updates on my projects and early access to my apps by joining my free newsletter, The Dodo Developer.
%20which%20is%20then%20used%20to%20automatically%20add%20metadata%20including%20images,%20descriptions,%20and%20more.%3C/p%3E%0A%0A%3Cp%3EWhilst%20I%20originally%20started%20building%20the%20app%20using%20Cloud%20Firestore%20from%20Firebase,%20this%20quickly%20proved%20to%20be%20insufficient%20for%20the%20ways%20in%20which%20we%20wanted%20to%20generate%20the%20various%20social%20feeds%20and%20explore%20pages.%20To%20remedy%20this,%20I%20built%20a%20custom%20server%20backend%20and%20API%20including%20such%20features%20as%20feed%20generation,%20friend%20requests,%20likes,%20shares,%20and%20profile%20data%20collection.%3C/p%3E%0A%0A%3Cp%3EThe%20beautiful%20design%20was%20provided%20by%20Gyfted%20but%20I%20did%20need%20to%20make%20a%20number%20of%20adjustments%20to%20ensure%20it%20would%20scale%20correctly%20on%20all%20devices%20from%20the%20iPhone%204%20up%20to%20the%20iPhone%2011%20Pro%20Max.%20The%20app%20is%20written%20entirely%20in%20Swift%205%20and%20there%20are%20several%20pieces%20of%20swiping%20interactivity%20and%20subtle%20animated%20bounces%20to%20make%20the%20app%20feel%20right%20at%20home%20in%20the%20modern%20iOS%20ecosystem.%20Other%20Apple%20technologies%20used%20include%20push%20notifications,%20accessing%20the%20address%20book%3Csup%20role%3D%22doc-noteref%22%3E%3Ca%20href%3D%22https://bendodson.com/%23fn:addressprivacy%22%20rel%3D%22footnote%22%3E1%3C/a%3E%3C/sup%3E,%20and%20a%20full%20sharing%20suite%20powered%20by%20Universal%20Links%20allowing%20the%20app%20to%20be%20opened%20directly%20to%20specific%20sections%20of%20the%20app%20or%20redirecting%20a%20user%20to%20the%20App%20Store%20if%20they%20don%E2%80%99t%20have%20the%20app%20installed.%3C/p%3E%0A%0A%3Cp%3EI%20really%20enjoyed%20working%20with%20Gyfted%20on%20this%20project%20and%20having%20a%20chance%20to%20build%20both%20an%20interesting%20wishlist%20app%20and%20the%20server%20infrastructure%20to%20support%20it.%20You%20can%20download%20%3Ca%20href%3D%22https://apps.apple.com/us/app/gyfted-the-universal-wishlist/id1475349910%22%3EGyfted%20on%20the%20App%20Store%3C/a%3E%20for%20free%20and%20learn%20more%20about%20it%20at%20%3Ca%20href%3D%22https://gyfted.it%22%3Egyfted.it%3C/a%3E.%3C/p%3E%0A%0A%3Cdiv%20role%3D%22doc-endnotes%22%3E%0A%20%20%3Col%3E%0A%20%20%20%20%3Cli%20role%3D%22doc-endnote%22%3E%0A%20%20%20%20%20%20%3Cp%3EDone%20in%20a%20secure%20and%20privacy-focussed%20way.%20The%20user%20doesn%E2%80%99t%20need%20to%20give%20full%20access%20to%20their%20contacts%20or%20provide%20access%20permissions.%C2%A0%3Ca%20href%3D%22https://bendodson.com/%23fnref:addressprivacy%22%20role%3D%22doc-backlink%22%3E%26%238617;%26%23xfe0e;%3C/a%3E%3C/p%3E%0A%20%20%20%20%3C/li%3E%0A%20%20%3C/ol%3E%0A%3C/div%3E%0A%3Cp%3EYou%20can%20get%20exclusive%20updates%20on%20my%20projects%20and%20early%20access%20to%20my%20apps%20by%20joining%20my%20free%20newsletter,%20%3Ca%20href%3D%22https://www.thedododeveloper.com/%22%3EThe%20Dodo%20Developer%3C/a%3E.%3C/p%3E)
Introducing the Apple TV Shows & Movies Artwork Finder 19 Aug 2019 2:30 AM (6 years ago)
With iOS 12.3, Apple unveiled a new design for the TV app featuring an industry unstandard 16:9 aspect ratio for cover artwork. This new design was used for both TV shows and movies which had been 1:1 squares and 3:2 portraits respectively. Apple doubled down on this design with the preview of macOS Catalina over the summer and the imminent removal of iTunes.
This new art style is notable for a few reasons. Firstly, it is almost the exact opposite to every other platform that uses portrait style artwork. Secondly, there must have been an insane amount of work done by the graphics department at Apple to get this ready. These aren’t just automated crops but brand new artwork treatments across tens of thousands of films and TV shows (which get this new treatment for each season).
This update doesn’t extend to every single property on the store but the vast majority of popular titles seem to have been updated. For those that haven’t, Apple typically places the old rectangular artwork into the 16:9 frame with an aspect fit and then uses a blurred version of the artwork in aspect fill to produce a passable thumbnail.
Since this new style debuted, I’ve received a lot of email asking when my iTunes Artwork Finder would be updated to support it. Unfortunately the old iTunes Search API does not provide this new artwork as it relates to the now defunct iTunes and a new API has not been forthcoming. Instead, I had to do some digging around and a bit of reverse engineering in order to bring you the Apple TV Shows & Movies Artwork Finder, a brand new tool designed specifically to fetch these new artwork styles.

When you perform a search, you’ll receive results for TV shows and movies in the same way as searching within the TV app. For each show or film, you’ll get access to a huge array of artwork including such things as the new 16:9 cover art, the old iTunes style cover art, preview frames, full screen imagery and previews, transparent PNG logos, and even parallax files as used by the Apple TV. Clicking on a TV show will give you similar options for each season of the show.
I’m not going to be open sourcing or detailing exactly how this works at present as the lack of a public API makes it far more likely that Apple would take issue with this tool. However, in broad terms your search is sent to my server1 to generate the necessary URLs and then your own browser makes the requests directly to Apple in order that IP blocking or rate limiting won’t affect the tool for everybody.
As always, this artwork finder is completely free and I do not accept financial donations. If you want to thank me, you can drop me an email, follow me on Twitch, check out some of my iOS apps, or share a link to the finder on your own blog.
Apple TV Shows & Movies Artwork Finder »
-
I don’t log search terms in any way. I don’t even use basic analytics on my website as it is information I neither need nor want. I only know how many people use these tools due to the overwhelming number of emails I get about them every day! ↩︎
You can get exclusive updates on my projects and early access to my apps by joining my free newsletter, The Dodo Developer.
.%3C/p%3E%0A%0A%3Cp%3E%3Cimg%20src%3D%22https://bendodson.s3.amazonaws.com/weblog/2019/tbbt-before-after.jpg%22%20alt%3D%22The%20Big%20Bang%20Theory%20artwork%20before%20and%20after%20the%20iOS%2012.3%20TV%20update%22%20width%3D%22800%22%20height%3D%22350%22%20/%3E%3C/p%3E%0A%0A%3Cp%3EThis%20update%20doesn%E2%80%99t%20extend%20to%20every%20single%20property%20on%20the%20store%20but%20the%20vast%20majority%20of%20popular%20titles%20seem%20to%20have%20been%20updated.%20For%20those%20that%20haven%E2%80%99t,%20Apple%20typically%20places%20the%20old%20rectangular%20artwork%20into%20the%2016:9%20frame%20with%20an%20aspect%20fit%20and%20then%20uses%20a%20blurred%20version%20of%20the%20artwork%20in%20aspect%20fill%20to%20produce%20a%20%3Ca%20href%3D%22https://bendodson.s3.amazonaws.com/weblog/2019/brass-eye-apple-tv.png%22%3Epassable%20thumbnail%3C/a%3E.%3C/p%3E%0A%0A%3Cp%3ESince%20this%20new%20style%20debuted,%20I%E2%80%99ve%20received%20a%20lot%20of%20email%20asking%20when%20my%20%3Ca%20href%3D%22https://bendodson.com/projects/itunes-artwork-finder/%22%3EiTunes%20Artwork%20Finder%3C/a%3E%20would%20be%20updated%20to%20support%20it.%20Unfortunately%20the%20old%20iTunes%20Search%20API%20does%20not%20provide%20this%20new%20artwork%20as%20it%20relates%20to%20the%20now%20defunct%20iTunes%20and%20a%20new%20API%20has%20not%20been%20forthcoming.%20Instead,%20I%20had%20to%20do%20some%20digging%20around%20and%20a%20bit%20of%20reverse%20engineering%20in%20order%20to%20bring%20you%20the%20%3Ca%20href%3D%22https://bendodson.com/projects/apple-tv-movies-artwork-finder/%22%3E%3Cstrong%3EApple%20TV%20Shows%20%26amp;%20Movies%20Artwork%20Finder%3C/strong%3E%3C/a%3E,%20a%20brand%20new%20tool%20designed%20specifically%20to%20fetch%20these%20new%20artwork%20styles.%3C/p%3E%0A%0A%3Cp%3E%3Cimg%20src%3D%22https://bendodson.s3.amazonaws.com/weblog/2019/thewalkingdead.jpg%22%20alt%3D%22The%20Walking%20Dead%20in%20Ben%20Dodson's%20Apple%20TV%20Shows%20Artwork%20Finder%22%20width%3D%22800%22%20height%3D%22400%22%20/%3E%3C/p%3E%0A%0A%3Cp%3E%3Cimg%20src%3D%22https://bendodson.s3.amazonaws.com/weblog/2019/jurassicworld.jpg%22%20alt%3D%22Jurassic%20World%20in%20Ben%20Dodson's%20Apple%20Movies%20Artwork%20Finder%22%20width%3D%22800%22%20height%3D%22400%22%20/%3E%3C/p%3E%0A%0A%3Cp%3EWhen%20you%20perform%20a%20search,%20you%E2%80%99ll%20receive%20results%20for%20TV%20shows%20and%20movies%20in%20the%20same%20way%20as%20searching%20within%20the%20TV%20app.%20For%20each%20show%20or%20film,%20you%E2%80%99ll%20get%20access%20to%20a%20huge%20array%20of%20artwork%20including%20such%20things%20as%20the%20new%2016:9%20cover%20art,%20the%20old%20iTunes%20style%20cover%20art,%20preview%20frames,%20full%20screen%20imagery%20and%20previews,%20transparent%20PNG%20logos,%20and%20even%20parallax%20files%20as%20used%20by%20the%20Apple%20TV.%20Clicking%20on%20a%20TV%20show%20will%20give%20you%20similar%20options%20for%20each%20season%20of%20the%20show.%3C/p%3E%0A%0A%3Cp%3EI%E2%80%99m%20not%20going%20to%20be%20open%20sourcing%20or%20detailing%20exactly%20how%20this%20works%20at%20present%20as%20the%20lack%20of%20a%20public%20API%20makes%20it%20far%20more%20likely%20that%20Apple%20would%20take%20issue%20with%20this%20tool.%20However,%20in%20broad%20terms%20your%20search%20is%20sent%20to%20my%20server%3Csup%20role%3D%22doc-noteref%22%3E%3Ca%20href%3D%22https://bendodson.com/%23fn:tracking%22%20rel%3D%22footnote%22%3E1%3C/a%3E%3C/sup%3E%20to%20generate%20the%20necessary%20URLs%20and%20then%20your%20own%20browser%20makes%20the%20requests%20directly%20to%20Apple%20in%20order%20that%20IP%20blocking%20or%20rate%20limiting%20won%E2%80%99t%20affect%20the%20tool%20for%20everybody.%3C/p%3E%0A%0A%3Cp%3EAs%20always,%20this%20artwork%20finder%20is%20completely%20free%20and%20I%20do%20not%20accept%20financial%20donations.%20If%20you%20want%20to%20thank%20me,%20you%20can%20%3Ca%20href%3D%22https://bendodson.com/contact/%22%3Edrop%20me%20an%20email%3C/a%3E,%20%3Ca%20href%3D%22https://twitch.tv/the_plainswalker/%22%3Efollow%20me%20on%20Twitch%3C/a%3E,%20check%20out%20%3Ca%20href%3D%22https://bendodson.com/apps/%22%3Esome%20of%20my%20iOS%20apps%3C/a%3E,%20or%20share%20a%20link%20to%20the%20finder%20on%20your%20own%20blog.%3C/p%3E%0A%0A%3Cp%3E%3Ca%20href%3D%22https://bendodson.com/projects/apple-tv-movies-artwork-finder/%22%3EApple%20TV%20Shows%20%26amp;%20Movies%20Artwork%20Finder%20%C2%BB%3C/a%3E%3C/p%3E%0A%0A%3Cdiv%20role%3D%22doc-endnotes%22%3E%0A%20%20%3Col%3E%0A%20%20%20%20%3Cli%20role%3D%22doc-endnote%22%3E%0A%20%20%20%20%20%20%3Cp%3EI%20don%E2%80%99t%20log%20search%20terms%20in%20any%20way.%20I%20don%E2%80%99t%20even%20use%20basic%20analytics%20on%20my%20website%20as%20it%20is%20information%20I%20neither%20need%20nor%20want.%20I%20only%20know%20how%20many%20people%20use%20these%20tools%20due%20to%20the%20overwhelming%20number%20of%20emails%20I%20get%20about%20them%20every%20day!%C2%A0%3Ca%20href%3D%22https://bendodson.com/%23fnref:tracking%22%20role%3D%22doc-backlink%22%3E%26%238617;%26%23xfe0e;%3C/a%3E%3C/p%3E%0A%20%20%20%20%3C/li%3E%0A%20%20%3C/ol%3E%0A%3C/div%3E%0A%3Cp%3EYou%20can%20get%20exclusive%20updates%20on%20my%20projects%20and%20early%20access%20to%20my%20apps%20by%20joining%20my%20free%20newsletter,%20%3Ca%20href%3D%22https://www.thedododeveloper.com/%22%3EThe%20Dodo%20Developer%3C/a%3E.%3C/p%3E)
Customising a website for iOS 13 / macOS Mojave Dark Mode 12 Jun 2019 12:30 AM (6 years ago)
On our The Checked Shirt podcast yesterday, Jason and I were discussing the announcements at WWDC and in particular the new “Dark Mode” in iOS 131. One question Jason asked (as I’m running the iOS 13 beta) is how Safari treats websites; are the colours suddenly inverted?
No. It turns out that just before the release of macOS Mojave last year, the W3C added a draft spec for prefers-color-scheme which is supported by Safari (from v12.1), Chrome (from v76), and Firefox (from v67). Since iOS 13 also includes a dark mode, Mobile Safari now supports this selector as well.
There are three possible values:
no-preference(evaluates as false): the default value if the device doesn’t support a mode or if the user hasn’t made a choicelight: the user has chosen a light themedark: the user has chosen a dark theme
In practice, usage is insanely simple. For my own website, my CSS is entirely for the light theme and then I use @media (prefers-color-scheme: dark) to override the relevant pieces for my dark mode like such:
@media (prefers-color-scheme: dark) {
    body {
        color: #fff;
        background: #000;
    }

    a {
        color: #fff;
        border-bottom: 1px solid #fff;
    }

    footer p {
        color: #aaa;
    }

    header h1,
    header h2 {
        color: #fff;
    }

    header h1 a {
        color: #fff;
    }

    nav ul li {
        background: #000;
    }

    .divider {
        border-bottom: 1px solid #ddd;
    }
}
The result is a website that seamlessly matches the theme that the user has selected for their device:
A nice touch with this is that the update is instantaneous, at least on iOS 13 and macOS Mojave with Safari; simply change the theme and the CSS will update without the need for a refresh!
I haven’t seen many websites provide an automatic dark mode switcher but I have a feeling it will become far more popular once iOS 13 is released later this year.
-
Of which I am rightly a hypocrite having complained for years about the never-ending demand for such a mode only to find that I quite like using it… ↩︎
You can get exclusive updates on my projects and early access to my apps by joining my free newsletter, The Dodo Developer.
%20is%20how%20Safari%20treats%20websites;%20are%20the%20colours%20suddenly%20inverted?%3C/p%3E%0A%0A%3Cp%3ENo.%20It%20turns%20out%20that%20just%20before%20the%20release%20of%20macOS%20Mojave%20last%20year,%20the%20W3C%20added%20a%20draft%20spec%20for%20%3Ccode%3Eprefers-color-scheme%3C/code%3E%20which%20is%20supported%20by%20Safari%20(from%20v12.1),%20Chrome%20(from%20v76),%20and%20Firefox%20(from%20v67).%20Since%20iOS%2013%20also%20includes%20a%20dark%20mode,%20Mobile%20Safari%20now%20supports%20this%20selector%20as%20well.%3C/p%3E%0A%0A%3Cp%3EThere%20are%20three%20possible%20values:%3C/p%3E%0A%0A%3Cul%3E%0A%20%20%3Cli%3E%3Ccode%3Eno-preference%3C/code%3E%20(evaluates%20as%20false):%20the%20default%20value%20if%20the%20device%20doesn%E2%80%99t%20support%20a%20mode%20or%20if%20the%20user%20hasn%E2%80%99t%20made%20a%20choice%3C/li%3E%0A%20%20%3Cli%3E%3Ccode%3Elight%3C/code%3E:%20the%20user%20has%20chosen%20a%20light%20theme%3C/li%3E%0A%20%20%3Cli%3E%3Ccode%3Edark%3C/code%3E:%20the%20user%20has%20chosen%20a%20dark%20theme%3C/li%3E%0A%3C/ul%3E%0A%0A%3Cp%3EIn%20practice,%20usage%20is%20insanely%20simple.%20For%20my%20own%20website,%20my%20CSS%20is%20entirely%20for%20the%20light%20theme%20and%20then%20I%20use%20%3Ccode%3E@media%20(prefers-color-scheme:%20dark)%3C/code%3E%20to%20override%20the%20relevant%20pieces%20for%20my%20dark%20mode%20like%20such:%3C/p%3E%0A%0A%3Cfigure%3E%3Cpre%3E%3Ccode%20data-lang%3D%22css%22%3E%3Cspan%3E@media%3C/span%3E%20%3Cspan%3E(%3C/span%3E%3Cspan%3Eprefers-color-scheme%3C/span%3E%3Cspan%3E:%3C/span%3E%20%3Cspan%3Edark%3C/span%3E%3Cspan%3E)%3C/span%3E%20%3Cspan%3E%7B%3C/span%3E%0A%20%20%20%20%3Cspan%3Ebody%3C/span%3E%20%3Cspan%3E%7B%3C/span%3E%0A%20%20%20%20%20%20%20%20%3Cspan%3Ecolor%3C/span%3E%3Cspan%3E:%3C/span%3E%20%3Cspan%3E%23fff%3C/span%3E%3Cspan%3E;%3C/span%3E%0A%20%20%20%20%20%20%20%20%3Cspan%3Ebackground%3C/span%3E%3Cspan%3E:%3C/span%3E%20%3Cspan%3E%23000%3C/span%3E%3Cspan%3E;%3C/span%3E%0A%20%20%20%20%3Cspan%3E%7D%3C/span%3E%0A%0A%20%20%20%20%3Cspan%3Ea%3C/span%3E%20%3Cspan%3E%7B%3C/span%3E%0A%20%20%20%20%20%20%20%20%3Cspan%3Ecolor%3C/span%3E%3Cspan%3E:%3C/span%3E%20%3Cspan%3E%23fff%3C/span%3E%3Cspan%3E;%3C/span%3E%0A%20%20%20%20%20%20%20%20%3Cspan%3Eborder-bottom%3C/span%3E%3Cspan%3E:%3C/span%3E%20%3Cspan%3E1px%3C/span%3E%20%3Cspan%3Esolid%3C/span%3E%20%3Cspan%3E%23fff%3C/span%3E%3Cspan%3E;%3C/span%3E%0A%20%20%20%20%3Cspan%3E%7D%3C/span%3E%0A%0A%20%20%20%20%3Cspan%3Efooter%3C/span%3E%20%3Cspan%3Ep%3C/span%3E%20%3Cspan%3E%7B%3C/span%3E%0A%20%20%20%20%20%20%20%20%3Cspan%3Ecolor%3C/span%3E%3Cspan%3E:%3C/span%3E%20%3Cspan%3E%23aaa%3C/span%3E%3Cspan%3E;%3C/span%3E%0A%20%20%20%20%3Cspan%3E%7D%3C/span%3E%0A%0A%20%20%20%20%3Cspan%3Eheader%3C/span%3E%20%3Cspan%3Eh1%3C/span%3E%3Cspan%3E,%3C/span%3E%0A%20%20%20%20%3Cspan%3Eheader%3C/span%3E%20%3Cspan%3Eh2%3C/span%3E%20%3Cspan%3E%7B%3C/span%3E%0A%20%20%20%20%20%20%20%20%3Cspan%3Ecolor%3C/span%3E%3Cspan%3E:%3C/span%3E%20%3Cspan%3E%23fff%3C/span%3E%3Cspan%3E;%3C/span%3E%0A%20%20%20%20%3Cspan%3E%7D%3C/span%3E%0A%0A%20%20%20%20%3Cspan%3Eheader%3C/span%3E%20%3Cspan%3Eh1%3C/span%3E%20%3Cspan%3Ea%3C/span%3E%20%3Cspan%3E%7B%3C/span%3E%0A%20%20%20%20%20%20%20%20%3Cspan%3Ecolor%3C/span%3E%3Cspan%3E:%3C/span%3E%20%3Cspan%3E%23fff%3C/span%3E%3Cspan%3E;%3C/span%3E%0A%20%20%20%20%3Cspan%3E%7D%3C/span%3E%0A%0A%20%20%20%20%3Cspan%3Enav%3C/span%3E%20%3Cspan%3Eul%3C/span%3E%20%3Cspan%3Eli%3C/span%3E%20%3Cspan%3E%7B%3C/span%3E%0A%20%20%20%20%20%20%20%20%3Cspan%3Ebackground%3C/span%3E%3Cspan%3E:%3C/span%3E%20%3Cspan%3E%23000%3C/span%3E%3Cspan%3E;%3C/span%3E%0A%20%20%20%20%3Cspan%3E%7D%3C/span%3E%0A%0A%20%20%20%20%3Cspan%3E.divider%3C/span%3E%20%3Cspan%3E%7B%3C/span%3E%0A%20%20%20%20%20%20%20%20%3Cspan%3Eborder-bottom%3C/span%3E%3Cspan%3E:%3C/span%3E%20%3Cspan%3E1px%3C/span%3E%20%3Cspan%3Esolid%3C/span%3E%20%3Cspan%3E%23ddd%3C/span%3E%3Cspan%3E;%3C/span%3E%0A%20%20%20%20%3Cspan%3E%7D%3C/span%3E%0A%3Cspan%3E%7D%3C/span%3E%3C/code%3E%3C/pre%3E%3C/figure%3E%0A%0A%3Cp%3EThe%20result%20is%20a%20website%20that%20seamlessly%20matches%20the%20theme%20that%20the%20user%20has%20selected%20for%20their%20device:%3C/p%3E%0A%0A%3Cp%3E%3Cimg%20src%3D%22https://bendodson.s3.amazonaws.com/weblog/2019/bendodson-darkmode.jpg%22%20alt%3D%22Enabling%20Dark%20Mode%20on%20a%20website%20for%20iOS%2013%22%20width%3D%22800%22%20height%3D%22600%22%20/%3E%3C/p%3E%0A%0A%3Cp%3EA%20nice%20touch%20with%20this%20is%20that%20the%20update%20is%20instantaneous,%20at%20least%20on%20iOS%2013%20and%20macOS%20Mojave%20with%20Safari;%20simply%20change%20the%20theme%20and%20the%20CSS%20will%20update%20without%20the%20need%20for%20a%20refresh!%3C/p%3E%0A%0A%3Cp%3EI%20haven%E2%80%99t%20seen%20many%20websites%20provide%20an%20automatic%20dark%20mode%20switcher%20but%20I%20have%20a%20feeling%20it%20will%20become%20far%20more%20popular%20once%20iOS%2013%20is%20released%20later%20this%20year.%3C/p%3E%0A%0A%3Cdiv%20role%3D%22doc-endnotes%22%3E%0A%20%20%3Col%3E%0A%20%20%20%20%3Cli%20role%3D%22doc-endnote%22%3E%0A%20%20%20%20%20%20%3Cp%3EOf%20which%20I%20am%20rightly%20a%20hypocrite%20having%20complained%20for%20years%20about%20the%20never-ending%20demand%20for%20such%20a%20mode%20only%20to%20find%20that%20I%20quite%20like%20using%20it%E2%80%A6%C2%A0%3Ca%20href%3D%22https://bendodson.com/%23fnref:darkmodehypo%22%20role%3D%22doc-backlink%22%3E%26%238617;%26%23xfe0e;%3C/a%3E%3C/p%3E%0A%20%20%20%20%3C/li%3E%0A%20%20%3C/ol%3E%0A%3C/div%3E%0A%3Cp%3EYou%20can%20get%20exclusive%20updates%20on%20my%20projects%20and%20early%20access%20to%20my%20apps%20by%20joining%20my%20free%20newsletter,%20%3Ca%20href%3D%22https://www.thedododeveloper.com/%22%3EThe%20Dodo%20Developer%3C/a%3E.%3C/p%3E)
Detecting text with VNRecognizeTextRequest in iOS 13 11 Jun 2019 12:30 AM (6 years ago)
At WWDC 2017, Apple introduced the Vision framework alongside iOS 11. Vision was designed to help developers classify and identify things such as objects, horizontal planes, barcodes, facial expressions, and text. However, the text detection only recognized where text was displayed, not the actual content of the text1. With the introduction of iOS 13 at WWDC last week, this has thankfully been solved with some updates to the Vision framework adding genuine text recognition.
To test this out, I’ve built a very basic app that can recognise a Magic The Gathering card and retrieve some pertinent information from it, namely the title, set code, and collector number. Here’s an example card and the highlighted text I would like to retrieve.
You may be looking at this and thinking “that text is pretty small” or that there is a lot of other text around that could get in the way. This is not a problem for Vision.
To get started, we need to create a VNRecognizeTextRequest. This is essentially a declaration of what we are hoping to find along with the set up for what language and accuracy we are looking for:
let request = VNRecognizeTextRequest(completionHandler: self.handleDetectedText)
request.recognitionLevel = .accurate
request.recognitionLanguages = ["en_GB"]
We give our request a completion handler (in this case a function that looks like handleDetectedText(request: VNRequest?, error: Error?)) and then set some properties. You can choose between a .fast or .accurate recognition level which should be fairly self-explanatory; as I’m looking at quite small text along the bottom of the card, I’ve opted for higher accuracy although the faster option does seem to be good enough for larger pieces of text. I’ve also locked the request to British English as I know all of my cards match that locale; you can specify multiple languages but be aware that scanning may take slightly longer for each additional language.
There are two other properties which bear mentioning:
customWords: you can provide an array of strings that will be used over the built-in lexicon. This is useful if you know you have some unusual words or if you are seeing misreadings. I’m not using it for this project but if I were to build a commercial scanner I would likely include some of the more difficult cards such as Fblthp, the Lost to avoid issues.minimumTextHeight: this is a float that denotes a size, relative to the image height, at which text should no longer be recognized. If I was building this scanner to just get the card name then this would be useful for removing all of the other text that isn’t necessary but I need the smallest pieces so for now I’ve ignored this property. Obviously the speed would increase if you are ignoring smaller text.
Now that we have our request, we need to use it with an image and a request handler like so:
let requests = [textDetectionRequest]
let imageRequestHandler = VNImageRequestHandler(cgImage: cgImage, orientation: .right, options: [:])
DispatchQueue.global(qos: .userInitiated).async {
    do {
        try imageRequestHandler.perform(requests)
    } catch let error {
        print("Error: \(error)")
    }
}
I’m using an image direct from the camera or camera roll which I’ve converted from a UIImage to a CGImage. This is used in the VNImageRequestHandler along with an orientation flag to help the request handler understand what text it should be recognizing. For the purposes of this demo, I’m always using my phone in portrait with cards that are in portrait so naturally I’ve chosen the orientation of .right. Wait, what? It turns out camera orientation on your device is completely separate to the device rotation and is always deemed to be on the left (as it was determined the default for taking photos back in 2009 was to hold your phone in landscape). Of course, times have changed and we mostly shoot photos and video in portrait but the camera is still aligned to the left so we have to counteract this. I could write an entire article about this subject but for now just go with the fact that we are orienting to the right in this scenario!
Once our handler is set up, we open up a user initiated thread and try to perform our requests. You may notice that this is an array of requests and that is because you could try to pull out multiple pieces of data in the same pass (i.e. identifying faces and text from the same image). As long as there aren’t any errors, the callback we created with our request will be called once text is detected:
func handleDetectedText(request: VNRequest?, error: Error?) {
    if let error = error {
        print("ERROR: \(error)")
        return
    }
    guard let results = request?.results, results.count > 0 else {
        print("No text found")
        return
    }

    for result in results {
        if let observation = result as? VNRecognizedTextObservation {
            for text in observation.topCandidates(1) {
                print(text.string)
                print(text.confidence)
                print(observation.boundingBox)
                print("\n")
            }
        }
    }
}
Our handler is given back our request which now has a results property. Each result is a VNRecognizedTextObservation which itself has a number of candidates for us to investigate. You can choose to receive up to 10 candidates for each piece of recognized text and they are sorted in decreasing confidence order. This can be useful if you have some specific terminology that maybe the parser is getting incorrect on the first try but determines correctly later even if it is less confident. For this example, we only want the first result so we loop through observation.topCandidates(1) and extract both the text and a confidence value. Whilst the candidate itself has different text and confidence, the bounding box is the same regardless and is provided by the observation. The bounding box uses a normalized coordinate system with the origin in the bottom-left so you’ll need to convert it if you want it to play nicely with UIKit.
That’s pretty much all there is to it. If I run a photo of a card through this, I’ll get the following result in just under 0.5s on an iPhone XS Max:
Carnage Tyrant
1.0
(0.2654155572255453, 0.6955686092376709, 0.18710780143737793, 0.019915008544921786)


Creature
1.0
(0.26317582130432127, 0.423814058303833, 0.09479101498921716, 0.013565015792846635)


Dinosaur
1.0
(0.3883238156636556, 0.42648010253906254, 0.10021591186523438, 0.014479541778564364)


Carnage Tyrant can't be countered.
1.0
(0.26538230578104655, 0.3742666244506836, 0.4300231456756592, 0.024643898010253906)


Trample, hexproof
0.5
(0.2610074838002523, 0.34864263534545903, 0.23053167661031088, 0.022259855270385653)


Sun Empire commanders are well versed
1.0
(0.2619712670644124, 0.31746063232421873, 0.45549616813659666, 0.022649812698364302)


in advanced martial strategy. Still, the
1.0
(0.2623249689737956, 0.29798884391784664, 0.4314465204874674, 0.021180248260498136)


correct maneuver is usually to deploy the
1.0
(0.2620727062225342, 0.2772137641906738, 0.4592740217844645, 0.02083740234375009)


giant, implacable death lizard.
1.0
(0.2610833962758382, 0.252408218383789, 0.3502468903859457, 0.023736238479614258)


7/6
0.5
(0.6693102518717448, 0.23347826004028316, 0.04697717030843107, 0.018937730789184593)


179/279 M
1.0
(0.24829587936401368, 0.21893787384033203, 0.08339192072550453, 0.011646795272827193)


XLN: EN N YEONG-HAO HAN
0.5
(0.246867307027181, 0.20903720855712893, 0.19095951716105145, 0.012227916717529319)


TN & 0 2017 Wizards of the Coast
1.0
(0.5428387324015299, 0.21133480072021482, 0.19361832936604817, 0.011657810211181618)
That is incredibly good! Every piece of text that has been recognized has been separated into it’s own bounding box and returned as a result with most garnering a 1.0 confidence rating. Even the very small copyright text is mostly correct2. This was all done on a 3024x4032 image weighing in at 3.1MB and it would be even faster if I resized the image first. It is also worth noting that this process is far quicker on the new A12 Bionic chips that have a dedicated Neural Engine; it runs just fine on older hardware but will take seconds rather than milliseconds.
With the text recognized, the last thing to do is to pull out the pieces of information I want. I won’t put all the code here but the key logic is to iterate through each bounding box and determine the location so I can pick out the text in the lower left hand corner and that in the top left hand corner whilst ignoring anything further along to the right. The end result is a scanning app that can pull out exactly the information I need in under a second3.
This example app is available on GitHub.
-
This seemed odd to be me at the time and still does now. Sure it was nice to be able to see a bounding box around individual bits of text but then having to pull them out and OCR them yourself was a pain. ↩︎
-
Although, ironically, the confidence is 1.0 but it put TN instead of ™ and 0 instead of ©. A high confidence does not mean the parser is correct! ↩︎
-
In reality I only need the set number and set code; these can then be used with an API call to Scryfall to fetch all of the other possible information about this card including game rulings and monetary value. ↩︎
You can get exclusive updates on my projects and early access to my apps by joining my free newsletter, The Dodo Developer.