How to Disable “Show Password” Button in Windows 8, Windows 8.1 and Internet Explorer Web Browser? 14 Jan 2014 6:15 PM (11 years ago)

The same feature has also been implemented in Internet Explorer 10 and 11 versions which are already present in Windows 8 and Windows 8.1 respectively and can also be installed in Windows 7 and Server 2012 R2 operating systems. When you open a website in Internet Explorer 10 or 11 versions which requires you to enter a password such as Gmail, Hotmail, etc, Internet Explorer shows the same password reveal button in password field to show the actual characters of password.

It might sound a useful feature but many people don't like it. It might become a security risk if someone accidentally or intentionally clicks on the button when you are typing the password. The person will immediately know your password and you'll need to change your password even if you didn't want to change it.
If you don't like this feature and want to get rid of password reveal button, this tutorial will definitely help you.
Today in this tutorial we'll tell you a few methods to remove password reveal button from Internet Explorer 10, 11 and Windows 8/8.1 operating systems.
So without wasting time lets start the tutorial. There are 2 ways to disable this password reveal button:
- Disable password reveal button in the whole Windows 8/8.1 OS which will automatically disable it in Internet Explorer 10/11 versions as well.
- Disable password reveal button in Internet Explorer 10/11 only which will not disable the button in other areas of Windows 8/8.1 OS.
This method will disable password reveal button in Windows 8/8.1 along with Internet Explorer 10/11 versions. It'll not work in Windows 7 or Server 2008 R2 OS.METHOD 1: Disable Password Reveal Button in Windows 8 and 8.1
You can disable the button either using Group Policy Editor (gpedit.msc) or using Registry Editor (regedit).
A: Using Group Policy Editor (gpedit.msc):
1. Press "WIN+R" key combination to launch RUN dialog box, then type gpedit.msc and press Enter. It'll open Group Policy Editor.
2. Now go to:
Computer Configuration -> Administrative Templates -> Windows Components -> Credential User Interface3. In right-side pane, double-click on "Do not display the password reveal button" option and set its value to "Enabled".

That's it. It'll immediately disable the password reveal button in entire OS including Internet Explorer. If you want to enable the button again in future, change the value to "Disabled" or "Not Configured".
B: Using Registry Editor (regedit):
1. Type regedit in RUN dialog box and press Enter. It'll open Registry Editor.
2. Now go to following key:
HKEY_LOCAL_MACHINE\Software\Policies\Microsoft\Windows\CredUIIf you can't find "CredUI" key, you'll need to create it manually.
3. In right-side pane, create a new DWORD DisablePasswordReveal and set its value to 1

It'll disable the password reveal button everywhere in Windows 8/8.1 OS including Internet Explorer. In future if you want to enable the button again, either delete the DWORD or change its value to 0
This method will work in Windows 7, Server 2008 R2, Windows 8 and Windows 8.1 operating systems. It'll disable password reveal button in Internet Explorer only.METHOD 2: Disable Password Reveal Button in Internet Explorer 10 and 11
Again you can disable the button using both Group Policy Editor (gpedit.msc) as well as Registry Editor (regedit).
A: Using Group Policy Editor (gpedit.msc):
1. Press "WIN+R" key combination to launch RUN dialog box, then type gpedit.msc and press Enter. It'll open Group Policy Editor.
2. Now go to:
Computer Configuration -> Administrative Templates -> Windows Components -> Internet Explorer -> Security Features3. In right-side pane, double-click on "Do not display the reveal password button" option and set its value to "Enabled".

That's it. It'll immediately disable the password reveal button in Internet Explorer 10 and 11 versions. If you want to enable the button again in future, change the value to "Disabled" or "Not Configured".
B: Using Registry Editor (regedit):
1. Type regedit in RUN dialog box and press Enter. It'll open Registry Editor.
2. Now go to following key:
HKEY_LOCAL_MACHINE\Software\Policies\Microsoft\Internet Explorer\Main3. In right-side pane, create a new DWORD DisablePasswordReveal and set its value to 1

It'll disable the password reveal button in Internet Explorer only. In future if you want to enable the button again, either delete the DWORD or change its value to 0
Above mentioned all methods will disable password reveal button for all Windows users. If you want to disable the button only for a single user, use following locations instead:IMPORTANT NOTE
For Group Policy Editor:
User Configuration -> Administrative Templates -> Windows Components -> Credential User Interface
User Configuration -> Administrative Templates -> Windows Components -> Internet Explorer -> Security Features
For Registry Editor:
HKEY_CURRENT_USER\Software\Policies\Microsoft\Windows\CredUI
HKEY_CURRENT_USER\Software\Policies\Microsoft\Internet Explorer\Main
That's all. Feel free to share your feedback and comments with us...


[Guide] How to Restore “TrustedInstaller” as Default Owner of a File, Folder or Registry Key in Windows? 4 Nov 2013 4:55 PM (11 years ago)
Taking ownership of a file or folder is very easy. We have provided a ready-made registry script which automatically adds a new option "Take Ownership" in file and folder context menu (right-click menu). So you just need to right-click on a file or folder and select "Take Ownership" option and it automatically makes you the owner of that file/folder and assigns you full permission on that file/folder.
How to Add “Take Ownership” Option to File or Folder Context Menu in Windows
We have also posted a detailed and easy to understand guide which teaches you how to take ownership of a file or folder manually in Windows:
[Guide] How to Take Ownership (Permission) of a File or Folder Manually in Windows?
Now the question comes! Once you have taken ownership of a file and now you want to restore "TrustedInstaller" as default owner of that file, how will you do that? How will you change the owner of a file back to "TrustedInstaller"?
We never realized that someone might need to restore ownership of a file to "TrustedInstaller" until we received following comment from an AskVG reader "KS":
How do I give permissions back to TrustedInstaller, when I changed it, TrustedInstaller wasn't in the list of possible owners anymore??That was really an interesting point. Once you take ownership of a file or folder in Windows, if you go back to its Properties and try to change the owner back to "TrustedInstaller", you'll be surprised to see that "TrustedInstaller" is no longer present in the users list.
So how to bring back the built-in system user "TrustedInstaller" and set it as default owner of a file or folder? Don't worry! Here is the solution.
Today in this tutorial, we'll tell you how to restore "TrustedInstaller" as default owner of a file or folder in Windows if you changed its owner to yourself?
So without wasting time, lets start the tutorial:
NOTE: The same method will apply to restore "TrustedInstaller" as owner of registry keys in Registry Editor.1. Go to the folder which contains the file or folder for which you want to restore ownership to "TrustedInstaller". Right-click on the file or folder and select Properties.
2. It'll open its Properties window. Now go to "Security" tab and click on Advanced button.

3. It'll open a new window. Now go to "Owner" tab and you'll see that the owner would be set to your username and "TrustedInstaller" would not be present in the list as we mentioned above.
Don't worry. We'll add it manually. Click on "Edit" button:

4. It'll open another window. Click on "Other users or groups" button.

5. Now type NT SERVICE\TrustedInstaller in "Enter the object name to select" text box and click on OK button as shown in following screenshot:

6. It'll immediately add "TrustedInstaller" to the users list. Click on Apply button.

7. Windows will show a message box, click on OK button to close it. Again click on OK button in all opened windows and you have successfully restored "TrustedInstaller" as default owner of the file or folder.
You can check and confirm the owner by opening the file or folder Properties and you'll see that "TrustedInstaller" has become the owner of that file or folder again.
.%20%20So%20you%20just%20need%20to%20right-click%20on%20a%20file%20or%20folder%20and%20select%20%22Take%20%20Ownership%22%20option%20and%20it%20automatically%20makes%20you%20the%20owner%20of%20that%20%20file/folder%20and%20assigns%20you%20full%20permission%20on%20that%20file/folder.%3Cbr%20/%3E%0A%3Cspan%3E%3Ca%20href%3D%22http://www.askvg.com/add-take-ownership-option-in-file-folder-context-menu-in-windows-vista/%22%20title%3D%22How%20to%20Add%20%E2%80%9CTake%20%0AOwnership%E2%80%9D%20Option%20to%20File%20or%20Folder%20Context%20Menu%20in%20Windows%20XP,%20Vista,%207%0A%20and%20Windows%208%22%3EHow%20%20to%20Add%20%E2%80%9CTake%20Ownership%E2%80%9D%20Option%20to%20File%20or%20Folder%20Context%20Menu%20in%20%20Windows%3C/a%3E%3C/span%3E%3Cbr%20/%3E%0AWe%20have%20also%20posted%20a%20detailed%20and%20easy%20to%20understand%20guide%20which%20%20teaches%20you%20how%20to%20take%20ownership%20of%20a%20file%20or%20folder%20manually%20in%20%20Windows:%3Cbr%20/%3E%0A%3Cspan%3E%3Ca%20href%3D%22http://www.askvg.com/guide-how-to-take-ownership-permission-of-a-file-or-folder-manually-in-windows/%22%20title%3D%22%5BGuide%5D%20How%20to%20%0ATake%20Ownership%20(Permission)%20of%20a%20File%20or%20Folder%20Manually%20in%20Windows?%22%3E%5BGuide%5D%20%20How%20to%20Take%20Ownership%20(Permission)%20of%20a%20File%20or%20Folder%20Manually%20in%20%20Windows?%3C/a%3E%3C/span%3E%3Cbr%20/%3E%0ANow%20the%20question%20comes!%20Once%20you%20have%20taken%20ownership%20of%20a%20file%20and%20%20now%20you%20want%20to%20restore%20%22TrustedInstaller%22%20as%20default%20owner%20of%20that%20%20file,%20how%20will%20you%20do%20that?%20How%20will%20you%20change%20the%20owner%20of%20a%20file%20back%20%20to%20%22TrustedInstaller%22?%3Cbr%20/%3E%0AWe%20never%20realized%20that%20someone%20might%20need%20to%20restore%20ownership%20of%20a%20%20file%20to%20%22TrustedInstaller%22%20until%20we%20received%20following%20comment%20from%20an%20%20AskVG%20reader%20%22KS%22:%3Cbr%20/%3E%0A%3Cblockquote%3E%0AHow%20do%20I%20give%20permissions%20back%20to%20TrustedInstaller,%20when%20I%20%20changed%20it,%20TrustedInstaller%20wasn't%20in%20the%20list%20of%20possible%20owners%20%20anymore??%3C/blockquote%3E%0AThat%20was%20really%20an%20interesting%20point.%20Once%20you%20take%20ownership%20of%20a%20%20file%20or%20folder%20in%20Windows,%20if%20you%20go%20back%20to%20its%20Properties%20and%20try%20to%20%20change%20the%20owner%20back%20to%20%22TrustedInstaller%22,%20you'll%20be%20surprised%20to%20see%20%20that%20%22TrustedInstaller%22%20is%20no%20longer%20present%20in%20the%20users%20list.%3Cbr%20/%3E%0ASo%20how%20to%20bring%20back%20the%20built-in%20system%20user%20%22TrustedInstaller%22%20and%20%20set%20it%20as%20default%20owner%20of%20a%20file%20or%20folder?%20Don't%20worry!%20Here%20is%20the%20%20solution.%3Cbr%20/%3E%0AToday%20in%20this%20tutorial,%20we'll%20tell%20you%20how%20to%20restore%20%20%22TrustedInstaller%22%20as%20default%20owner%20of%20a%20file%20or%20folder%20in%20Windows%20if%20%20you%20changed%20its%20owner%20to%20yourself?%3Cbr%20/%3E%0ASo%20without%20wasting%20time,%20lets%20start%20the%20tutorial:%3Cbr%20/%3E%0A%3Cblockquote%3E%0A%3Ci%3E%3Cb%3ENOTE:%3C/b%3E%20The%20same%20method%20will%20apply%20to%20%20restore%20%22TrustedInstaller%22%20as%20owner%20of%20registry%20keys%20in%20Registry%20Editor.%3C/i%3E%3C/blockquote%3E%0A%3Cb%3E1.%3C/b%3E%20Go%20to%20the%20folder%20which%20contains%20the%20file%20or%20%20folder%20for%20which%20you%20want%20to%20restore%20ownership%20to%20%22TrustedInstaller%22.%20%20Right-click%20on%20the%20file%20or%20folder%20and%20select%20%3Cb%3EProperties%3C/b%3E.%3Cbr%20/%3E%0A%3Cb%3E2.%3C/b%3E%20It'll%20open%20its%20Properties%20window.%20Now%20go%20to%20%22%3Cb%3ESecurity%3C/b%3E%22%20%20tab%20and%20click%20on%20%3Cb%3EAdvanced%3C/b%3E%20button.%3Cbr%20/%3E%0A%3Cimg%20alt%3D%22File_Permissions_Details.png%22%20src%3D%22http://media.askvg.com/articles/images2/File_Permissions_Details.png%22%20/%3E%3Cbr%20/%3E%0A%3Cb%3E3.%3C/b%3E%20It'll%20open%20a%20new%20window.%20Now%20go%20to%20%22%3Cb%3EOwner%3C/b%3E%22%20%20tab%20and%20you'll%20see%20that%20the%20owner%20would%20be%20set%20to%20your%20username%20and%20%20%22TrustedInstaller%22%20would%20not%20be%20present%20in%20the%20list%20as%20we%20mentioned%20%20above.%3Cbr%20/%3E%0ADon't%20worry.%20We'll%20add%20it%20manually.%20Click%20on%20%22%3Cb%3EEdit%3C/b%3E%22%20%20button:%3Cbr%20/%3E%0A%3Cimg%20alt%3D%22Editing_Owner_File_Folder.png%22%20src%3D%22http://media.askvg.com/articles/images3/Editing_Owner_File_Folder.png%22%20/%3E%3Cbr%20/%3E%0A%3Cb%3E4.%3C/b%3E%20It'll%20open%20another%20window.%20Click%20on%20%22%3Cb%3EOther%20%20users%20or%20groups%3C/b%3E%22%20button.%3Cbr%20/%3E%0A%3Cimg%20alt%3D%22Changing_Owner_File_Folder.png%22%20src%3D%22http://media.askvg.com/articles/images3/Changing_Owner_File_Folder.png%22%20/%3E%3Cbr%20/%3E%0A%3Cb%3E5.%3C/b%3E%20Now%20type%20%3Cb%3E%3Cspan%3ENT%20SERVICE%5CTrustedInstaller%3C/span%3E%3C/b%3E%20in%20%22Enter%20the%20%20object%20name%20to%20select%22%20text%20box%20and%20click%20on%20OK%20button%20as%20shown%20in%20%20following%20screenshot:%3Cbr%20/%3E%0A%3Cimg%20alt%3D%22Restoring_TruestedInstaller_as_Owner_File_Folder.png%22%20src%3D%22http://media.askvg.com/articles/images3/Restoring_TruestedInstaller_as_Owner_File_Folder.png%22%20/%3E%3Cbr%20/%3E%0A%3Cb%3E6.%3C/b%3E%20It'll%20immediately%20add%20%22TrustedInstaller%22%20to%20the%20%20users%20list.%20Click%20on%20%3Cb%3EApply%3C/b%3E%20button.%3Cbr%20/%3E%0A%3Cimg%20alt%3D%22Setting_TruestedInstaller_as_Owner_File_Folder.png%22%20src%3D%22http://media.askvg.com/articles/images3/Setting_TruestedInstaller_as_Owner_File_Folder.png%22%20/%3E%3Cbr%20/%3E%0A%3Cb%3E7.%3C/b%3E%20Windows%20will%20show%20a%20message%20box,%20click%20on%20OK%20%20button%20to%20close%20it.%20Again%20click%20on%20OK%20button%20in%20all%20opened%20windows%20and%20%20you%20have%20successfully%20restored%20%22TrustedInstaller%22%20as%20default%20owner%20of%20%20the%20file%20or%20folder.%3Cbr%20/%3E%0AYou%20can%20check%20and%20confirm%20the%20owner%20by%20opening%20the%20file%20or%20folder%20%20Properties%20and%20you'll%20see%20that%20%22TrustedInstaller%22%20has%20become%20the%20owner%20%20of%20that%20file%20or%20folder%20again.%3C/div%3E)
Simple Trick to Replace Default Built-in “Flower” Profile Picture for All User Accounts in Windows Vista, 7 and 8 4 Aug 2012 2:40 AM (12 years ago)
I was looking into various system files using Resource Hacker to find a BITMAP file. Although I couldn't find that particular BITMAP file but found something interesting which I would like to share in this topic.
When you install Windows 7 in a new computer system or create a new user account in Windows 7, by default Windows assigns built-in "Flower" image as profile picture for the new user account.
You can change this profile picture using User Accounts applet in Control Panel. But if you have many user accounts in your computer and want to set your desired image or company logo as user profile picture for all accounts in a single step, this tutorial will definitely help you.

Today we are going to share a very simple and secret trick which will allow you to replace default built-in flower profile picture with your desired image so that if you create a new user account in Windows, the new account will have your desired image as its profile picture instead of default flower picture.
We are not going to use any registry trick or Resource Hacker trick in this tutorial. We'll just replace an existing BITMAP file with our desired BITMAP file.
So without wasting time, lets start the tutorial:
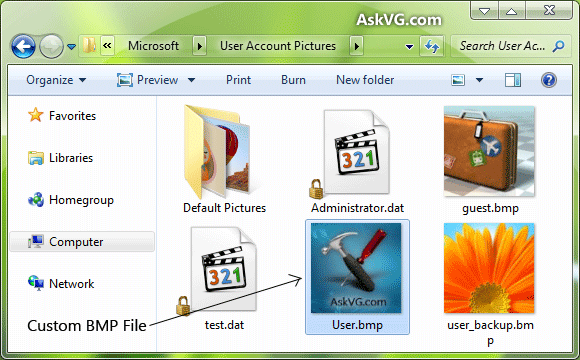
1. The default flower profile picture is actually a BITMAP file which is stored in following folder:
%ProgramData%\Microsoft\User Account Pictures\PS: Copy the above string and paste in RUN or start menu search box and press Enter. It'll directly open the folder in Explorer window.
The BITMAP file name is user.bmp and its a 128x128, 24-bit bitmap file.

2. We just need to create a new BMP file in an image editing software like MS Paint, Adobe Photoshop, GIMP, etc but we'll keep its size 128x128 pixels similar to default BITMAP file.
3. Once you finish creating the desired BITMAP file, save it at any location with user.bmp file name.
4. Now you'll need to replace existing user.bmp file present in "User Account Pictures" folder mentioned in STEP 1 with your newly created BMP file.
Before replacing default user.bmp file, you should create a backup of the file so that you can restore it later if you want. To take a backup, you can simply rename it to any other name like user_backup.bmp.
Now copy new user.bmp file to "User Account Pictures" folder.
5. That's it. Since you have replaced default BITMAP file with your new one, now all new and existing user accounts which have their profile picture set to default flower picture will automatically start showing new picture which you created in STEP 2.

If your existing user account doesn't show new picture, restart or log off and it'll start using new BITMAP as profile picture.
BONUS TIP: All other profile pictures which are shown when you click on "Change your picture" link in User Accounts applet of Control Panel, are stored in "%ProgramData%\Microsoft\User Account Pictures\Default Pictures" folder. If you want to customize all of them, you can follow above mentioned steps for each BITMAP file.
BONUS TIP 2: You can also customize profile picture for "Guest" account by replacing guest.bmp file present in same folder mentioned in STEP 1.
PS: I don't have Windows XP and Vista installed, so can't check this trick in both OS. If you have Windows XP or Vista, please check this method and let me know if it also works in XP and Vista or not.

OEM Configurator 2.0: Free Portable Utility to Add Customized Strings (OEM Information) and Logo in Windows XP, Vista, 7 and 8 System Properties 4 Aug 2012 2:39 AM (12 years ago)
NOTE: You can check other interesting and useful free software created by our readers here.
UPDATE: New version 2.0 released which comes with support for Windows 8 Developer Preview. Now Windows XP users can also enjoy this tool. The tool now also supports 64-bit Windows editions in this new version.Long time back we posted tutorials for customizing System Properties window in Windows XP, Vista and 7:
- Add Customized Strings (OEM Information) in System Properties of Windows Vista and 7
- Add Customized Strings (OEM Information) and Logo in System Properties of Windows XP

It also allows you to customize and change various items in System Properties window like Owner name, processor name, product ID, etc. Many times when we share our System Properties screenshot with others, we hide product ID from others. Now no need to do this. You can set any desired text string or numbers as Product ID using this tool. Don't worry! It'll now change the actual product ID in your system. It'll just replace the text which is shown in System Properties window.

Following is a result of the output which you can get with the help of this awesome little tool. You can see extra entries like Manufacturer, Model, Phone number, Support hours, Website and logo in right-side in System Properties window:

You can download it using following link:
Download Link
![]()
How to Extract / Copy System Files from Windows XP, Vista, 7, 8, Server 2003 and Server 2008 Setup? 4 Aug 2012 2:38 AM (12 years ago)
But what to do if we neither created a System restore point nor took a backup of the file? In such condition, we have no other option left except repairing or reinstalling Windows or we can copy the same file from another system and paste it in our system.
Don't worry! Today we are going to share a small and easy to use trick which can help you in extracting any system file from Windows setup disc or ISO image file so that you can easily restore the original system file in Windows.
This trick will also help customization lovers who always want to grab system files from a new Windows OS to extract new resources from it without installing the OS in their system.
The one and only tool which we use in this tutorial is 7-Zip which is an awesome and absolutely free file archive software. So first download it using following link:
Download 7-Zip
For your convenience, we have divided the tutorial in 2 parts:
- Extracting system files from Windows XP and Windows Server 2003 setup
- Extracting system files from Windows Vista, 7, 8, Windows Server 2003 and 2008 setup
Extracting a system file from Windows XP and Windows Server 2003 is very simple and easy. All system files in XP and Server 2003 setup are stored in "I386" folder present in the setup and all files are stored in compressed format. For example, Explorer.exe file will be present as Explorer.ex_, Shell32.dll file will be present as Shell32.dl_ and so on.Extracting System Files from Windows XP and Server 2003 Setup
You just need to right-click on the file which you want to copy or extract, go to 7-Zip context menu and click on "Extract Here" option.

That's it. It'll immediately extract the original system file which you can use anywhere you want.
Extracting a system file from Windows Vista, Windows 7, Windows 8, Server 2003 and Server 2008 setup is a bit tricky because the setup ISO of these Windows OS uses a new file format .WIM to store all system files in it. Normally this file format is not recognized by many popular file archiving utilities but 7-Zip can recognize it without any problem.Extracting System Files from Windows Vista, Server 2008, 7 or Windows 8 Setup
Many people mount Windows setup ISO to extract the files but if you use 7-Zip, you'll not need to mount it. You can directly extract any desired system file using following simple steps:
1. If you have Windows setup disc, insert it in the drive or if you already have Windows setup copied in your hard disk, go to that folder.
2. Now go to "Sources" folder and look for a file "install.wim". That's the file which contains all system files. Once you find the file, right-click on it and select "7-Zip -> Open archive" option. It'll open the file in 7-Zip.
Now jump to Step 3.
NOTE: For people who have copied Windows setup ISO directly in their hard disk, right-click on it and select "7-Zip -> Open archive" option.

Now go to "Sources" folder and look for a file "install.wim". Once you find the file, right-click on it and select "Open" option.

3. Once you open "install.wim" in 7-Zip, you'll see a few folders having numbers in their names like 1, 2, 3, 4 and 5 as shown in following screenshot:

Actually each number is associated with a different edition of Windows. These numbered folder may vary for different setup ISO.
Now you just need to find the correct folder which corresponds to the correct Windows edition installed in your system. To find out the correct edition, you can extract [1].xml file present in the archive and open it. This file contains information about all these numbered folders.
Look for a line <IMAGE INDEX="1"> in the [1].xml file. It should be 4th line in the file. After a few lines under it, you'll see <EDITIONID>, <NAME>, <DESCRIPTION>, <DISPLAYNAME> and <DISPLAYDESCRIPTION> tags. These tags will give you an idea which number corresponds to which edition of Windows.

The number of occurrence of <IMAGE INDEX="#"> tag in xml file will be equal to number of folders present in "install.wim" file.
If the first occurrence of <IMAGE INDEX="#"> tag doesn't match with your installed edition of Windows, go to next occurrence until you find the correct edition and its index.
Once you find out the correct edition and its index number, open that numbered folder within 7-Zip and you'll see all files and folders which you normally see in C: drive after installing Windows as shown in following screenshot:

That's it. Now you can browser through folders and copy/extract the desired file.
Feel free to post your feedback about this tutorial in your comment. Do you already use 7-Zip to extract system files or was it new for you? If you know any other interesting method, please share it in your comment...
[AIO] Ultimate Tutorial to Customize Desktop Context Menu in Windows Vista, 7 and 8 4 Aug 2012 2:37 AM (12 years ago)
As you all know AskVG.com is always the first website which shares interesting tweaks and customization related stuffs. We have posted so many tutorials in past which help you in customizing Desktop context menu in Windows Vista and 7. Many of them allow you to add new items to Desktop context menu and some of them allow you to remove existing items which you find unnecessary.
We are proud to say that we were the first to post about adding your favorite program shortcut in Desktop context menu, adding cascading menus in Desktop context menu, adding restart Explorer option and many other exclusive tutorials.
Today in this article, we are going to list all such tutorials in a single place for your convenience. It'll help you in reading all these tutorials quickly and easily and will also make sure that you have not missed any of them.
So without wasting any time lets make an ultimate list of all these tutorials:
Following tutorials allow you to add your desired program's shortcut in Desktop context menu. You can add your favorite browser shortcut, media player shortcut or any other shortcut to access it quickly and easily:Add Program Shortcuts in Desktop Context Menu:

- Add Your Favorite Program Shortcut in Desktop Context Menu in Windows Vista and 7
- Add Program Shortcuts and Other Useful Shortcuts with Icons in Windows 7 Desktop Context Menu?
This tutorial helps you in adding your favorite website links in Desktop context menu. You can add AskVG.com or any other website link to open it directly in your favorite web browser:Add Favorite Website Link in Desktop Context Menu:

Add AskVG.com or Other Website Links in Desktop Context Menu in Windows Vista, Server 2008 and 7
Customization lovers can also add their name or any other desired text in Desktop context menu for fun:Add Your Name in Desktop Context Menu:

How to Add Your Name in Windows 7 Desktop Context Menu
You can also add groups of shortcuts in Desktop context menu. For example, you can add a folder "Browsers" which will contain all web browsers shortcuts installed in your system. Having a group of shortcuts saves space and doesn't make your context menu look weird.Add Cascading Menus in Desktop Context Menu:
- Add Cascading Menus for Favorite Programs in Windows 7 Desktop and My Computer Context Menus
- Add “Windows Apps” Cascading Menu in Windows 7 Desktop Context Menu
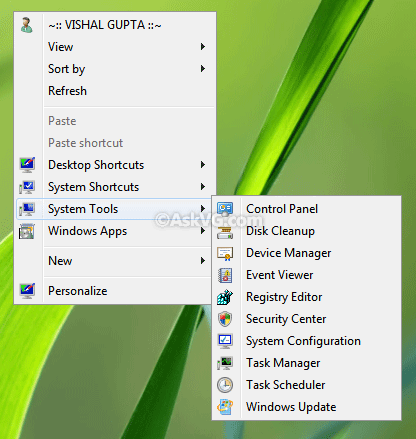
- Add “System Tools” Cascading Menu in Windows 7 Desktop Context Menu
- Add “System Shortcuts” Cascading Menu in Windows 7 Desktop Context Menu
- Add “Desktop Shortcuts” Cascading Menu in Windows 7 Desktop Context Menu
- Add Cascading Menu for Restart, Shut Down, Hibernate and Other Power Shortcuts in Desktop Context Menu of Windows 7 and 8
This tutorial allows you to customize the default 3 options "Screen Resolution", "Gadgets" and "Personalize" present in Windows 7 Desktop context menu. You can change their text, icons and positions in context menu. You can even remove them according to your requirements:Customizing "Screen Resolution", "Gadgets" and "Personalize" Options in Desktop Context Menu:


Customizing “Screen Resolution”, “Gadgets” and “Personalize” Options in Windows 7 Desktop Context Menu
When you use Desktop SlideShow feature in Windows 7, it automatically adds a new option "Next Desktop Background" in Desktop context menu which makes the whole context menu a bit wide. If you don't like this new option, you can remove it using following tutorial:Remove "Next Desktop Background"Option from Desktop Context Menu:

How to Remove “Next Desktop Background” Option from Windows 7 Desktop Context Menu?
This tutorial allows you to add "Show/Hide Hidden Files" option in Desktop context menu so that you can enable or disable "Show Hidden Files" option in Folder Options quickly and easily by just right-click on Desktop and select the option:Add "Show/Hide Hidden Files" Option in Desktop Context Menu:
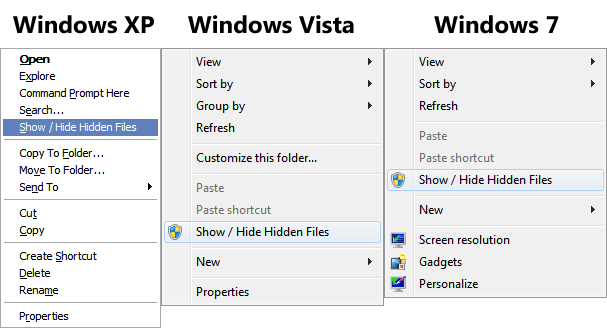
Add “Show / Hide Hidden Files” Option in Desktop and Explorer Context Menu in Windows XP, Vista and 7
This tutorial allows you to add "Show/Hide File Extensions" option in Desktop context menu so that you can enable or disable "Show Known File Extensions" option in Folder Options quickly and easily by just right-click on Desktop and select the option:Add "Show/Hide File Extensions" Option in Desktop Context Menu:
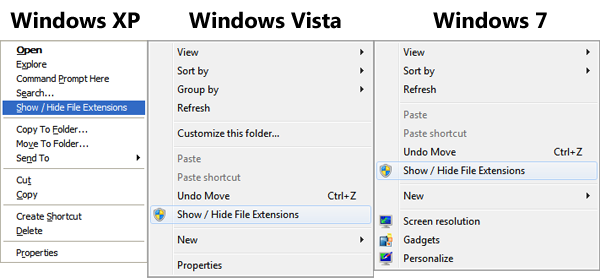
Add “Show / Hide File Extensions” Option in Desktop and Explorer Context Menu in Windows XP, Vista, 7
This tutorial allows you to add "Show/Hide Checkbox" option in Desktop context menu so that you can enable or disable "Show Checkbox to Select Items" option in Folder Options quickly and easily by just right-click on Desktop and select the option:Add "Show/Hide Checkbox" Option in Desktop Context Menu:
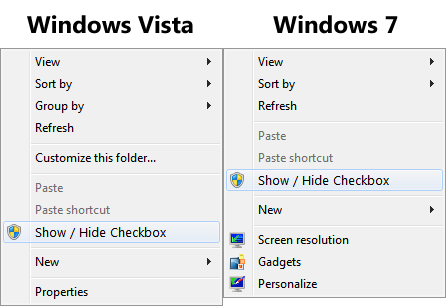
Add “Show / Hide Checkbox” Option in Desktop and Explorer Context Menu in Windows Vista and 7
It'll add a new option "Kill Not Responding Tasks" in Desktop context menu which allows you to immediately kill or end tasks which are not responding:Add "Kill Not Responding Tasks"Option in Desktop Context Menu:

How to Add “Kill Not Responding Tasks” in Desktop Context Menu Under Windows Vista and 7
Many times we need to restart Explorer to complete a software installation or some other reasons. This tutorial helps you in adding a new option "Restart Explorer" which restarts Explorer immediately as soon as you select the option:Add "Restart Explorer" Option in Desktop Context Menu:
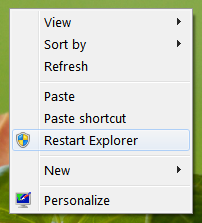
Add “Restart Explorer” Option in Desktop and Explorer Context Menu under Windows Vista and 7
Many times we need to restart uxsms service to fix Windows Aero related problems. This tutorials adds a new option "Restart uxsms" in Desktop context menu which restarts uxsms service automatically:Add "Restart uxsms" Option in Desktop Context Menu:

Add “Restart uxsms” Option in Desktop and Explorer Context Menu under Windows Vista and 7
This tutorial helps you in adding "Network Connections" shortcut in Desktop context menu:Add "Network Connections" Option in Desktop Context Menu:

How to Add “Network Connections” Shortcut in Desktop Context Menu Under Windows Vista and 7
"God Mode" is a secret Windows component which shows all Control Panel items in a single place. This tutorial adds a shortcut to God Mode in Desktop context menu:Add "God Mode"Option in Desktop Context Menu:

How to Add Windows 7 “God Mode” Shortcut in Desktop Context Menu?
This tutorial helps you in adding many useful system shortcuts in Desktop context menu:Add Change Sound, Task manager and Other Shortcuts in Desktop Context Menu:

Add “Change Sound”, “Change Cursor” and Other Shortcuts in Windows Vista and 7 Desktop Context Menu
This tutorial adds various useful shortcuts related to Desktop customization in Desktop context menu:Add Change Wallpaper, Change Theme and Other Shortcuts in Desktop Context Menu:

Add “Change Wallpaper”, “Change Theme” and Other Shortcuts in Windows Vista, 7 Desktop Context Menu
This tutorial allows you to add a shortcut to quickly turn Windows Aero on or off in Desktop context menu:Add "Aero On / Off"Shortcut in Desktop Context Menu:

Add Aero ON / OFF Shortcuts in Desktop and My Computer Context Menu Under Windows Vista and 7
When we install display driver like nVidia, Intel, etc, it adds a new entry for it in Desktop context menu. This tutorial helps you in removing that extra entry from Desktop context menu:Remove Display Driver Entry from Desktop Context Menu:

How to Remove nVidia and Other Display Driver Entries from Desktop Context Menu in Windows XP, Vista, 7
Following tutorials help you in customizing "New" item present in Desktop context menu:Customize "New"Item in Desktop Context Menu:

- How to Enable / Disable “New -> Shortcut” in Windows XP, Vista and 7 Context Menu?
- How to Add / Remove Items from “New” in Windows Context Menu?
- How to Restore Missing “New” Menuitem in Windows Desktop and Explorer Context Menu?
Also check following 2 free utilities created by AskVG readers which allow you to add your favorite program shortcuts in Desktop context menu automatically:Free Software to Add Program Shortcuts in Desktop Context Menu:
That's all for now. We'll keep updating the list whenever we post a new tutorial to customize Desktop context menu. So stay tuned and keep visiting AskVG...
[AIO] Ultimate Tutorial to Customize My Computer Context Menu in Windows XP, Vista, 7 and 8 4 Aug 2012 2:36 AM (12 years ago)
UPDATE: This tutorial will also work in Windows 8.
Context menu is basically the menu which appears when you right-click somewhere e.g. Desktop, shortcuts, etc. Almost all Windows users use My Computer context menu to access "System Properties", "Computer Manager" and other tools.
We have posted many tutorials in past which allow you to add many interesting and useful shortcuts to My Computer context menu like Device Manager, Services, Network Connections, God Mode, Task Manager and many more.
Recently we posted a long article which is actually a collection of all Desktop context menu related tutorials posted here at AskVG:
[AIO] Ultimate Tutorial to Customize Desktop Context Menu in Windows Vista and 7
Using the same idea, today in this article we are going to put our best My Computer context menu tutorials together for your convenience. It'll help you in reading all these tutorials quickly and easily and will also make sure that you have not missed any of them.
Most of these tutorials work in almost all Windows versions including XP, Vista, 7 and Server editions but some are exclusive for Windows 7 only.
So without wasting any time lets make an ultimate list of all these tutorials:
Following articles will help you in adding your desired program shortcuts and various useful system tools shortcuts like Add/Remove Programs, Disk Cleanup, Control Panel, Device Manager, Event Viewer, Computer Manager, MSConfig, Registry Editor, Services Manager, Task Manager and Windows Update with icons in My Computer context menu:Add Control Panel, Task Manager and Other Useful Shortcuts in My Computer Context Menu:

- How to Add New Program Shortcuts in My Computer Context Menu in Windows XP, Vista, 7 and 8
- Add Control Panel, Task Manager and Other Useful Shortcuts in My Computer Context Menu
This tutorial helps you in adding group of shortcuts in My Computer context menu. For example, you can add a folder "System Tools" which will contain all system tools shortcuts like Folder Options, Power Options, Administrative Tools, etc installed in your system. Having a group of shortcuts saves space and doesn't make your context menu look weird.Add Cascading Menus in My Computer Context Menu:

- Add Cascading Menus for Your Favorite Programs in My Computer Context Menu in Windows 7
- Add “Windows Apps” Cascading Menu in My Computer Context Menu in Windows 7
- Add “System Tools” Cascading Menu in My Computer Context Menu in Windows 7
- Add “System Shortcuts” Cascading Menu in My Computer Context Menu in Windows 7
- Add “Desktop Shortcuts” Cascading Menu in My Computer Context Menu in Windows 7
If you use Windows Vista or 7, you might miss the classic System Properties window which used to show in Windows XP. Following tutorial helps you in adding the same classic System Properties shortcut in My Computer context menu under Windows Vista and 7.Add Windows XP Style "Classic System Properties" Shortcut in My Computer Context Menu:

Add Windows XP Style Classic System Properties Shortcut in My Computer Context Menu
This tutorial helps you in adding a shortcut to "Network Connections" window in My Computer context menu so that you can access it quickly and easily:Add "Network Connections" Shortcut in My Computer Context Menu:

How to Add “Network Connections” Shortcut in My Computer Context Menu?
"God Mode" in Windows 7 allows quick access to all Control Panel options in a single place. This tutorial helps you in adding a shortcut to "God Mode" in My Computer context menu so that you can quickly and easily access it by right-clicking on My Computer icon and selecting "God Mode" option.Add Windows 7 "God Mode" Shortcut in My Computer Context Menu:

How to Add Windows 7 “God Mode” Shortcut in My Computer Context Menu?
If you want to turn Aero on or off in Windows Vista and 7, you need to do it using System Properties or Desktop Properties. But there are 2 simple commands which quickly enable / disable Aero.Add Aero ON / OFF Shortcuts in My Computer Context Menu:
Following tutorial helps you in adding shortcuts to these 2 commands in My Computer context menu so that you can turn Aero on / off quickly and easily.

How to Add Aero ON / OFF Shortcuts in My Computer Context Menu Under Windows Vista and 7
Following tutorials will help you in adding various useful shortcuts like Recycle Bin, Network Connections, etc directly in My Computer window:Add Useful Shortcuts in My Computer Main Window:

- How to Add Recycle Bin, Run, Search and Many Other Useful Shortcuts in My Computer?
- How to Add Useful Shortcuts, Files and Folders in My Computer Window Using Hidden Network Shortcuts Hack
- How to Add “Network Connections” Folder in My Computer?
- Create a Virtual Drive for Your Desired Folder in My Computer Using Subst Command
- How to Remove Nokia PC Suite Folder, Web Folders, My Sharing Folders or Other Unwanted Items from My Computer?
Following are a few other tutorials which help you in adding various useful shortcuts in Explorer context menu:Other Useful Explorer Context Menu Tutorials:
[Guide] How to Restore “TrustedInstaller” as Default Owner of a File, Folder or Registry Key in Windows? 4 Aug 2012 2:33 AM (12 years ago)
Taking ownership of a file or folder is very easy. We have provided a ready-made registry script which automatically adds a new option "Take Ownership" in file and folder context menu (right-click menu). So you just need to right-click on a file or folder and select "Take Ownership" option and it automatically makes you the owner of that file/folder and assigns you full permission on that file/folder.
How to Add “Take Ownership” Option to File or Folder Context Menu in Windows
We have also posted a detailed and easy to understand guide which teaches you how to take ownership of a file or folder manually in Windows:
[Guide] How to Take Ownership (Permission) of a File or Folder Manually in Windows?
Now the question comes! Once you have taken ownership of a file and now you want to restore "TrustedInstaller" as default owner of that file, how will you do that? How will you change the owner of a file back to "TrustedInstaller"?
We never realized that someone might need to restore ownership of a file to "TrustedInstaller" until we received following comment from an AskVG reader "KS":
How do I give permissions back to TrustedInstaller, when I changed it, TrustedInstaller wasn't in the list of possible owners anymore??That was really an interesting point. Once you take ownership of a file or folder in Windows, if you go back to its Properties and try to change the owner back to "TrustedInstaller", you'll be surprised to see that "TrustedInstaller" is no longer present in the users list.
So how to bring back the built-in system user "TrustedInstaller" and set it as default owner of a file or folder? Don't worry! Here is the solution.
Today in this tutorial, we'll tell you how to restore "TrustedInstaller" as default owner of a file or folder in Windows if you changed its owner to yourself?
So without wasting time, lets start the tutorial:
NOTE: The same method will apply to restore "TrustedInstaller" as owner of registry keys in Registry Editor.1. Go to the folder which contains the file or folder for which you want to restore ownership to "TrustedInstaller". Right-click on the file or folder and select Properties.
2. It'll open its Properties window. Now go to "Security" tab and click on Advanced button.
3. It'll open a new window. Now go to "Owner" tab and you'll see that the owner would be set to your username and "TrustedInstaller" would not be present in the list as we mentioned above.
Don't worry. We'll add it manually. Click on "Edit" button:
4. It'll open another window. Click on "Other users or groups" button.
5. Now type NT SERVICE\TrustedInstaller in "Enter the object name to select" text box and click on OK button as shown in following screenshot:
6. It'll immediately add "TrustedInstaller" to the users list. Click on Apply button.
7. Windows will show a message box, click on OK button to close it. Again click on OK button in all opened windows and you have successfully restored "TrustedInstaller" as default owner of the file or folder.
You can check and confirm the owner by opening the file or folder Properties and you'll see that "TrustedInstaller" has become the owner of that file or folder again.
.%20%20So%20you%20just%20need%20to%20right-click%20on%20a%20file%20or%20folder%20and%20select%20%22Take%20%20Ownership%22%20option%20and%20it%20automatically%20makes%20you%20the%20owner%20of%20that%20%20file/folder%20and%20assigns%20you%20full%20permission%20on%20that%20file/folder.%3Cbr%20/%3E%0A%3Cspan%3E%3Ca%20href%3D%22http://www.askvg.com/add-take-ownership-option-in-file-folder-context-menu-in-windows-vista/%22%20title%3D%22How%20to%20Add%20%E2%80%9CTake%20%0AOwnership%E2%80%9D%20Option%20to%20File%20or%20Folder%20Context%20Menu%20in%20Windows%20XP,%20Vista,%207%0A%20and%20Windows%208%22%3EHow%20%20to%20Add%20%E2%80%9CTake%20Ownership%E2%80%9D%20Option%20to%20File%20or%20Folder%20Context%20Menu%20in%20%20Windows%3C/a%3E%3C/span%3E%3Cbr%20/%3E%0AWe%20have%20also%20posted%20a%20detailed%20and%20easy%20to%20understand%20guide%20which%20%20teaches%20you%20how%20to%20take%20ownership%20of%20a%20file%20or%20folder%20manually%20in%20%20Windows:%3Cbr%20/%3E%0A%3Cspan%3E%3Ca%20href%3D%22http://www.askvg.com/guide-how-to-take-ownership-permission-of-a-file-or-folder-manually-in-windows/%22%20title%3D%22%5BGuide%5D%20How%20to%20%0ATake%20Ownership%20(Permission)%20of%20a%20File%20or%20Folder%20Manually%20in%20Windows?%22%3E%5BGuide%5D%20%20How%20to%20Take%20Ownership%20(Permission)%20of%20a%20File%20or%20Folder%20Manually%20in%20%20Windows?%3C/a%3E%3C/span%3E%3Cbr%20/%3E%0ANow%20the%20question%20comes!%20Once%20you%20have%20taken%20ownership%20of%20a%20file%20and%20%20now%20you%20want%20to%20restore%20%22TrustedInstaller%22%20as%20default%20owner%20of%20that%20%20file,%20how%20will%20you%20do%20that?%20How%20will%20you%20change%20the%20owner%20of%20a%20file%20back%20%20to%20%22TrustedInstaller%22?%3Cbr%20/%3E%0AWe%20never%20realized%20that%20someone%20might%20need%20to%20restore%20ownership%20of%20a%20%20file%20to%20%22TrustedInstaller%22%20until%20we%20received%20following%20comment%20from%20an%20%20AskVG%20reader%20%22KS%22:%3Cbr%20/%3E%0A%3Cblockquote%3EHow%20do%20I%20give%20permissions%20back%20to%20TrustedInstaller,%20when%20I%20%20changed%20it,%20TrustedInstaller%20wasn't%20in%20the%20list%20of%20possible%20owners%20%20anymore??%3C/blockquote%3EThat%20was%20really%20an%20interesting%20point.%20Once%20you%20take%20ownership%20of%20a%20%20file%20or%20folder%20in%20Windows,%20if%20you%20go%20back%20to%20its%20Properties%20and%20try%20to%20%20change%20the%20owner%20back%20to%20%22TrustedInstaller%22,%20you'll%20be%20surprised%20to%20see%20%20that%20%22TrustedInstaller%22%20is%20no%20longer%20present%20in%20the%20users%20list.%3Cbr%20/%3E%0ASo%20how%20to%20bring%20back%20the%20built-in%20system%20user%20%22TrustedInstaller%22%20and%20%20set%20it%20as%20default%20owner%20of%20a%20file%20or%20folder?%20Don't%20worry!%20Here%20is%20the%20%20solution.%3Cbr%20/%3E%0AToday%20in%20this%20tutorial,%20we'll%20tell%20you%20how%20to%20restore%20%20%22TrustedInstaller%22%20as%20default%20owner%20of%20a%20file%20or%20folder%20in%20Windows%20if%20%20you%20changed%20its%20owner%20to%20yourself?%3Cbr%20/%3E%0ASo%20without%20wasting%20time,%20lets%20start%20the%20tutorial:%3Cbr%20/%3E%0A%3Cblockquote%3E%3Cem%3E%3Cstrong%3ENOTE:%3C/strong%3E%20The%20same%20method%20will%20apply%20to%20%20restore%20%22TrustedInstaller%22%20as%20owner%20of%20registry%20keys%20in%20Registry%20Editor.%3C/em%3E%3C/blockquote%3E%3Cstrong%3E1.%3C/strong%3E%20Go%20to%20the%20folder%20which%20contains%20the%20file%20or%20%20folder%20for%20which%20you%20want%20to%20restore%20ownership%20to%20%22TrustedInstaller%22.%20%20Right-click%20on%20the%20file%20or%20folder%20and%20select%20%3Cstrong%3EProperties%3C/strong%3E.%3Cbr%20/%3E%0A%3Cstrong%3E2.%3C/strong%3E%20It'll%20open%20its%20Properties%20window.%20Now%20go%20to%20%22%3Cstrong%3ESecurity%3C/strong%3E%22%20%20tab%20and%20click%20on%20%3Cstrong%3EAdvanced%3C/strong%3E%20button.%3Cbr%20/%3E%0A%3Cimg%20alt%3D%22File_Permissions_Details.png%22%20src%3D%22http://media.askvg.com/articles/images2/File_Permissions_Details.png%22%20/%3E%3Cbr%20/%3E%0A%3Cstrong%3E3.%3C/strong%3E%20It'll%20open%20a%20new%20window.%20Now%20go%20to%20%22%3Cstrong%3EOwner%3C/strong%3E%22%20%20tab%20and%20you'll%20see%20that%20the%20owner%20would%20be%20set%20to%20your%20username%20and%20%20%22TrustedInstaller%22%20would%20not%20be%20present%20in%20the%20list%20as%20we%20mentioned%20%20above.%3Cbr%20/%3E%0ADon't%20worry.%20We'll%20add%20it%20manually.%20Click%20on%20%22%3Cstrong%3EEdit%3C/strong%3E%22%20%20button:%3Cbr%20/%3E%0A%3Cimg%20alt%3D%22Editing_Owner_File_Folder.png%22%20src%3D%22http://media.askvg.com/articles/images3/Editing_Owner_File_Folder.png%22%20/%3E%3Cbr%20/%3E%0A%3Cstrong%3E4.%3C/strong%3E%20It'll%20open%20another%20window.%20Click%20on%20%22%3Cstrong%3EOther%20%20users%20or%20groups%3C/strong%3E%22%20button.%3Cbr%20/%3E%0A%3Cimg%20alt%3D%22Changing_Owner_File_Folder.png%22%20src%3D%22http://media.askvg.com/articles/images3/Changing_Owner_File_Folder.png%22%20/%3E%3Cbr%20/%3E%0A%3Cstrong%3E5.%3C/strong%3E%20Now%20type%20%3Cstrong%3E%3Cspan%3ENT%20SERVICE%5CTrustedInstaller%3C/span%3E%3C/strong%3E%20in%20%22Enter%20the%20%20object%20name%20to%20select%22%20text%20box%20and%20click%20on%20OK%20button%20as%20shown%20in%20%20following%20screenshot:%3Cbr%20/%3E%0A%3Cimg%20alt%3D%22Restoring_TruestedInstaller_as_Owner_File_Folder.png%22%20src%3D%22http://media.askvg.com/articles/images3/Restoring_TruestedInstaller_as_Owner_File_Folder.png%22%20/%3E%3Cbr%20/%3E%0A%3Cstrong%3E6.%3C/strong%3E%20It'll%20immediately%20add%20%22TrustedInstaller%22%20to%20the%20%20users%20list.%20Click%20on%20%3Cstrong%3EApply%3C/strong%3E%20button.%3Cbr%20/%3E%0A%3Cimg%20alt%3D%22Setting_TruestedInstaller_as_Owner_File_Folder.png%22%20src%3D%22http://media.askvg.com/articles/images3/Setting_TruestedInstaller_as_Owner_File_Folder.png%22%20/%3E%3Cbr%20/%3E%0A%3Cstrong%3E7.%3C/strong%3E%20Windows%20will%20show%20a%20message%20box,%20click%20on%20OK%20%20button%20to%20close%20it.%20Again%20click%20on%20OK%20button%20in%20all%20opened%20windows%20and%20%20you%20have%20successfully%20restored%20%22TrustedInstaller%22%20as%20default%20owner%20of%20%20the%20file%20or%20folder.%3Cbr%20/%3E%0AYou%20can%20check%20and%20confirm%20the%20owner%20by%20opening%20the%20file%20or%20folder%20%20Properties%20and%20you'll%20see%20that%20%22TrustedInstaller%22%20has%20become%20the%20owner%20%20of%20that%20file%20or%20folder%20again.%3C/div%3E)
Will Windows 8 be a Good OS for Desktop PCs? 4 Aug 2012 2:33 AM (12 years ago)

Although there are many improvements and new additions in this new Windows OS but the question comes, will Windows 8 be a good OS for Desktop and laptops? This question came in my mind because it seems Microsoft is mainly targeting touch-devices like Tablets for Windows 8 development. Why? Please read below:
Lets talk about Start Screen first. Start Screen shows big live thumbnails (called Tiles) of installed programs in Windows 8. Its extremely cool to have such kind of screen in touch devices as the user needs to use his finger to select an item and it would be really hard to select an item from traditional start menu. Big thumbnails help user in opening a program easily and quickly.Windows 8 Start Screen
But what about Desktop and laptop users? Why would a Desktop user want new Start Screen to forcefully occupy the whole screen area to show big thumbnails of programs? Start Menu takes a very small amount of screen space and the user also have access to Desktop but in Start Screen, if you want to look at Desktop, you'll need to click on Desktop tile or use keyboard shortcuts.
Also using mouse to scroll between several program tiles on Start Screen takes much time compared to the good old start menu where it shows a list of all installed programs using small icons and text which doesn't take much space.
So for a Desktop user, Start Menu is far better than new Start Screen.
PS: There is a registry tweak to enable Start Menu in Windows which can be found here. But again its a hidden trick and I'm not sure whether it'll work in final RTM build of Windows 8 or not? Microsoft can disable this trick in RTM build.
Now the news are coming from latest Windows 8 testing build that Microsoft has removed "Start button" from Taskbar.Removal of Start Button
First removal of Classic start menu from Windows 7, then removal of the whole start menu from Windows 8 and now they removed Start button from Taskbar? Where are they going?
The Start button in Windows 8 Developer Preview build used to launch new Start Screen and now after the removal of Start button, you need to move your mouse cursor to the bottom-left corner of screen which shows a small thumbnail of Start Screen. You need to click on that thumbnail to launch Start Screen.

The reason behind this move is the presence of actual "Start Button" key on all touch devices. Actually Microsoft has provided some guidelines to all computer manufacturer companies to develop devices compatible with Windows 8. The first and most important guideline is the presence of Start button key. All touch devices must have a Start button on the device panel which should launch the Start Screen.
Now Microsoft is again thinking about touch devices and forgetting about Desktop users. Desktop users don't need Start Screen. They just need to click on Start Button and launch the desired program.
Instead of completely removing the Start button, Microsoft could have made it a bit shorter or could have used a rectangular shape similar to Aero Peek (Show Desktop) rectangle present in the end of Taskbar. Microsoft can make it completely transparent or put Windows flag icon or a big S on it. So that at least users can know that they need to click on it to access Start Screen.
And about Metro Apps, why would a Desktop user need a chromeless Internet Explorer metro version when he already have an excellent IE9 version? Metro IE is great for touch devices like tablets where the screen is small and you need to use your fingers to browse the sites but for a Desktop user its not so great. IE9 already comes with minimal UI. It hardly takes screen space and provides much space to browse websites.Metro Apps
Again Metro Apps are great for touch devices but not for Desktops.
Its true that tablets are becoming popular day by day but Desktop users are still there and will always be there so we should not forget about them.What Would Be The Best Solution?
Why to create a single OS which is perfect for tablets but not very good for Desktops?
What Microsoft should do is to develop 2 separate editions of Windows 8, one for tablets and the other for Desktops. Desktop edition should come with traditional Start button and Start Menu and the Tablet edition should come with new Start Screen.
Or Microsoft can program Windows 8 setup in such a way that it should automatically detect the computer system at the installation time whether its a touch device or Desktop and then it should install the right edition.
Also instead of completely removing a component, Microsoft should provide an option to switch between features. If they wish, they can disable Start menu but they should also provide an option in Taskbar Properties to enable traditional start menu. Same thing can be done for Start button. Providing options to user is better instead of forcing him to use something which he doesn't want to use.
I'm sure if tablets were not so popular and Microsoft didn't think about them, Windows 8 would have been something different than what we are seeing today.
Just my two cents. What do you think???
Windows 8 Gets New Metro Style Logo, Goodbye Windows Flag 4 Aug 2012 2:31 AM (12 years ago)
According to Microsoft, Windows 8 is a complete reimagination of Windows operating system. the Windows logo is a strong and widely recognized mark. In some ways you can trace the evolution of the Windows logo in parallel with the advancements of the technology used to create logos. From the simple two color version in Windows 1.0 to the intricate and detailed renderings in Windows Vista and Windows 7, each change makes sense in the context in which it was created. As computing capabilities increased, so did the use of that horse power to render more colors, better fonts, and more detailed and life-like 3D visual effects like depth, shadows, and materiality. And what started as a simple "window" to compliment the product name became a flying or waving flag. But if you look back to the origins of the logo you see that it really was meant to be a window.
Following is the brand new Windows 8 logo:
With Windows 8, Microsoft approached the logo redesign with a few key goals on mind:
1. Microsoft wanted the new logo to be both modern and classic by echoing the International Typographic Style (or Swiss design) that has been a great influence on Metro style design philosophy. Using bold flat colors and clean lines and shapes, the new logo has the characteristics of way-finding design systems seen in airports and subways.
2. It was important that the new logo carries Metro principle of being "Authentically Digital". It does not try to emulate faux-industrial design characteristics such as materiality (glass, wood, plastic, etc.). It has motion – aligning with the fast and fluid style you'll find throughout Windows 8.
3. Microsoft's final goal was for the new logo to be humble, yet confident. Welcoming you in with a slight tilt in perspective and when you change your color, the logo changes to reflect you. It is a "Personal" Computer after all.
So what do you think about this new logo? Like it or do you find it too simple? Feel free to share your feedback about this new Windows 8 logo...
![]()
How to Use Windows 8 Developer Preview for One More Year? 4 Aug 2012 2:29 AM (12 years ago)
But what if you don't want to uninstall Windows 8 Developer Preview and want to keep it using for some more time as you have installed your favorite software programs and don't want to take the tension of installing them again?
Don't worry! Here is the solution. Microsoft has released a new update for Windows 8 Developer Preview which will extend the expiry date to January 15, 2013 so you'll get almost one extra year to enjoy Windows 8 DP build.
But before talking about the update, lets see what will happen when Windows 8 Developer Preview license expires:
You'll receive following message on the Activate Windows screen in Control Panel:
The license for this pre-released version of Windows has expired. You'll need to enter a new product key to activate Windows. Until you activate, Windows will restart every 1 hour, so you should back up your data.You'll receive the following message on the Windows Activation screen:
Install the latest version of Windows.
This pre-release version of Windows has expired. Your computer will restart every 2 hours and you might lose any unsaved data.You'll receive the following message on the Personalize pane in Control Panel:
You need to Activate Windows before you can personalize your PC.Additionally, starting 14 days before the expiration date, you may receive the following notification on the desktop and in the Security section of Action Center:
This pre-release version of Windows will expire soon. Go to Windows Activation to purchase and install a released version of Windows.So if you don't want to uninstall Windows 8 Developer Preview and want to use it for some more time, open Windows Update in Windows 8 Developer Preview and install the new update KB2671501 to extend the expiry period.
![]()
Windows 8 Consumer Preview (Public Beta) Released, Download Now 4 Aug 2012 2:28 AM (12 years ago)
Today Microsoft has released a free Consumer Preview build of Windows 8 to public. You may consider it as a public Beta build, Microsoft has decided to call it as Consumer Preview build.
Windows 8 Consumer Preview is available in English, Chinese (Simplified), French, German, and Japanese.
Since its a beta build, you should get better performance and lesser bugs compared to the previous Developer Preview build.
There are many noticeable changes in this Consumer Preview build such as removal of Start button, a little bit modified Ribbon UI in Windows Explorer, new login screen, better Start Screen, etc.
Interested people can download Windows 8 Consumer Preview (Beta) build using following download link:
Download Windows 8 Consumer Preview (Public Beta)The first download link contains Windows 8 Consumer Preview Setup which includes an optimized download and built-in tools for creating an ISO or bootable flash drive. Alternatively, you can download the ISO image using second link. Third link contains direct download links for all available editions of Windows 8 Consumer Preview.
Download Windows 8 Consumer Preview (Public Beta) ISO Images
Direct Download Links for Windows 8 Consumer Preview (Public Beta)
The Consumer Preview of Windows 8 will expire on January 15th, 2013 so you can enjoy it for approx. one year.
Windows 8 Consumer Preview Setup will check to see if your PC can run Windows 8 Consumer Preview and select the right download. Setup also features a compatibility report and upgrade assistance. Built-in tools for creating an ISO or bootable flash drive are available for some previous versions of Windows (excluding Windows XP and earlier).
One more thing, you can upgrade to Windows 8 Consumer Preview from Windows 8 Developer Preview, Windows 7, Windows Vista, or Windows XP, but you might not be able to keep all of your files, programs, and settings.
If Windows 8 Consumer Preview setup asks for a product key at the time of installation, you can type any of following keys:
NF32V-Q9P3W-7DR7Y-JGWRW-JFCK8You can also download following interesting stuff about Windows 8:
DNJXJ-7XBW8-2378T-X22TX-BKG7J
Download Windows 8 Consumer Preview Product Guide
Download Remote Server Administration Tools for Windows 8 Consumer Preview
Windows 8 Consumer Preview (Public Beta) Frequently Asked Questions (FAQ)
![]()
[Direct Download Links] Windows 8 Consumer Preview (Public Beta) 4 Aug 2012 2:27 AM (12 years ago)

English64-bit (x64) Download Link (3.3 GB)
32-bit (x86) Download Link (2.5 GB)
Chinese (Simplified)64-bit (x64) Download Link (3.4 GB)
32-bit (x86) Download Link (2.6 GB)
French64-bit (x64) Download Link (3.3 GB)
32-bit (x86) Download Link (2.5 GB)
German64-bit (x64) Download Link (3.3 GB)
32-bit (x86) Download Link (2.5 GB)
Japanese64-bit (x64) Download Link (3.3 GB)
32-bit (x86) Download Link (2.5 GB)
When you'll run Windows 8 Consumer Preview setup, it'll ask for a product key. You can use any of following 2 product keys provided by Microsoft:
DNJXJ-7XBW8-2378T-X22TX-BKG7JPlease note that the Consumer Preview of Windows 8 will expire on January 15th, 2013 so you can enjoy it for approx. one year.
NF32V-Q9P3W-7DR7Y-JGWRW-JFCK8
One more thing, you can upgrade to Windows 8 Consumer Preview from Windows 8 Developer Preview, Windows 7, Windows Vista, or Windows XP, but you might not be able to keep all of your files, programs, and settings.
![]()
Windows 8 Consumer Preview (Public Beta) Frequently Asked Questions (FAQ) 4 Aug 2012 2:14 AM (12 years ago)
NOTE: Almost all things are same for Windows 8 Release Preview as well.
Microsoft has released free Consumer Preview (Beta) build of its upcoming OS "Windows 8" to public which can be downloaded using following link:
Windows 8 Consumer Preview (Public Beta) Released, Download Now
There are many questions related to Windows 8 Consumer Preview which are coming in people minds. We have received so many emails about Windows 8 from various AskVG readers asking almost same questions. So today in this topic we are going to answer all those frequently asked questions (FAQs) related to Windows 8.
So without wasting time, lets share Windows 8 Consumer Preview FAQs:
Q.1. What is Windows 8 Consumer Preview? Is it Beta version of Windows 8?Ans. Yes. Windows 8 Consumer Preview is actually a Beta version of Windows 8 which has been released absolutely free to public by Microsoft.
Microsoft called it as Consumer Preview because the company didn't want to create confusion as the meaning of the word "Beta" has changed a lot lately.
Q.2. Is Windows 8 Consumer Preview stable? Can I use it as my primary OS?Ans. Since its a beta version of Windows 8, bugs and issues are obvious but you should expect better performance and experience compared to Windows 8 Developer Preview build.
If you use your computer for normal stuff like checking email, web browsing, playing games, etc, you can install and use Windows 8 Consumer Preview as primary OS.
Q.3. What are the system requirements of Windows 8 Consumer Preview?Ans. Windows 8 Consumer Preview system requirements are same as of Windows 7. If you are using Windows Vista or 7 in your system, it should work with Windows 8 without any problem.
You can take a look at following topic for better idea:
Windows 8 Consumer Preview (Public Beta) System Requirements
Q.4. I already have a Windows installed in my system, can I upgrade the existing Windows to Windows 8 Consumer Preview?Ans. That's an important question! Yes, you can upgrade from Windows XP, Vista, Windows 7 or Windows 8 Developer Preview to Windows 8 Consumer Preview but there are some limitations.
Upgrade from Windows 8 Developer Preview:
If you upgrade your system from Windows 8 Developer Preview to Windows 8 Consumer Preview, you'll be able to keep your user accounts and files but you won't be able to keep installed programs and Windows settings.
Upgrade from Windows 7:
If you upgrade your system from Windows 7 to Windows 8 Consumer Preview, you'll be able to keep your user accounts and files, installed programs and Windows settings.
Upgrade from Windows Vista:
If you upgrade your system from Windows Vista to Windows 8 Consumer Preview, you'll be able to keep your user accounts and files and Windows settings but you won't be able to keep installed programs.
Upgrade from Windows XP:
If you upgrade your system from Windows XP to Windows 8 Consumer Preview, you'll be able to keep your user accounts and files but you won't be able to keep installed programs and Windows settings.
Q.5. Should I upgrade my existing Windows to Windows 8 Consumer Preview or should I install it separately?Ans. Installing Windows 8 Consumer Preview separately on a different partition and doing a dual-boot between existing Windows version and Windows 8 Consumer Preview would be a better idea. It'll help you in uninstalling/removing Windows 8 Consumer Preview easily from your system in future if you want. Also you'll not have any chance of data loss and your existing Windows version will remain untouched.
Q.6. If I upgrade my existing Windows to Windows 8 Consumer Preview, will I able to uninstall Windows 8 Consumer Preview in future and return to previous Windows version?Ans. No. You can't go back to previous Windows version. You'll need to reinstall it using setup disk.
Q.7. How to install Windows 8 Consumer Preview in a virtualization software like VMware Workstation, VirtualBox, Virtual PC, etc?Ans. Installing a testing product in a virtualization software is a wise idea. It helps in testing the product before actually installing it in your system.
[Windows 8 Start Screen] How to Pin, Unpin, Resize, Move, Close and Search Tiles 4 Aug 2012 2:13 AM (12 years ago)
If you don't like a tile in Start Screen and want to remove it from the screen, just right-click on it and click on "Unpin from Start" option in the bottom bar:1. How to Unpin (Remove) or Resize a Tile in Start Screen

If its a 3rd party program tile, you can also uninstall it by clicking on "Uninstall" button.
You can also resize a rectangular tile by clicking on "Smaller" button. You can again make that tile large by clicking on "Larger" button.
If you accidentally removed a tile and want to pin it back to Start Screen or if you want to add a new tile to Start Screen, move your mouse cursor to the extreme top-right corner. It'll show the new Charms bar, select "Search" option from it.2. How to Pin New Tiles in Start Screen
Alternatively, you can press "Ctrl+Tab" keys together to access Apps screen or right-click on Start Screen and click on "All apps" option in bottom bar.
It'll open the Apps page where you'll get a long list of lots of interesting apps. Right-click on an app which you want to pin to Start Screen and click on "Pin to Start" option in bottom bar:
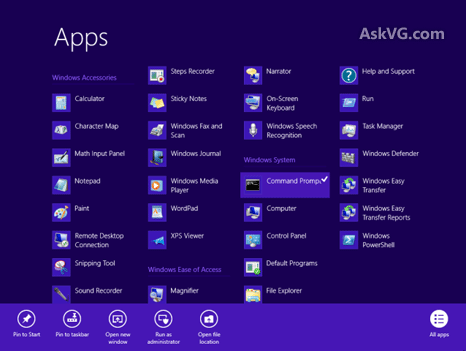
That's it. It'll immediately add the app tile to Start Screen.
Did you know you can also move the tiles in Start Screen using simple drag-n-drop? Take an example of the above mentioned "Command Prompt" tile which we added manually. We just dragged-n-dropped it at the beginning of Start Screen:3. How to Move Tiles in Start Screen

Isn't it simple?
You can close a running app by pressing Alt+F4 keys together. Or you can move mouse cursor to top-middle area of screen and the cursor will change into a hand shape. Now click and hold the cursor and drag-n-drop it to the bottom and it'll immediately close the app.4. How to Close Apps in Start Screen
%20or%20%20Resize%20a%20Tile%3C/strong%3E%3Cstrong%3E%20in%20Start%20Screen%3C/strong%3E%3C/div%3E%3C/blockquote%3EIf%20you%20don't%20like%20a%20tile%20in%20Start%20Screen%20and%20want%20to%20remove%20it%20from%20%20the%20screen,%20just%20right-click%20on%20it%20and%20click%20on%20%22%3Cstrong%3EUnpin%20from%20%20Start%3C/strong%3E%22%20option%20in%20the%20bottom%20bar:%3Cbr%20/%3E%0A%3Cimg%20alt%3D%22Unpin_Tile_Windows_8_Start_Screen.png%22%20src%3D%22http://media.askvg.com/articles/images3/Unpin_Tile_Windows_8_Start_Screen.png%22%20/%3E%3Cbr%20/%3E%0AIf%20its%20a%203rd%20party%20program%20tile,%20you%20can%20also%20uninstall%20it%20by%20%20clicking%20on%20%22%3Cstrong%3EUninstall%3C/strong%3E%22%20button.%3Cbr%20/%3E%0AYou%20can%20also%20resize%20a%20rectangular%20tile%20by%20clicking%20on%20%22%3Cstrong%3ESmaller%3C/strong%3E%22%20%20button.%20You%20can%20again%20make%20that%20tile%20large%20by%20clicking%20on%20%22%3Cstrong%3ELarger%3C/strong%3E%22%20%20button.%3Cbr%20/%3E%0A%3Cblockquote%3E%3Cdiv%3E%3Cstrong%3E2.%20How%20to%20Pin%20New%20Tiles%3C/strong%3E%3Cstrong%3E%20%20in%20Start%20Screen%3C/strong%3E%3C/div%3E%3C/blockquote%3EIf%20you%20accidentally%20removed%20a%20tile%20and%20want%20to%20pin%20it%20back%20to%20Start%20%20Screen%20or%20if%20you%20want%20to%20add%20a%20new%20tile%20to%20Start%20Screen,%20move%20your%20mouse%20%20cursor%20to%20the%20extreme%20top-right%20corner.%20It'll%20show%20the%20new%20Charms%20bar,%20%20select%20%22%3Cstrong%3ESearch%3C/strong%3E%22%20option%20from%20it.%3Cbr%20/%3E%0AAlternatively,%20you%20can%20press%20%22%3Cstrong%3ECtrl+Tab%3C/strong%3E%22%20keys%20%20together%20to%20access%20Apps%20screen%20or%20right-click%20on%20Start%20Screen%20and%20click%20%20on%20%22%3Cstrong%3EAll%20apps%3C/strong%3E%22%20option%20in%20bottom%20bar.%3Cbr%20/%3E%0AIt'll%20open%20the%20Apps%20page%20where%20you'll%20get%20a%20long%20list%20of%20lots%20of%20%20interesting%20apps.%20Right-click%20on%20an%20app%20which%20you%20want%20to%20pin%20to%20Start%20%20Screen%20and%20click%20on%20%22%3Cstrong%3EPin%20to%20Start%3C/strong%3E%22%20option%20in%20bottom%20%20bar:%3Cbr%20/%3E%0A%3Cimg%20alt%3D%22Pin_New_Tile_Windows_8_Start_Screen.png%22%20src%3D%22http://media.askvg.com/articles/images3/Pin_New_Tile_Windows_8_Start_Screen.png%22%20/%3E%3Cbr%20/%3E%0AThat's%20it.%20It'll%20immediately%20add%20the%20app%20tile%20to%20Start%20Screen.%3Cbr%20/%3E%0A%3Cblockquote%3E%3Cdiv%3E%3Cstrong%3E3.%20How%20to%20Move%20Tiles%20in%20Start%20%20Screen%3C/strong%3E%3C/div%3E%3C/blockquote%3EDid%20you%20know%20you%20can%20also%20move%20the%20tiles%20in%20Start%20Screen%20using%20simple%20%20drag-n-drop?%20Take%20an%20example%20of%20the%20above%20mentioned%20%22Command%20Prompt%22%20%20tile%20which%20we%20added%20manually.%20We%20just%20dragged-n-dropped%20it%20at%20the%20%20beginning%20of%20Start%20Screen:%3Cbr%20/%3E%0A%3Cimg%20alt%3D%22Move_Tile_Windows_8_Start_Screen.png%22%20src%3D%22http://media.askvg.com/articles/images3/Move_Tile_Windows_8_Start_Screen.png%22%20/%3E%3Cbr%20/%3E%0AIsn't%20it%20simple?%3Cbr%20/%3E%0A%3Cblockquote%3E%3Cdiv%3E%3Cstrong%3E4.%20How%20to%20Close%20Apps%20in%20Start%20%20Screen%3C/strong%3E%3C/div%3E%3C/blockquote%3EYou%20can%20close%20a%20running%20app%20by%20pressing%20%3Cstrong%3EAlt+F4%3C/strong%3E%20keys%20%20together.%20Or%20you%20can%20move%20mouse%20cursor%20to%20top-middle%20area%20of%20screen%20and%20%20the%20cursor%20will%20change%20into%20a%20hand%20shape.%20Now%20click%20and%20hold%20the%20cursor%20%20and%20drag-n-drop%20it%20to%20the%20bottom%20and%20it'll%20immediately%20close%20the%20app.%3C/div%3E)
How to Log Off, Restart and Shut Down Windows 8 PC? 4 Aug 2012 2:12 AM (12 years ago)
The new Start Screen also doesn't provide any direct shortcut to restart or shut down the PC, then how to turn your system off?
Don't worry! Although there are no direct options given in Windows 8 but here in this tutorial we are going to share lots of ways to lock, log off, restart and shut down your Windows 8 PC:
It doesn't matter whether you are on new Start Screen or Windows 8 Desktop, simply press the good old Ctrl+Alt+Del key combination and it'll show following screen:METHOD 1: Using Ctrl+Alt+Del Key Combination

Now you can lock, log off or switch between users. If you want to restart or shut down your system, click on the turn off icon given at the bottom-right corner and select the desired option.
Again this method works for both Start Screen and Desktop. Simply move your mouse cursor at the extreme top-right corner and it'll show the new Charms bar. Click on "Settings" charm and it'll show a sidebar in right-side of screen.METHOD 2: Using New Charms Bar

There you can click on "Power" button and select the desired option.
This method only works for Desktop. Click on Taskbar and press Alt+F4 keys together. It'll show following dialog box:METHOD 3: Using Alt+F4 Key Combination

Now you can select the desired option from drop-down menu and click on OK button.
This method only works for Start Screen. It allows you to lock or log off in Windows 8.METHOD 4: Using User Details Shown at Start Screen
Simply click on your username or avatar shown at the top-right corner of Start Screen and there you can select the desired option:

That's it. These all are the easiest and quickest ways to log off, restart and shut down a Windows 8 PC. Please feel free to share more ways if you know in your comment...
%3C/em%3E%3Cbr%20/%3E%0AThe%20new%20%3Ca%20href%3D%22http://www.askvg.com/how-to-log-off-restart-and-shut-down-windows-8-pc/%22%20target%3D%22undefined%22%3E%3Cspan%3E%3Cspan%3EStart%20%3C/span%3E%3Cspan%3EScreen%3C/span%3E%3C/span%3E%3C/a%3E%20also%20doesn't%20provide%20any%20direct%20%20shortcut%20to%20restart%20or%20shut%20down%20the%20PC,%20then%20how%20to%20turn%20your%20system%20%20off?%3Cbr%20/%3E%0ADon't%20worry!%20Although%20there%20are%20no%20direct%20options%20given%20in%20Windows%208%20%20but%20here%20in%20this%20tutorial%20we%20are%20going%20to%20share%20lots%20of%20ways%20to%20lock,%20%20log%20off,%20restart%20and%20shut%20down%20your%20Windows%208%20PC:%3Cbr%20/%3E%0A%3Cblockquote%3E%3Cdiv%3E%3Cstrong%3EMETHOD%201:%20Using%20Ctrl+Alt+Del%20Key%20%20Combination%3C/strong%3E%3C/div%3E%3C/blockquote%3EIt%20doesn't%20matter%20whether%20you%20are%20on%20new%20Start%20Screen%20or%20Windows%208%20%20Desktop,%20simply%20press%20the%20good%20old%20%3Cstrong%3ECtrl+Alt+Del%3C/strong%3E%20key%20%20combination%20and%20it'll%20show%20following%20screen:%3Cbr%20/%3E%0A%3Cimg%20alt%3D%22Restart_Shutdown_Windows_8_PC_2.png%22%20src%3D%22http://media.askvg.com/articles/images3/Restart_Shutdown_Windows_8_PC_2.png%22%20/%3E%3Cbr%20/%3E%0ANow%20you%20can%20lock,%20log%20off%20or%20switch%20between%20users.%20If%20you%20want%20to%20%20restart%20or%20shut%20down%20your%20system,%20click%20on%20the%20turn%20off%20icon%20given%20at%20%20the%20bottom-right%20corner%20and%20select%20the%20desired%20option.%3Cbr%20/%3E%0A%3Cblockquote%3E%3Cdiv%3E%3Cstrong%3EMETHOD%202:%20Using%20New%20Charms%20Bar%3Cbr%20/%3E%0A%3C/strong%3E%3C/div%3E%3C/blockquote%3EAgain%20this%20method%20works%20for%20both%20Start%20Screen%20and%20Desktop.%20Simply%20%20move%20your%20mouse%20cursor%20at%20the%20extreme%20top-right%20corner%20and%20it'll%20show%20%20the%20new%20Charms%20bar.%20Click%20on%20%22%3Cstrong%3ESettings%3C/strong%3E%22%20charm%20and%20it'll%20%20show%20a%20sidebar%20in%20right-side%20of%20screen.%3Cbr%20/%3E%0A%3Cimg%20alt%3D%22Restart_Shutdown_Windows_8_PC.png%22%20src%3D%22http://media.askvg.com/articles/images3/Restart_Shutdown_Windows_8_PC.png%22%20/%3E%3Cbr%20/%3E%0AThere%20you%20can%20click%20on%20%22%3Cstrong%3EPower%3C/strong%3E%22%20button%20and%20select%20the%20%20desired%20option.%3Cbr%20/%3E%0A%3Cblockquote%3E%3Cdiv%3E%3Cstrong%3EMETHOD%203:%20Using%20Alt+F4%20Key%20%20Combination%3C/strong%3E%3C/div%3E%3C/blockquote%3EThis%20method%20only%20works%20for%20Desktop.%20Click%20on%20%3Ca%20href%3D%22http://www.askvg.com/how-to-log-off-restart-and-shut-down-windows-8-pc/%22%20target%3D%22undefined%22%3E%3Cspan%3E%3Cspan%3ETaskbar%3C/span%3E%3C/span%3E%3C/a%3E%20%20and%20press%20%3Cstrong%3EAlt+F4%3C/strong%3E%20keys%20together.%20It'll%20show%20following%20%20dialog%20box:%3Cbr%20/%3E%0A%3Cimg%20alt%3D%22Log_Off_Restart_Shutdown_Windows_8_PC.png%22%20src%3D%22http://media.askvg.com/articles/images3/Log_Off_Restart_Shutdown_Windows_8_PC.png%22%20/%3E%3Cbr%20/%3E%0ANow%20you%20can%20select%20the%20desired%20option%20from%20drop-down%20menu%20and%20click%20%20on%20OK%20button.%3Cbr%20/%3E%0A%3Cblockquote%3E%3Cdiv%3E%3Cstrong%3EMETHOD%204:%20Using%20User%20Details%20%20Shown%20at%20Start%20Screen%3C/strong%3E%3C/div%3E%3C/blockquote%3EThis%20method%20only%20works%20for%20Start%20Screen.%20It%20allows%20you%20to%20lock%20or%20log%20%20off%20in%20Windows%208.%3Cbr%20/%3E%0ASimply%20click%20on%20your%20username%20or%20avatar%20shown%20at%20the%20top-right%20corner%20%20of%20Start%20Screen%20and%20there%20you%20can%20select%20the%20desired%20option:%3Cbr%20/%3E%0A%3Cimg%20alt%3D%22Log_off_Lock_Windows_8_PC.png%22%20src%3D%22http://media.askvg.com/articles/images3/Log_off_Lock_Windows_8_PC.png%22%20/%3E%3Cbr%20/%3E%0AThat's%20it.%20These%20all%20are%20the%20easiest%20and%20quickest%20ways%20to%20log%20off,%20%20restart%20and%20shut%20down%20a%20Windows%208%20PC.%20Please%20feel%20free%20to%20share%20more%20%20ways%20if%20you%20know%20in%20your%20comment...%3C/div%3E)
How to Enable Good Old Start Button (ORB) and Start Menu in Windows 8? 4 Aug 2012 2:11 AM (12 years ago)
Will Windows 8 be a Good OS for Desktop PCs?
Microsoft already removed start menu from Windows 8 in previously released Developer Preview build and now the start button has also gone.
Without start button the Taskbar looks weird and new users can't decide where to go and open their favorite programs? Today in this tutorial, we are going to tell you how to bring the good old start button and start menu back in Windows 8?
Yes. You heard it right. although start button and start menu have been permanently removed from Windows 8 but there are ways to get them back.
In this tutorial, we'll share 2 easy to use methods which can help you in enabling start button and start menu in Windows 8:
- METHOD 1: Using New Taskbar Toolbar
- METHOD 2: Using 3rd Party Software
Long time back we shared a small tutorial to get classic start menu back in Windows 7 in which we took help of built-in Taskbar toolbar feature of Windows.METHOD 1: Using New Taskbar Toolbar
[Manual Method] Get “Classic Start Menu” Back in Windows 7 Without Using 3rd Party Software
The same method also works in Windows 8 and you can get an alternative start menu as shown in following screenshot:

As you can see you can access all programs list using this new menu similar to start menu.
If you are not satisfied with this method and want to get original Windows 7 style start ORB and start menu in Windows 8, then following method will definitely help you.
In this method, we'll use a freeware "ViStart" which was actually created for Windows XP to get Windows Vista or 7 style start menu but this excellent tool works in Windows 8 as well.METHOD 2: Using 3rd Party Software
1. So first download ViStart using following topic:
ViStart: Free Windows Vista and Windows 7 Start Menu Clone for Windows XP
NOTE: When you run ViStart setup, it tries to install two 3rd party programs bundled with it. You can skip the installation of these extra programs by unchecking "Install Babylon toolbar" option and clicking on "Decline" button when the setup asks to install "Registry Cleaner Pro" software.
2. Once you install ViStart, it'll bring back the start ORB and start menu in Windows 8. But the start ORB will overlap Taskbar button as shown in following screenshot:

3. You can fix this problem by adding a new blank toolbar in Taskbar. Simply follow these steps:
3.a. First create a new folder anywhere. It might be on Desktop, in C: drive or in any other drive. We have created a folder "test" in C: drive in our example.

3.b. Now right-click on Taskbar and select "Toolbars -> New toolbar..." option.
3.c. It'll open browse dialog box where you'll need to select a folder. Select the new folder which you created in 3.a. step and click on "Select Folder" button.

3.d. It'll immediately add the new folder toolbar in Taskbar. It'll be added near system tray (notification area) as shown in following screenshot:

3.e. Right-click on Taskbar and uncheck "Lock the Taskbar" option. It'll show a placeholder to drag the folder toolbar.

3.f. Now you need to drag-n-drop the new folder toolbar to the start of Taskbar. Simply click and hold on the folder toolbar handler, drag the handler to the start of Taskbar. It'll put the new folder toolbar to the start of Taskbar and you'll see a huge gap between folder toolbar and program buttons.
3.g. Now right-click on the empty area between folder toolbar and program buttons and uncheck both "Show Text" and "Show title" options.

3.h. Now you can drag-n-drop the program buttons handler near start ORB to remove the gap.

3.i. Lock the Taskbar again and now start ORB will no longer overlap program buttons and you'll get a working start ORB and start menu in Windows 8.

ViStart works perfectly without any problem in Windows 8 so you'll never miss the good old Start button and Start Menu in Windows 8.
Windows 8 Hidden Secret Features and Useful Hotkeys 4 Aug 2012 2:10 AM (12 years ago)
Microsoft has made lots of changes in Windows 8. Microsoft has completely removed Start Menu and Start button from Windows 8 and all known registry tricks or other methods to get them back are not working in this new build.
Removal of Start button and Start Menu also makes performing power operations a bit difficult. Now you don't get a direct option to restart, shut down your PC. All these options have been moved to Settings charm which can be accessed by moving your mouse cursor to top-right corner of screen and selecting Settings charm from Charms bar.
We have posted 2 detailed guides for getting Start Menu, Start button back in Windows 8 and for adding power options in Desktop context menu. You can read them at following links:
- How to Enable Good Old Start Button (ORB) and Start Menu in Windows 8?
- Add Cascading Menu for Restart, Shut Down, Hibernate and Other Power Shortcuts in Desktop Context Menu of Windows 7 and 8
After using Windows 8 for a few days, we have came across a few interesting features, some of which are not directly visible on screen. The most strange part is that Microsoft has not talked about a few of these features yet in any official blog post.
Anyway for your convenience, today in this topic we are going to share a few hidden secret features which we have found in Windows 8.
So without wasting time, lets share the hidden gems in Windows 8:
Although Microsoft has removed Start button and Start Menu from Windows 8 Taskbar but they have added a hidden Quick Access Menu (QAM) which provides easier access to many useful system tools such as:1. Hidden Quick Access Menu
- Programs and Features
- Power Options
- System Settings
- Device Manager
- Command Prompt
- Task Manager
- Control Panel
- Search
- Run
- and a few more
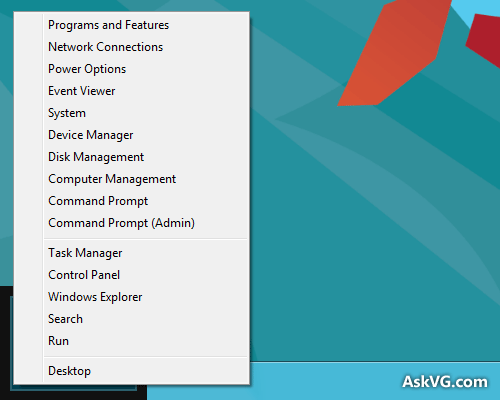
You can also access it using "Win+X" hotkey.
You can also check out following exclusive tutorial to customize this new Quick Access Menu in Windows 8:
[EXCLUSIVE] Customize New Quick Access Menu (Win+X Menu) in Windows 8
If you are still using Windows XP, Vista or Windows 7, you can get a similar system menu in Desktop context menu or My Computer context menu using following tutorials:
- [AIO] Ultimate Tutorial to Customize My Computer Context Menu in Windows XP, Vista and 7
- [AIO] Ultimate Tutorial to Customize Desktop Context Menu in Windows Vista and 7
That's an awesome addition to Windows 8. In previous Windows versions, whenever you needed to take a screenshot of your screen, you had to press "PrntScr" key or if you wanted to take screenshot of a specific program window, you needed to click on it to make it active and press "Alt+PrntScr" keys. After doing this, the screenshot was captured by clipboard and you had to paste and save it using an image editing software like built-in MS Paint, Adobe Photoshop, etc.2. Auto-Save Screenshots
Windows 8 makes the whole process a lot easier. You can just press "Win+PrntScr" keys together and Windows 8 will automatically save the screenshot in your "Pictures" library folder. The screenshot is saved with the name "Screenshot.png". If you take more screenshots, they are saved with an added number such as "Screenshot (2).png", "Screenshot (3).png" and so on.

I wonder why they didn't add hotkey "Win+Alt+PrntScr" to automatically save screenshot of a specific window. I hope they'll add it in final build of Windows 8.
In previous Windows versions, if the user wanted to boot into Safe Mode, he needed to press "F8" key at system startup but this good old and well know hotkey no longer works in Windows 8. Microsoft has replaced it with a new hotkey.3. New Hotkey to Access Safe Mode
The new hotkey is "Shift+F8". So now you need to press "Shift+F8" keys together to access Safe Mode option in Windows 8. I can't understand the reason behind this move. May be they'll use "F8" hotkey for some new stuff? Who knows?
Windows 8 comes with hot corner feature which allows you to access some built-in options when you move your mouse cursor in a corner of your monitor screen.4. New Hot Corners in Screen
When you move your mouse cursor to bottom-left corner of screen, it shows small Start Screen thumbnail which lets you go to Start Screen.
When you move your mouse cursor to top-left corner of screen, it shows a list of all running Metro apps so that you can switch between apps or close an app.

When you move your mouse cursor to top-right or bottom-right corner of screen, it shows new Charms Bar where you can access Settings, Search, Share, Devices and Start Screen charm.

There are a few useful hotkeys (keyboard shortcuts) introduced in Windows 8 which can make your Windows 8 experience better. Some of them are given below:5. New Useful Hotkeys (Keyboard Shortcuts)
- Win key - Toggles between Start Screen and Windows Desktop
- Win+X - Opens Quick Access Menu as mentioned in point 1
- Win+PrntScr - Automatically saves screenshot in Pictures folder as mentioned in point 2
- Win+C - Shows Charms Bar
- Win+I - Shows Settings panel
- Win+Tab - Shows Metro apps switcher as mentioned in point 4
- Ctrl+F1 - Minimizes / maximizes ribbon in Windows Explorer
- Ctrl+Tab – Launches All Apps list on Start Screen.
How to Remove Watermark (Build Number Info) from Desktop in Windows 8 Consumer Preview (Public Beta)? 4 Aug 2012 2:07 AM (12 years ago)
There are many methods available to remove the watermark from Windows Desktop. These methods include modifying system files using our favorite tool "Resource Hacker". One needs to open a specific system file in Resource Hacker and then remove the text present in the file which is shown on Desktop. More info can be found here.
There are also a few 3rd party patching utilities released whenever a new testing build of Windows or service pack is released by Microsoft. These patchers automatically modify system files to get rid of watermark from Desktop.
Recently Microsoft released free Consumer Preview (public Beta) build of Windows 8 which also shows a watermark on Desktop as shown in following screenshot:

Many AskVG readers asked us how to remove this watermark from Windows 8 Desktop? Believe me removing watermark from Windows Desktop was never so easy before.
Although the watermark string is stored in a system file "shell32.dll.mui" in Windows 8 but the process of showing this watermark on Desktop is a bit different in Windows 8.
Actually whenever you set an image file as Desktop wallpaper, Windows automatically creates a copy of that image file in a hidden folder and then puts the watermark on that image file. So basically the watermark is shown by the image file and if you edit that image file and remove the text from it, you can easily get rid of the watermark from Windows 8 Desktop.
What we'll do is that we'll replace the hidden JPG image file which contains our Desktop wallpaper and watermark with a similar image file but without the watermark.
To make it clear, lets start the tutorial for removing watermark from Windows 8 Consumer Preview Desktop:
1. First apply your desired image as Desktop wallpaper or leave it to default Windows 8 wallpaper if you like.
2. Now copy following text:
%appdata%\Microsoft\Windows\Themes3. Press "Win+R" keys together to open RUN dialog box and paste the above text and press Enter.
4. It'll open Themes folder in Windows Explorer where you'll find a folder "CachedFiles" and an image file "TranscodedWallpaper.jpg".

Here, "TranscodedWallpaper.jpg" file contains the wallpaper image which you set on your Desktop and "CachedFiles" folder contains a cached image file which is used by Windows to show wallpaper on Desktop. Its basically a copy of "TranscodedWallpaper.jpg" file + watermark on it.
5. Now click on "TranscodedWallpaper.jpg" file and press "Ctrl+C" keys. It'll copy the file. Now press "Ctrl+V" keys to make a copy of the image file in same folder. You can also do the task using right-click menu.

6. Now open "CachedFiles" folder and you'll see an image file with the name "CachedImage_xxx.jpg". That's the actual image file which is showing your Desktop wallpaper. Windows automatically creates it whenever you change your Desktop wallpaper.
7. Now click on the image file and press "F2" key or right-click on the file and select Rename option. Now copy its name.

8. Go back to previous folder and rename new "TranscodedWallpaper - Copy.jpg" file and paste the copied text string.
It'll set the new image file name to same as the name of image file present in CachedFiles folder.

9. Now cut this new image file from "Themes" folder and paste it into "CachedFiles" folder.
Windows will ask for confirmation, click on "Replace the file in the destination folder" option.

10. That's it. Close the folder and refresh your Desktop and the watermark will be gone.

PS: If you see some black space on Desktop, unlock Taskbar and move it to some other place such as top, left or right and then put it back to previous place i.e. bottom and the black space will disappear.
NOTE: You can also directly edit the image file present in "CachedFiles" folder using an image editing software such as MS Paint, Adobe Photoshop, Gimp, etc and remove the watermark text on it and then save the image file. It'll save the extra steps to make a copy of the image file and replace files.
Hidden Secret Trick to Enable / Activate “Aero Glass” in Windows 8 “Aero Lite” Theme 4 Aug 2012 2:06 AM (12 years ago)

As you can see "Aero Lite" theme doesn't provide Aero Glass and looks very basic.
Today we are going to share a secret trick to enable or activate Aero Glass effect in Windows 8 "Aero Lite" theme. This secret trick is actually a bug / goof-up which might get fixed in RTM version of Windows 8. You may also consider it as a hidden easter-egg in Windows 8.
To enable Aero Glass in Aero Lite theme, you need to follow these simple steps:
STEP 1. Right-click on Windows 8 Desktop and select "Personalize" option. It'll open Personalization window.
Make sure default Aero theme is applied. If it is not, apply Aero theme.
Now click on "Window Color" link given at the bottom of the window. Keep the window opened.
STEP 2. Now again right-click on Desktop and select "Personalize" option. It'll open another Personalization window. Now click on "Windows Basic" theme to apply Aero Lite theme.
It'll apply Aero Lite theme and obviously you'll not get Aero glass.

STEP 3. Now the tricky part comes. Go to previously opened Personalization window which we opened in Step 1.
Uncheck "Enable transparency" option and then re-check it. Click on "Save changes" button and get ready to enjoy Aero glass in "Aero Lite" (Windows Basic) theme.
%20theme.%3C/div%3E)
[Did You Know] Windows 8 Allows You to Remove “Favorites” from Windows Explorer Navigation Pane 4 Aug 2012 1:52 AM (12 years ago)
Today in this topic, we are going to share another cool feature found in Windows 8. As we know Microsoft re-designed navigation pane in Windows 7 Explorer and added following 5 things to it:
- Favorites
- Libraries
- Homegroup
- Computer
- Network
Now Microsoft has surprisingly added a new option in Windows 8 Explorer to remove "Favorites" entry from navigation pane.
When you right-click in navigation pane of Windows Explorer in Windows 8, you get a new option "Show favorites". Its enabled by default and if you disable the option, it'll immediately remove Favorites from navigation pane:

You can access the same option from Folder Options as well.
That's really a nice addition to Windows 8 as many Windows 7 users wanted to remove Favorites from Windows Explorer navigation pane. Now Windows 8 users will not complain about it.
We hope that Microsoft will also provide similar options to remove other entries from navigation pane in final RTM version of Windows 8. Fingers crossed.
%3C/a%3E%3C/span%3E%20build%20of%20%3Cspan%3E%3Cstrong%3E%3Ca%20href%3D%22http://www.askvg.com/windows-8-review-whats-new-in-windows-8-developer-preview/%22%3EWindows%20%208%3C/a%3E%3C/strong%3E%3C/span%3E%20comes%20with%20many%20new%20and%20secret%20features.%20We%20%20highlighted%20a%20few%20secret%20features%20in%20following%20topic:%20%3Cspan%3E%3Ca%20href%3D%22http://www.askvg.com/windows-8-hidden-secret-features-and-useful-hotkeys/%22%20title%3D%22Go%20to%20Windows%208%20%0AHidden%20Secret%20Features%20and%20Useful%20Hotkeys%22%3EWindows%20%208%20Hidden%20Secret%20Features%20and%20Useful%20Hotkeys%3C/a%3E%3C/span%3E%3Cbr%20/%3E%0AToday%20in%20this%20topic,%20we%20are%20going%20to%20share%20another%20cool%20feature%20found%20%20in%20Windows%208.%20As%20we%20know%20Microsoft%20re-designed%20navigation%20pane%20in%20%20Windows%207%20Explorer%20and%20added%20following%205%20things%20to%20it:%3Cbr%20/%3E%0A%3Cul%3E%3Cli%3EFavorites%3C/li%3E%0A%3Cli%3ELibraries%3C/li%3E%0A%3Cli%3EHomegroup%3C/li%3E%0A%3Cli%3EComputer%3C/li%3E%0A%3Cli%3ENetwork%3C/li%3E%0A%3C/ul%3EBut%20as%20usual%20Microsoft%20didn't%20provide%20any%20built-in%20option%20to%20%20add/remove%20entries%20from%20navigation%20pane%20so%20you%20were%20not%20able%20to%20remove%20%20any%20of%20the%20above%20mentioned%20options%20from%20navigation%20pane.%20Although%20there%20%20are%20Registry%20tricks%20available%20to%20remove%20these%20options%20from%20Windows%20%20Explorer%20navigation%20pane.%20%3Ca%20href%3D%22http://www.askvg.com/did-you-know-windows-8-allows-you-to-remove-favorites-from-windows-explorer-navigation-pane/%22%20target%3D%22undefined%22%3E%3Cspan%3E%3Cspan%3EInterested%3C/span%3E%3C/span%3E%3C/a%3E%20%20people%20can%20find%20these%20tutorial%20links%20at%20the%20end%20of%20this%20article.%3Cbr%20/%3E%0ANow%20Microsoft%20has%20surprisingly%20added%20a%20new%20option%20in%20Windows%208%20%20Explorer%20to%20remove%20%22%3Cstrong%3EFavorites%3C/strong%3E%22%20entry%20from%20navigation%20%20pane.%3Cbr%20/%3E%0AWhen%20you%20right-click%20in%20navigation%20pane%20of%20Windows%20Explorer%20in%20%20Windows%208,%20you%20get%20a%20new%20option%20%22%3Cstrong%3EShow%20favorites%3C/strong%3E%22.%20Its%20%20enabled%20by%20default%20and%20if%20you%20disable%20the%20option,%20it'll%20immediately%20%20remove%20Favorites%20from%20navigation%20pane:%3Cbr%20/%3E%0A%3Cimg%20alt%3D%22Remove_Favorites_Windows_8_Explorer.png%22%20src%3D%22http://media.askvg.com/articles/images3/Remove_Favorites_Windows_8_Explorer.png%22%20/%3E%3Cbr%20/%3E%0AYou%20can%20access%20the%20same%20option%20from%20%3Cstrong%3EFolder%20Options%3C/strong%3E%20%20as%20well.%3Cbr%20/%3E%0AThat's%20really%20a%20nice%20addition%20to%20Windows%208%20as%20many%20Windows%207%20users%20%20wanted%20to%20remove%20Favorites%20from%20Windows%20Explorer%20navigation%20pane.%20Now%20%20Windows%208%20users%20will%20not%20complain%20about%20it.%3Cbr%20/%3E%0AWe%20hope%20that%20Microsoft%20will%20also%20provide%20similar%20options%20to%20remove%20%20other%20entries%20from%20navigation%20pane%20in%20final%20RTM%20version%20of%20Windows%208.%20%20Fingers%20crossed.%3C/div%3E)
Right Click Context Menu Adder 2.0: Freeware to Add Program Shortcuts, Website Links, Files or Folders in Windows 7 and Windows 8 Desktop Context Menu 4 Aug 2012 1:51 AM (12 years ago)
NOTE: You can check other interesting and useful free software created by our readers here.As you all know we have posted a detailed tutorial in past which allows you to add your desired favorite program shortcut in Windows 7 and Windows 8 Desktop context (right-click) menu so that you can run the program quickly and easily by just right-click on Desktop:
How to Add Program Shortcuts and Useful Shortcuts in Windows 7 and Windows 8 Desktop Context Menu?
We have also posted lots of other similar tutorials to customize Desktop context menu in Windows which can be found in following article:
Ultimate Tutorial to Customize Desktop Context Menu in Windows Vista, 7 and 8
Today we are going to share a free and portable utility "Right Click Context Menu Adder" created by an AskVG reader "Gromas" which allows you to add your favorite program shortcut, website link, file or folder shortcut in Windows 7 and Windows 8 Desktop context menu quickly and easily and you'll not need to modify Windows Registry yourself, this software will do the job for you.
Following is an example of the output which you can get with the help of this awesome software:

As you can see in the above screenshot, we have added a link to AskVG.com at top of context menu, added a link to wallpapers folder in the middle of context menu and added a shortcut to change desktop icons settings at the bottom of Desktop context menu with the help of this freeware.
You just need to run this tool and select the desired item which you want to add in Desktop context menu. You can select any of following items to add to context menu:
- Program
- Folder
- Web Address
- Any type of file
This small utility also allows you to select the position of the new shortcut in Desktop context menu. You can select any of following positions:
- Top
- Middle
- Bottom

If you select "Show only when SHIFT key is pressed" option, the new shortcut will only be shown in Desktop context menu when you press SHIFT key while right-clicking on Desktop. It'll not be visible normally. So you can enable this option for those shortcuts which you don't use regularly or want to hide from others.
You can also tell the software whether the new shortcut should be added to Desktop context menu only or should the software add the new shortcut to folder context menu as well. If you select the 2nd option, the shortcut will also be visible when you right-click on a folder.
Once a new shortcut is added, you can remove it later using 2nd tab. Simply select the desired item from the list and click on "Remove" button.
This software comes in 2 languages: English and Portuguese.
This software is highly customizable and works perfectly without any problem. The best thing is that its portable so you don't need to install it. Simply run the EXE file and add desired shortcuts in Desktop context menu.
It can be used in both 32-bit and 64-bit Windows editions. You can download it using following link:
Download Link
![]()
[Exclusive] Customize New Quick Access Menu (Win+X Menu) in Windows 8 – Add, Remove, Rename or Move Shortcuts and Much More 4 Aug 2012 1:50 AM (12 years ago)
Microsoft has made many changes in Windows 8. A brand new Start Screen has been added which unfortunately has replaced the good old Start Menu.
Microsoft has also removed Start button (ORB) from Windows 8 Taskbar and has replaced it with a new Start Screen thumbnail which appears when you move your mouse cursor to bottom-left corner of screen.
To make Windows 8 users life easier, Microsoft has added a new context menu which appears when you right-click on extreme bottom-left corner of screen. I personally prefer to call it "Quick Access Menu" similar to Quick Access Toolbar present in Ribbon UI of Windows 8 Explorer or Microsoft Office 2010.
You can also use keyboard shortcut "Win+X" to access this new quick access menu. This new menu provides quick access to lots of useful Windows utilities such as Power Options, Command Prompt, Control Panel, etc.
But did you know you can customize this new menu in Windows 8? Yep, I accidentally found an interesting way to customize this new menu present in Windows 8.
In past, Microsoft used to put all menus, context menus, etc in system files such as Shell32.dll, Explorer.exe, etc. You can visit following article which will provide you a better idea:
[AIO] Complete Tutorial to Customize Desktop Context Menu in Windows XP Using Resource Hacker
Then Microsoft made use of Windows Registry to show items in Windows Vista and Windows 7 Desktop context menu:
[AIO] Ultimate Tutorial to Customize Desktop Context Menu in Windows Vista and 7
And now for the first time in history, Microsoft is using a very simple way to show context menus in Windows 8. I have not seen such kind of things in any previous Windows version.
In Windows 8, Microsoft is using a hidden folder which contains all those shortcuts which are shown in Quick Access Menu. Quite interesting, huh?
I was working on this tutorial since a few days but couldn't post it as I was trying to find out each and every thing which can be customized in this new menu present in Windows 8.
So without wasting time, let me share the hidden secret way to customize this new Quick Access Menu of Windows 8:
I was looking into various system folders of Windows 8 to find out what's new and where are all new UI resources present in Windows 8. Then suddenly I found following hidden folder:Customize Quick Access Menu in Windows 8:
C:\Users\user_name\AppData\Local\Microsoft\Windows\WinXAs the name suggests "WinX" folder contains all shortcuts which are displayed in new Quick Access Menu (Win+X) in Windows 8.
To access above mentioned folder, press Win+R keys together to open RUN dialog box and then type appdata and press Enter.
Now you can easily go to "Local\Microsoft\Windows\WinX" folder. Once you open "WinX" folder, you'll notice 3 sub-folders under it:
- Group1
- Group2
- Group3

And the 3 folders Group1, Group2 and Group3 present in "WinX" folder contains those shortcuts respectively.
Following are screenshots of all these 3 folders content:
Group1 Folder:

Group2 Folder:

Group3 Folder:

As you can see in the above images, all 3 group folders contain same shortcuts which are shown in Quick Access Menu in Windows 8.
First thing which you can customize in this Quick Access Menu is removal of unwanted shortcuts.Removing Shortcuts from Quick Access Menu in Windows 8:
Quick Access Menu contains lots of shortcuts and you might not use a few of them. So you can delete unwanted shortcuts to make the context menu short and to easily find the shortcuts which you want to use.
1. To remove a shortcut, simply go to that Group folder and delete the shortcut.
For example, if you want to delete "Command Prompt" shortcut, go to "Group3" folder and delete "Command Prompt" shortcut.
2. Now you'll need to either log off or restart Explorer to take effect. You can restart Explorer using Task Manager. Check out following article:
Windows 8 Allows You to Restart Explorer Using Task Manager
3. That's it. Now you'll not see that removed shortcut in context menu.

As you can see in above image, "Command Prompt" shortcut is not present in Quick Access Menu.
You can also change names of shortcuts shown in Quick Access Menu. For example, you can change name of "Command Prompt (Admin)" to some other name such as "Terminal", etc.Renaming Shortcuts in Quick Access Menu in Windows 8:
1. To rename a shortcut, first maximize the ribbon in Windows Explorer. Click on small arrow present below the Close button and it'll maximize the ribbon. You can also press "Ctrl+F1" keys together to toggle the ribbon.
2. Now go to "View" tab and enable "Hidden Items" checkbox.
3. Now open the Group folder which contains your desired shortcut and you'll see a hidden file "Desktop.ini".
4. Double-click on "Desktop.ini" file and it'll open in Notepad.
5. You'll see a list of all shortcuts present in Quick Access Menu along with some file names and random numbers. Actually this file defines the labels or names of shortcuts which you see in Quick Access Menu.
The first part of a line contains shortcut's file name such as "06 - System.lnk" and the second part after the equal sign (=) defines its label in context menu such as "@%SystemRoot%\system32\systemcpl.dll,-1". These labels are pre-defined in those system files.
6. To change the name of a shortcut, you just need to replace the label part given after the equal sign (=) with your desired name.
For example, we are going to change "System" shortcut name to "System Properties".
To do this, we'll just replace the whole "@%SystemRoot%\system32\systemcpl.dll,-1" string with "System Properties" string as shown in following screenshot:

7. That's it. Once you replace the label and save the file, again restart Explorer or log off and you'll see new name in context menu:

You can also ungroup all these shortcuts present in Quick Access Menu. For example you can move all shortcuts in a single group to remove separators between the groups or you can also create new groups for desired shortcuts.Moving Shortcuts in Quick Access Menu in Windows 8:
1. To ungroup all shortcuts, simply move all shortcuts in a single folder.
For example, you can move all shortcuts present in "Group1" and "Group2" folders to "Group3" folder. Restart Explorer or log off and you'll see all shortcuts in a single group in Quick Access Menu. You'll not see any separator between shortcuts.
2. To create new group, simply create a new folder such as "Group4" in "WinX" folder and move the desired shortcuts from other group folders to this new folder.

That's it. Restart Explorer or log off and you'll see a new group in context menu:

UPDATE: Check out following tutorial to learn how to add new shortcuts in "Win+X" menu:Adding New Shortcuts in Quick Access Menu in Windows 8:
[Exclusive] How to Add New Shortcuts in Quick Access Menu (Win+X Menu) of Windows 8?
I'm yet to find a way to add new shortcuts in Quick Access Menu. I'm sure it can be done and I'm trying my best to find a way to do it.
I tried to place a new shortcut in those Group folders but didn't work. I also tried to add its entry in hidden Desktop.ini file but didn't work.
I tried to replace existing shortcuts with my new shortcuts having same names but again didn't work.
I have found something interesting in Windows Registry (regedit). Following Registry key contains references for all these shortcuts:
HKEY_LOCAL_MACHINE\SOFTWARE\Microsoft\Windows\CurrentVersion\ShellCompatibility\InboxAppIf you look carefully in right-side pane of this key, you'll find entries of all these shortcuts there:

I'm trying to use this Registry key to add new shortcuts.
I have found a way to change existing shortcuts functionality. You can change an existing shortcut to open your desired program instead of built-in program shortcut. Simply right-click on a shortcut present in those Group folders and select Properties option. Now change the command present in Target text box to the full path of your desired program's EXE file. Once done, the shortcut present in Quick Access Menu will open your desired program instead of the previous built-in program shortcut. So using this method, you can change shortcut's target and open desired programs using those shortcuts in context menu.
How to Disable New Ribbon UI and Get Old Toolbar Back in Windows 8 Explorer? 4 Aug 2012 1:49 AM (12 years ago)
When Microsoft released Developer Preview build of Windows 8, removing ribbon from Explorer and getting Windows Vista/7 style command bar back was very easy using a small registry trick.
But Microsoft patched this method in recently released Consumer Preview (Public Beta) build of Windows 8. Now the Registry trick no longer works and there is no known way to remove ribbon from Windows 8 Explorer.
Recently while working on Windows 8, I found an interesting thing which forced me to believe that the old Windows Vista and 7 style Explorer is still there in Windows 8 and the new ribbon UI is actually hiding it.
Why do I think so? Its because you can get the new ribbon UI and old Vista/7 style command bar at the same time in Windows 8 Explorer. Don't believe me? Here is the proof:
Open Windows Explorer in Windows 8 and you'll get new ribbon UI obviously as shown in following screenshot:
Now press "F11" key to go full screen and the good old Windows Vista and 7 style command bar will appear and you'll no longer see new ribbon UI. Following screenshot shows it clearly:

Please note that when you enter into full screen mode, the toolbar is set to auto-hidden. You can right-click on toolbar and disable "Auto-hide" option to show it permanently.
So the bottom line is that if you don't want to use ribbon in Windows Explorer and want to get more vertical space, simply press "F11" key and you'll get the old command bar back and you'll not have to use new ribbon UI.
Here I would like to add one more thing! There are many system folders in Windows 8 which still have old command bar instead of new ribbon UI. For example, go to "C:\Windows\Downloaded Program Files" folder and you'll get Vista and 7 style Windows Explorer instead of new Windows 8 Explorer with ribbon as shown in following screenshot:

Since its a beta build of Windows 8, I'm sure Microsoft will fix it in RTM version of Windows 8. Till then you can enjoy the old command bar and remove ribbon UI from Windows 8 Explorer using a simple keyboard shortcut "F11".
%20build%20of%20Windows%208.%20Now%20the%20%3Ca%20href%3D%22http://www.askvg.com/how-to-disable-new-ribbon-ui-and-get-old-toolbar-back-in-windows-8-explorer/%22%20target%3D%22undefined%22%3E%3Cspan%3E%3Cspan%3ERegistry%3C/span%3E%3C/span%3E%3C/a%3E%20%20trick%20no%20longer%20works%20and%20there%20is%20no%20known%20way%20to%20remove%20ribbon%20from%20%20Windows%208%20Explorer.%3Cbr%20/%3E%0ARecently%20while%20working%20on%20Windows%208,%20I%20found%20an%20interesting%20thing%20%20which%20forced%20me%20to%20believe%20that%20the%20old%20Windows%20Vista%20and%207%20style%20%20Explorer%20is%20still%20there%20in%20Windows%208%20and%20the%20new%20ribbon%20UI%20is%20actually%20%20hiding%20it.%3Cbr%20/%3E%0AWhy%20do%20I%20think%20so?%20Its%20because%20you%20can%20get%20the%20new%20ribbon%20UI%20and%20old%20%20Vista/7%20style%20command%20bar%20at%20the%20same%20time%20in%20Windows%208%20Explorer.%20Don't%20%20believe%20me?%20Here%20is%20the%20proof:%3Cbr%20/%3E%0AOpen%20Windows%20Explorer%20in%20Windows%208%20and%20you'll%20get%20new%20ribbon%20UI%20%20obviously%20as%20shown%20in%20following%20screenshot:%3Cbr%20/%3E%0A%3Cimg%20alt%3D%22Windows_8_Explorer_Ribbon.png%22%20src%3D%22http://media.askvg.com/articles/images3/Windows_8_Explorer_Ribbon.png%22%20/%3E%3Cbr%20/%3E%0ANow%20press%20%22%3Cstrong%3EF11%3C/strong%3E%22%20key%20to%20go%20full%20screen%20and%20the%20good%20%20old%20Windows%20Vista%20and%207%20style%20command%20bar%20will%20appear%20and%20you'll%20no%20%20longer%20see%20new%20ribbon%20UI.%20Following%20screenshot%20shows%20it%20clearly:%3Cbr%20/%3E%0A%3Cimg%20alt%3D%22Windows_8_Explorer_Full_Screen_View.png%22%20src%3D%22http://media.askvg.com/articles/images3/Windows_8_Explorer_Full_Screen_View.png%22%20/%3E%3Cbr%20/%3E%0APlease%20note%20that%20when%20you%20enter%20into%20full%20screen%20mode,%20the%20toolbar%20is%20%20set%20to%20auto-hidden.%20You%20can%20right-click%20on%20toolbar%20and%20disable%20%22%3Cstrong%3EAuto-hide%3C/strong%3E%22%20%20option%20to%20show%20it%20permanently.%3Cbr%20/%3E%0ASo%20the%20bottom%20line%20is%20that%20if%20you%20don't%20want%20to%20use%20ribbon%20in%20Windows%20%20Explorer%20and%20want%20to%20get%20more%20vertical%20space,%20simply%20press%20%22%3Cstrong%3EF11%3C/strong%3E%22%20%20key%20and%20you'll%20get%20the%20old%20command%20bar%20back%20and%20you'll%20not%20have%20to%20use%20%20new%20ribbon%20UI.%3Cbr%20/%3E%0AHere%20I%20would%20like%20to%20add%20one%20more%20thing!%20There%20are%20many%20system%20%20folders%20in%20Windows%208%20which%20still%20have%20old%20command%20bar%20instead%20of%20new%20%20ribbon%20UI.%20For%20example,%20go%20to%20%22%3Cstrong%3EC:%5CWindows%5CDownloaded%20Program%20%20Files%3C/strong%3E%22%20folder%20and%20you'll%20get%20Vista%20and%207%20style%20Windows%20Explorer%20%20instead%20of%20new%20Windows%208%20Explorer%20with%20ribbon%20as%20shown%20in%20following%20%20screenshot:%3Cbr%20/%3E%0A%3Cimg%20alt%3D%22Windows_8_Explorer_Ribbon_Removed.png%22%20src%3D%22http://media.askvg.com/articles/images3/Windows_8_Explorer_Ribbon_Removed.png%22%20/%3E%3Cbr%20/%3E%0ASince%20its%20a%20beta%20build%20of%20Windows%208,%20I'm%20sure%20Microsoft%20will%20fix%20it%20%20in%20RTM%20version%20of%20Windows%208.%20Till%20then%20you%20can%20enjoy%20the%20old%20command%20bar%20%20and%20remove%20ribbon%20UI%20from%20Windows%208%20Explorer%20using%20a%20simple%20keyboard%20%20shortcut%20%22%3Cstrong%3EF11%3C/strong%3E%22.%3C/div%3E)
The Best Way to Get Rid of Windows 8 Explorer Ribbon 4 Aug 2012 1:48 AM (12 years ago)
Yesterday we posted a very easy to use trick to temporarily disable Ribbon UI in Windows 8 Explorer. We used the built-in Full Screen mode to disable Windows 8 Explorer ribbon:
How to Disable New Ribbon UI and Get Old Toolbar Back in Windows 8 Explorer?
This method proves that the old Windows Vista or 7 style command bar is still present in Windows 8 Explorer and the new ribbon is simply hiding it.
And today our friend "Lee Whittington" shared another simple method to completely remove ribbon from Windows 8 Explorer. This method involves renaming a system file present in Windows 8 which is responsible of showing ribbon in Windows 8 Explorer.
This method will permanently remove ribbon from Windows Explorer in Windows 8 and you'll get Windows Vista and 7 style Explorer as shown in following screenshot:

So without wasting time lets start the tutorial:
1. Open Windows Explorer and go to C:\Windows\System32 folder. Here we are assuming that Windows 8 is installed in C: drive in your computer. If you installed Windows 8 in any other partition, replace C: drive with the correct drive letter.
2. Now look for a file UIRibbon.dll.
3. Now you'll need to take ownership of this DLL file. You can use any of following 2 methods to take ownership of UIRibbon.dll file:
- How to Add “Take Ownership” Option to File or Folder Context Menu in Windows?
- [Guide] How to Take Ownership (Permission) of a File or Folder Manually in Windows?

5. That's it. Restart your system and you'll no longer see ribbon in Windows 8 Explorer.
%20of%20a%20File%20or%20%0AFolder%20Manually%20in%20Windows?%22%3E%5BGuide%5D%20%20How%20to%20Take%20Ownership%20(Permission)%20of%20a%20File%20or%20Folder%20Manually%20in%20%20Windows?%3C/a%3E%3C/li%3E%0A%3C/ul%3E%3Cstrong%3E4.%3C/strong%3E%20Once%20you%20take%20ownership,%20rename%20UIRibbon.dll%20file%20%20to%20any%20other%20name%20such%20as%20UIRibbon_bak.dll%20or%20UIRibbon.old%20or%20any%20other%20%20name.%3Cbr%20/%3E%0A%3Cimg%20alt%3D%22Removing_Ribbon_Windows_8_Explorer.png%22%20src%3D%22http://media.askvg.com/articles/images3/Removing_Ribbon_Windows_8_Explorer.png%22%20/%3E%3Cbr%20/%3E%0A%3Cstrong%3E5.%3C/strong%3E%20That's%20it.%20Restart%20your%20system%20and%20you'll%20no%20%20longer%20see%20ribbon%20in%20Windows%208%20Explorer.%3C/div%3E)