Knitted Knockers 30 Jul 2019 9:03 AM (5 years ago)


Knitted Knockers are special handmade breast prostheses for women who have undergone mastectomies or other procedures to the breast. Traditional breast prosthetics are usually expensive, heavy, sweaty and uncomfortable. They typically require special bras or camisoles with pockets and can’t be worn for weeks after surgery. Knitted Knockers on the other hand are soft, comfortable, beautiful and when placed in a regular bra they take the shape and feel of a real breast. Our special volunteer knitters provide these FREE to those requesting them. KnittedKnockers.org
This has been a departure for me, but I've been knitting prayer shawls for quite a while, and I have to say, I'm a little tired of them. A friend told me about these. Her mother asked her to knit some for her, and she's been doing them since. They're a fun project, quick, and interesting knitting, yet not requiring total attention. A really good travel or television project. You can choose which size to make from their pattern.I am using Paton's Grace, one of the approved yarns. They have a long list of yarns that have been tested to remain soft after washing, etc. I've had no problem finding it at Michael's.
You can see that mine are not stuffed yet. I will send them in for distribution without stuffing them, as it's easier to mail them flat, and they are adjustable with a drawstring at the center hole on the back, and the recipient can personalize them with the amount and type of stuffing, including adding weight if desired.
Here's what I've done so far.


I Found It! (The Instant Jacket Pattern) 7 Nov 2018 6:56 AM (6 years ago)
 I'm sure most of you have just as much stuff as I do related to our love of needlework of various kinds, and this will be a familiar tale.

This is a photo from 2010 and the only one I can find right now, but you can see why it's just a nice, handy, boxy little cardigan that takes very little yarn. I'm pretty sure I've made this pattern with a collar as well. It was a ribbon-y yarn mixture with pink and brown and gold, maybe. Hmmm, I 'll have to look for that one.

I looked hard for a while, then finally decided that it would show up eventually. It wasn't really an emergency anyway. Well, today was the day. I was putting away the few Halloween decorations I have, and found a pile of knitting magazines I had overlooked. At the bottom was a very large 3-ring binder with notes and patterns. I hardly dared hope it would be there, but TaDa! There it was. Now I need to find the years I thought I had in mind.
I've really been in a knitting, sewing, making, singing mood lately, and it's great. I hope it lasts. I think it's the singing that's doing it.
%26bodytext%3DI'm%20sure%20most%20of%20you%20have%20just%20as%20much%20stuff%20as%20I%20do%20related%20to%20our%20love%20of%20needlework%20of%20various%20kinds,%20and%20this%20will%20be%20a%20familiar%20tale.%3Cbr%20/%3E%0A%3Cbr%20/%3E%0A%3Cdiv%3E%0A%3Ca%20href%3D%22https://blogger.googleusercontent.com/img/b/R29vZ2xl/AVvXsEimIHvr_sE5LDBPnGM3vvmaHi3-5yzB69ZCEJzEKy9_Z52_C6EZa6NuOc-oOkDuFXgzsf6TY_4A5CwC5Pv3_Vp0d6om-Hy1rjklVwYQH9nYjGH2wK1AAbowdtytpYqq1orwC0oL/s1600/IMG_20181107_094208.jpg%22%20imageanchor%3D%221%22%3E%3Cimg%20border%3D%220%22%20data-original-height%3D%221600%22%20data-original-width%3D%221266%22%20height%3D%22400%22%20src%3D%22https://blogger.googleusercontent.com/img/b/R29vZ2xl/AVvXsEimIHvr_sE5LDBPnGM3vvmaHi3-5yzB69ZCEJzEKy9_Z52_C6EZa6NuOc-oOkDuFXgzsf6TY_4A5CwC5Pv3_Vp0d6om-Hy1rjklVwYQH9nYjGH2wK1AAbowdtytpYqq1orwC0oL/s400/IMG_20181107_094208.jpg%22%20width%3D%22316%22%20/%3E%3C/a%3E%3C/div%3E%0AThis%20summer%20I%20suddenly%20decided%20I%20needed%20to%20make%20another%20little%20knitted%20cardigan/jacket,%20and%20I%20wanted%20to%20use%20a%20TNT%20pattern%20(Tried%20and%20True)%20that%20I've%20made%20several%20times%20before,%20but%20it's%20been%20probably%2010%20years%20since%20I%20used%20this%20pattern.%20And%20so,%20the%20pattern%20hunt%20began.%3Cbr%20/%3E%0A%3Cbr%20/%3E%0AThis%20is%20a%20photo%20from%202010%20and%20the%20only%20one%20I%20can%20find%20right%20now,%20but%20you%20can%20see%20why%20it's%20just%20a%20nice,%20handy,%20boxy%20little%20cardigan%20that%20takes%20very%20little%20yarn.%26nbsp;%20I'm%20pretty%20sure%20I've%20made%20this%20pattern%20with%20a%20collar%20as%20well.%26nbsp;%20It%20was%20a%20ribbon-y%20yarn%20mixture%20with%20pink%20and%20brown%20and%20gold,%20maybe.%26nbsp;%20Hmmm,%20I%20'll%20have%20to%20look%20for%20that%20one.%3Cbr%20/%3E%0A%3Cbr%20/%3E%0A%3Cdiv%3E%0A%3Ca%20href%3D%22https://blogger.googleusercontent.com/img/b/R29vZ2xl/AVvXsEjSOh_xfMw9YSQJdobI3yeTIoKXa_9-nZZGcpARFmeycw7uZrsssG5dAJS8w5AZlixYqiYJdXoCCC1kc4MjHl0qytjoplT5ggbV5v-sT0-oJ6a_TamF4ee0e9CJTAY7WFAZBQ0J/s1600/DSCN0696.JPG%22%20imageanchor%3D%221%22%3E%3Cimg%20border%3D%220%22%20data-original-height%3D%221024%22%20data-original-width%3D%22884%22%20height%3D%22320%22%20src%3D%22https://blogger.googleusercontent.com/img/b/R29vZ2xl/AVvXsEjSOh_xfMw9YSQJdobI3yeTIoKXa_9-nZZGcpARFmeycw7uZrsssG5dAJS8w5AZlixYqiYJdXoCCC1kc4MjHl0qytjoplT5ggbV5v-sT0-oJ6a_TamF4ee0e9CJTAY7WFAZBQ0J/s320/DSCN0696.JPG%22%20width%3D%22276%22%20/%3E%3C/a%3E%3C/div%3E%0A%3Cdiv%3E%0A%3C/div%3E%0A%3Cbr%20/%3E%0A%3Ca%20href%3D%22https://www.blogger.com/null%22%3E%3Cbr%20/%3E%3C/a%3E%0AI%20looked%20hard%20for%20a%20while,%20then%20finally%20decided%20that%20it%20would%20show%20up%20eventually.%26nbsp;%20It%20wasn't%20really%20an%20emergency%20anyway.%26nbsp;%20Well,%20today%20was%20the%20day.%20I%20was%20putting%20away%20the%20few%20Halloween%20decorations%20I%20have,%20and%20found%20a%20pile%20of%20knitting%20magazines%20I%20had%20overlooked.%20At%20the%20bottom%20was%20a%20very%20large%203-ring%20binder%20with%20notes%20and%20patterns.%26nbsp;%20I%20hardly%20dared%20hope%20it%20would%20be%20there,%20but%20TaDa!%20There%20it%20was.%20Now%20I%20need%20to%20find%20the%20years%20I%20thought%20I%20had%20in%20mind.%3Cbr%20/%3E%0A%0A%3Ca%20href%3D%22https://www.blogger.com/null%22%3E%3Cbr%20/%3E%3C/a%3E%0AI've%20really%20been%20in%20a%20knitting,%20sewing,%20making,%20singing%20mood%20lately,%20and%20it's%20great.%26nbsp;%20I%20hope%20it%20lasts.%26nbsp;%20I%20think%20it's%20the%20singing%20that's%20doing%20it.)
Microwave Toffee Recipe 6 Nov 2018 6:51 PM (6 years ago)


This recipe was requested, and I'm happy to share. It's a really easy, delicious treat. I've made Toffee Spoons several times, but it's been a while. I guess I should do it again this year. It's fun to get demitasse spoons and dip them in the toffee, then decorate or dip again in chocolate. I tie small cellophane candy bags over the bowls of the spoons with festive twist ties, and they're nice gifts. I have been surprised how often I get the spoons back. I think people are hoping I'll make them again.
Buttery Almond Toffee
(Recipe from my friend, Beth K D)
My own, personal notes:
(½ Recipe makes about 70 Demitasse Spoons)
%3C/span%3E%3Cbr%20/%3E%0A%3Cdiv%20dir%3D%22ltr%22%3E%0A%3Cbr%20/%3E%3C/div%3E%0A%3Cdiv%20dir%3D%22ltr%22%3E%0A%3Cspan%3E1%20cup%20chopped%20whole%20natural%20almonds%20(or%20pecans)%3C/span%3E%3C/div%3E%0A%3Cdiv%20dir%3D%22ltr%22%3E%0A%3Cspan%3E2%20TBS%20unsalted%20butter%3C/span%3E%3C/div%3E%0A%3Cdiv%20dir%3D%22ltr%22%3E%0A%3Cspan%3E1%20cup%20unsalted%20butter%3C/span%3E%3C/div%3E%0A%3Cdiv%20dir%3D%22ltr%22%3E%0A%3Cspan%3E2%20cups%20sugar%3C/span%3E%3C/div%3E%0A%3Cdiv%20dir%3D%22ltr%22%3E%0A%3Cspan%3E%C2%BC%20cup%20water%3C/span%3E%3C/div%3E%0A%3Cdiv%20dir%3D%22ltr%22%3E%0A%3Cspan%3E%C2%BC%20cup%20light%20corn%20syrup%3C/span%3E%3C/div%3E%0A%3Cdiv%20dir%3D%22ltr%22%3E%0A%3Cspan%3E%C2%BD%20tsp.%20salt%3C/span%3E%3C/div%3E%0A%3Cdiv%20dir%3D%22ltr%22%3E%0A%3Cspan%3E1%20tsp.%20vanilla%20extract%3C/span%3E%3C/div%3E%0A%3Cdiv%20dir%3D%22ltr%22%3E%0A%3Cspan%3EParchment%20paper%3C/span%3E%3C/div%3E%0A%3Cdiv%20dir%3D%22ltr%22%3E%0A%3Cspan%3E1%20(12%20oz)%20package%20semisweet%20chocolate%20morsels%3C/span%3E%3C/div%3E%0A%3Cbr%20/%3E%0A%3Cdiv%20dir%3D%22ltr%22%3E%0A%3Cspan%3E%3Cb%3EToast%20the%20Almonds:%3C/b%3E%20Preheat%20oven%20to%20350%20degrees.%20Combine%20almonds%20and%202%20Tbs.%20butter%20on%20a%20jelly-roll%20p%3C/span%3E%3Cspan%3Ean.%20Bake%20at%20350%20degrees%20for%208%20minutes,%20stir%20and%20bake%202%20more%20minutes.%20(Try%20a%20%3C/span%3E%3Cspan%3Elittle%20less%20time%20than%20called%20for%20if%20using%20pecans).%20%26nbsp;Drain%20on%20paper%20towels.%3C/span%3E%3C/div%3E%0A%3Cb%3E%3Cspan%3EMake%20the%20Toffee:%3C/span%3E%3C/b%3E%3Cbr%20/%3E%0A%3Cdiv%20dir%3D%22ltr%22%3E%0A%3Cspan%3EPlace%201%20cup%20butter%20in%20a%20large%20microwave-safe%20bowl.%20Cover%20with%20plastic%20wrap%20and%20%3C/span%3E%3C/div%3E%0A%3Cdiv%20dir%3D%22ltr%22%3E%0A%3Cspan%3Emicrowave%20at%20HIGH%20for%201%20minute.%20%26nbsp;Add%20sugar,%20%C2%BC%20cup%20water,%20corn%20syrup,%20and%20salt.%20Cover;%20%3C/span%3E%3C/div%3E%0A%3Cdiv%20dir%3D%22ltr%22%3E%0A%3Cspan%3Emicrowave%20at%20HIGH%20for%203%20minutes.%20(This%20step%20washes%20down%20sugar%20crystals%20from%20sides%3C/span%3E%3C/div%3E%0A%3Cdiv%20dir%3D%22ltr%22%3E%0A%3Cspan%3Eof%20pan.)%20Uncover,%20stir%20gently,%20and%20microwave%20at%20HIGH%20for%2010%20minutes%20or%20until%20golden%3C/span%3E%3C/div%3E%0A%3Cdiv%20dir%3D%22ltr%22%3E%0A%3Cspan%3Ebrown.%3C/span%3E%3C/div%3E%0A%3Cbr%20/%3E%0A%3Cdiv%20dir%3D%22ltr%22%3E%0A%3Cspan%3EUsing%20oven%20mitts,%20remove%20bowl%20from%20microwave,%20stir%20in%20vanilla.%20Pour%20candy%20mixture,%3C/span%3E%3C/div%3E%0A%3Cdiv%20dir%3D%22ltr%22%3E%0A%3Cspan%3Ewithout%20scraping%20sides%20of%20pan,%20onto%20a%20greased%20baking%20sheet%20lined%20with%20parchment%3C/span%3E%3C/div%3E%0A%3Cdiv%20dir%3D%22ltr%22%3E%0A%3Cspan%3Epaper,%20quickly%20spreading%20candy%20to%20%C2%BC%20inch%20thickness.%3C/span%3E%3C/div%3E%0A%3Cbr%20/%3E%0A%3Cdiv%20dir%3D%22ltr%22%3E%0A%3Cspan%3ESprinkle%20chocolate%20morsels%20over%20toffee;%20let%20stand%201%20minute%20or%20until%20chocolate%20begins%20to%20%3C/span%3E%3C/div%3E%0A%3Cdiv%20dir%3D%22ltr%22%3E%0A%3Cspan%3Emelt.%20Spread%20chocolate%20evenly%20over%20candy;%20sprinkle%20with%20almonds,%20pressing%20gently%3C/span%3E%3C/div%3E%0A%3Cdiv%20dir%3D%22ltr%22%3E%0A%3Cspan%3Ewith%20fingertips.%20Cool%20completely.%20Chill%201%20hour%20or%20until%20firm.%20Break%20toffee%20into%20pieces.%20Store%20in%3C/span%3E%3C/div%3E%0A%3Cdiv%20dir%3D%22ltr%22%3E%0A%3Cspan%3Ean%20airtight%20container.%3C/span%3E%3C/div%3E%0A%3Cbr%20/%3E%0A%3Cdiv%20dir%3D%22ltr%22%3E%0A%3Cspan%3E(Note:%20%26nbsp;I%20added%20most%20of%20my%20nuts%20into%20the%20toffee%20mixture%20except%20some%20really%20fine%20ones%20for%3C/span%3E%3C/div%3E%0A%3Cdiv%20dir%3D%22ltr%22%3E%0A%3Cspan%3Esprinkling%20on%20top.%20%26nbsp;I%20also%20melted%20my%20chips%20in%20the%20microwave%20so%20I%20didn%E2%80%99t%20have%20to%20wait%20to%3C/span%3E%3C/div%3E%0A%3Cdiv%20dir%3D%22ltr%22%3E%0A%3Cspan%3Espread).%3C/span%3E%3C/div%3E%0A%3Cdiv%20dir%3D%22ltr%22%3E%0A%3Cspan%3E%3Cspan%3E%3Cbr%20/%3E%3C/span%3E%3C/span%3E%0A%3Cspan%3E%3Cspan%3EMy%20own,%20personal%20notes:%3C/span%3E%3C/span%3E%3Cbr%20/%3E%0A%3Cspan%3E%3Cspan%3E(%C2%BD%20Recipe%20makes%20about%2070%20Demitasse%20Spoons)%3C/span%3E%3C/span%3E%3C/div%3E%0A%3Cdiv%20dir%3D%22ltr%22%3E%0A%3Cspan%3EXmas%202013%20as%20per%20recipe%20instructions.%3C/span%3E%3C/div%3E%0A%3Cdiv%20dir%3D%22ltr%22%3E%0A%3Cspan%3EXmas%202014%20half%20recipe.%20Half%20as%20dipped%20toffee%20spoons%20using%20demitasse%20spoons.%20%26nbsp;Added%201/2Tbsp%20oil%20to%201%20Cup%20chocolate%20chips%20for%20dipping.%20%20Chopped%20nuts%20very%20fine%20and%20dipped%20after%20chocolate.%20%26nbsp;Half%20as%20per%20recipe%20instructions.%20%20%3C/span%3E%3Cspan%3EWill%20%3C/span%3E%3Cspan%3Euse%20dipping%20chocolate/almond%20bark%20next%20time.%20%20Otherwise%3C/span%3E%3Cspan%3E%20it%20never%20wants%20to%20harden,%20and%20is%20a%20mess.%3C/span%3E%3C/div%3E%0A%3Cdiv%20dir%3D%22ltr%22%3E%0A%3Cspan%3E%3Cbr%20/%3E%0A%3C/span%3E%3C/div%3E%0A%3Cdiv%20dir%3D%22ltr%22%3E%0A%3Cspan%3ESpoons%20from%20%3Ca%20href%3D%22https://www.webstaurantstore.com/choice-dominion-5-7-8-18-0-stainless-steel-medium-weight-teaspoon-case/267020001.html%22%20target%3D%22_blank%22%3EWebstaurant.com%3C/a%3E.%20%20They%20are%20unbelievably%20affordable.%3C/span%3E%3C/div%3E%0A%3Cbr%20/%3E)
Vogue 1250 in a Woven Cotton (for Carolyn) 11 Sep 2018 1:58 PM (6 years ago)

 I promised Carolyn some photos of the front of this dress when I got them taken. I think these aren't too bad, and so here they are.
You can see that I used a 'belt' at centerfront, with covered buttons to attach it, to control the fullness that I had to add to be able to wear this dress in a woven, totally non-stretch fabric rather than the knit it was designed for. There's also a zipper on the side seam for ease of getting it on. You still have to pull it over your head, but this helps.


%26bodytext%3D%3Cdiv%3E%0A%3Ca%20href%3D%22https://blogger.googleusercontent.com/img/b/R29vZ2xl/AVvXsEh96kWlCkCiS6mORY9IocxO8GMUL3t8ROWoQnrFxdZEoChuIErPspxI24kILfjWGgKBN2GwQwtSFlpxsZ4GBcamgnCdyH7mnWEcrBbQMGtnrGrUkFJ6HFEg6eobwcI9OUifxKsQ/s1600/DSC_0290.JPG%22%20imageanchor%3D%221%22%3E%3Cbr%20/%3E%3C/a%3E%3Ca%20href%3D%22https://blogger.googleusercontent.com/img/b/R29vZ2xl/AVvXsEh96kWlCkCiS6mORY9IocxO8GMUL3t8ROWoQnrFxdZEoChuIErPspxI24kILfjWGgKBN2GwQwtSFlpxsZ4GBcamgnCdyH7mnWEcrBbQMGtnrGrUkFJ6HFEg6eobwcI9OUifxKsQ/s1600/DSC_0290.JPG%22%20imageanchor%3D%221%22%3E%3Cimg%20border%3D%220%22%20data-original-height%3D%221600%22%20data-original-width%3D%221072%22%20height%3D%22640%22%20src%3D%22https://blogger.googleusercontent.com/img/b/R29vZ2xl/AVvXsEh96kWlCkCiS6mORY9IocxO8GMUL3t8ROWoQnrFxdZEoChuIErPspxI24kILfjWGgKBN2GwQwtSFlpxsZ4GBcamgnCdyH7mnWEcrBbQMGtnrGrUkFJ6HFEg6eobwcI9OUifxKsQ/s640/DSC_0290.JPG%22%20width%3D%22427%22%20/%3E%3C/a%3EI%20promised%20Carolyn%20some%20photos%20of%20the%20front%20of%20this%20dress%20when%20I%20got%20them%20taken.%26nbsp;%20I%20think%20these%20aren't%20too%20bad,%20and%20so%20here%20they%20are.%3C/div%3E%0A%3Cdiv%3E%0A%3Ca%20href%3D%22https://blogger.googleusercontent.com/img/b/R29vZ2xl/AVvXsEimzfnQYqNZOC3dVyhSS1Uj_m-ELZnr-31XVoJssEWqCG9buw72TXFyzrzoyHHKOpQ2Pfi6c_tMa7N1oUKjag_HDVCykO8tPB_-k09zuyphCj0bab3-jFOwYhXz1zJk2huQQl0m/s1600/DSC_0289.JPG%22%20imageanchor%3D%221%22%3E%3Cimg%20border%3D%220%22%20data-original-height%3D%221600%22%20data-original-width%3D%221072%22%20height%3D%22640%22%20src%3D%22https://blogger.googleusercontent.com/img/b/R29vZ2xl/AVvXsEimzfnQYqNZOC3dVyhSS1Uj_m-ELZnr-31XVoJssEWqCG9buw72TXFyzrzoyHHKOpQ2Pfi6c_tMa7N1oUKjag_HDVCykO8tPB_-k09zuyphCj0bab3-jFOwYhXz1zJk2huQQl0m/s640/DSC_0289.JPG%22%20width%3D%22428%22%20/%3E%3C/a%3E%3C/div%3E%0A%3Cbr%20/%3E%0A%26nbsp;You%20can%20see%20that%20I%20used%20a%20'belt'%20at%20centerfront,%20with%20covered%20buttons%20to%20attach%20it,%20to%20control%20the%20fullness%20that%20I%20had%20to%20add%20to%20be%20able%20to%20wear%20this%20dress%20in%20a%20woven,%20totally%20non-stretch%20fabric%20rather%20than%20the%20knit%20it%20was%20designed%20for.%26nbsp;%20There's%20also%20a%20zipper%20on%20the%20side%20seam%20for%20ease%20of%20getting%20it%20on.%26nbsp;%20You%20still%20have%20to%20pull%20it%20over%20your%20head,%20but%20this%20helps.%3Cbr%20/%3E%0A%3Cbr%20/%3E%0A%3Cdiv%3E%0A%3Ca%20href%3D%22https://blogger.googleusercontent.com/img/b/R29vZ2xl/AVvXsEj-Og35ovIUnpbALUACcuiqw9Ug3imz6GtyZB1AwsOnhSf_HrhnLkspFumzXwWUqxvuq8tJpeSbdCjilvmS20ALQ5tmcTf-v-e7pgqlnvtlGt_oMC9x_YymQePlY7EdhDvo0hrn/s1600/DSC_0287.JPG%22%20imageanchor%3D%221%22%3E%3Cimg%20border%3D%220%22%20data-original-height%3D%221600%22%20data-original-width%3D%221072%22%20height%3D%22640%22%20src%3D%22https://blogger.googleusercontent.com/img/b/R29vZ2xl/AVvXsEj-Og35ovIUnpbALUACcuiqw9Ug3imz6GtyZB1AwsOnhSf_HrhnLkspFumzXwWUqxvuq8tJpeSbdCjilvmS20ALQ5tmcTf-v-e7pgqlnvtlGt_oMC9x_YymQePlY7EdhDvo0hrn/s640/DSC_0287.JPG%22%20width%3D%22428%22%20/%3E%3C/a%3E%3C/div%3E%0A%3Cbr%20/%3E%0A%26nbsp;%3Cbr%20/%3E%0A%3Cdiv%3E%0A%3Ca%20href%3D%22https://blogger.googleusercontent.com/img/b/R29vZ2xl/AVvXsEjazHRkK_ywQc274gyp-mWJaU2KXBfi6Ifet2GLOE30eIeQXnZLiIRPEmqxbgWKZFQl-fDiFLGLuMAb0ozwPpLi_ktxSUwm968KBSiW7QBRAH9exkhJiZ7uZ-bv3W-i-lozT3nP/s1600/DSC_0291.JPG%22%20imageanchor%3D%221%22%3E%3Cimg%20border%3D%220%22%20data-original-height%3D%221600%22%20data-original-width%3D%221072%22%20height%3D%22640%22%20src%3D%22https://blogger.googleusercontent.com/img/b/R29vZ2xl/AVvXsEjazHRkK_ywQc274gyp-mWJaU2KXBfi6Ifet2GLOE30eIeQXnZLiIRPEmqxbgWKZFQl-fDiFLGLuMAb0ozwPpLi_ktxSUwm968KBSiW7QBRAH9exkhJiZ7uZ-bv3W-i-lozT3nP/s640/DSC_0291.JPG%22%20width%3D%22428%22%20/%3E%3C/a%3E%3C/div%3E%0A%3Cbr%20/%3E%0A%3Cbr%20/%3E%0A%3Cbr%20/%3E%0A%3Cbr%20/%3E)
Frugality and a New Gym Bag 11 Sep 2018 1:49 PM (6 years ago)


I thought this was just interesting. To me, if no one else, anyway. I have always liked mending, to some extent. It's nice to be able to keep something going if I really like it, rather than throwing it away for a small problem
The photo above is my OLD gym bag, which was a give-away from the World Wildlife Fund, probably about 8 or 9 years ago. It has held together remarkably well. I have mended it several times, but mainly it was the straps that would come loose. I've reattached them several times. I think I re-sewed the seams at some time or other, but only because there was a small opening in one, and I thought I might as well just reinforce them all while I was at it.

The bottom photo is my new gym bag, which is a give-away from the World Wildlife Fund. Luckily, they were still offering these as a premium, so I got a nice blue one. Still turtles, but I miss the seahorses.
Though it doesn't look like it, they are the same 'fabric'. The old one almost looks quilted at this point, but it's just the structure of the fabric and the way that it's gotten old and worn. I'm assuming the new one will do the same in a few years. It didn't start de-laminating until the last few months, so I have high hopes for another decade or so from this one.


NBMCC & KASG SEWING EXPO 2018 31 Aug 2018 9:00 AM (6 years ago)

Nebraska Bishop Method of Clothing Construction
and
Kearney Area Sewing Guild
present:
NBMCC & KASG SEWING EXPO 2018

I promised you the flyer when I got it, so here it is.
12825 E. Kilmar Valley Road
Stapleton, NE 69163-9626

Photo Day 16 Aug 2018 3:02 PM (6 years ago)

As some of you know, I'm going to be the Presenter at the Kearney, Nebraska Sewing Expo September 21 and 22, 2018. It's put on each year by the Bishop Method Clothing Group of Nebraska, and the Kearney-Area ASG chapter. It's always a wonderful weekend, and I'm so excited to have been asked to present this year! Their flyer will be out this month, and I will put it here in case anyone is interested who hasn't gotten it before.
So as you can imagine, I'm madly getting ready for my classes. I've been working on this for quite some time, and it's getting down to the wire.
One of the things I will be doing is a Trunk Show with many items from my wardrobe. It will be mainly Marfy pattern garments, since that's what I sew most, and like best, but of course, there are others too. When you come across something great, you have to go for it. There will be 4 classes altogether including
I am so lucky to have a sister who's a whiz with a camera. She came over today and we took quite a few long-delayed photos of my projects. Here are a few teasers.

 Marfy caftan 3924 in silk charmeuse with lace motifs at the neckline. This was made to wear at a destination wedding in Cozumel.
Vogue dress 1250 in a woven cotton print. The dress is designed for knits only, but it worked out well with a side zipper and a sightly larger size. I also added the double collar with applique. This was made to attend a summer wedding, and it's one of my favorite summer dresses.
 FSG Tunic 1960, Marfy Tank 9829, Marfy pants 0913. The tank and tunic are in a semi-sheer knit, so two layers give opacity. The pants are in a pleather-type fabric from one of my New York garment district shopping trips.

Sew Intriguing: Re-Publishing the Stitcher's Guild Backstory and History 28 Jun 2017 11:12 AM (7 years ago)
Sew Intriguing: Re-Publishing the Stitcher's Guild Backstory and History
I originally published this in July, 2013. I then took this post down as a courtesy to Julie Ford (DragonLady on SG), but I see no reason not to re-publish it at this point. I have not been reading SG or having anything to do with it since this time, and since Julie has never seen fit to acknowledge either my (or Kathryn's) genesis of the whole thing, or my acquiescence to her request to remove this post, it's going back up. Obviously it doesn't matter to her, so why should it matter to me?

Sheila Hicks at Joslyn 30 Aug 2016 5:30 PM (8 years ago)


I've been trying to get to this show for a while now, and I actually paid and made it to the gallery at Joslyn Art Museum in Omaha about a month ago, but they were having trouble with their alarm system, and there were strobe lights all over the museum flashing rapidly. It was instant headache time, so we left, and I made it back today alone. I'm so glad I didn't miss this. What a wonderful exhibit!
Sheila Hicks is a native of Hastings, Nebraska. Here's what Joslyn has as her bio:
 Hicks was born in Hastings, Nebraska, in 1934 and trained as a painter
at the Yale University School of Art, taking courses with famed color
theorist Josef Albers, pre-Columbian art scholar George Kubler,
and the architect Louis Kahn. Although she had learned to embroider and
knit early
in life, Hicks became interested in textiles in 1956 while studying
Latin American art. The following year, she traveled to South America, a
formative experience for the young artist. With Santiago, Chile, as her
home base, Hicks toured the continent to photograph the landscape and
historical sites and learn indigenous weaving techniques. These textile
practices, along
with other skills the artist discovered during her extensive travels —
such as back-strap weaving and Moroccan and Guatemalan rug-making —
continue to inform Hicks’s approach, even as she has developed new ways
to use thread.
Hicks was born in Hastings, Nebraska, in 1934 and trained as a painter
at the Yale University School of Art, taking courses with famed color
theorist Josef Albers, pre-Columbian art scholar George Kubler,
and the architect Louis Kahn. Although she had learned to embroider and
knit early
in life, Hicks became interested in textiles in 1956 while studying
Latin American art. The following year, she traveled to South America, a
formative experience for the young artist. With Santiago, Chile, as her
home base, Hicks toured the continent to photograph the landscape and
historical sites and learn indigenous weaving techniques. These textile
practices, along
with other skills the artist discovered during her extensive travels —
such as back-strap weaving and Moroccan and Guatemalan rug-making —
continue to inform Hicks’s approach, even as she has developed new ways
to use thread. I really love almost all of what they showed, although I found it interesting that the first smaller room of the exhibition gallery, that you could see some of without a ticket, was the least interesting, at least to me. Her colors and use of varied textiles and threads is really inspiring.


Style Arc Issy Dress with Gorgeous Fabric 18 Jan 2016 12:50 PM (9 years ago)


Last week gave us some horrendously cold weather which is still with us, and I decided last night to begin a dress out of this cheery fabric, just to warm up a little. Dresses seem to be what I want to wear lately, and I don't really have many winter dresses, and this is not one either, so obviously my planning is not the best.
I've been wanting to try Style Arc's Issy Top as a dress since my top turned out pretty well. (Apparently I did not blog about that top, although I like it a lot.) I got this pattern as a free pattern-of-the-month from StyleArc with the purchase of the Zoe Pencil Skirt. I have to say, the skirt pattern was not a winner for me. I made it up in a nice wool, lined it, had high hopes for the interesting side seams, and it was really nothing spectacular. However, the Issy Top has been great fun, so I feel like it turned out well either way.
As you can see in the line drawing, it's an asymmetric top with gathers on both side seams, and an unusual draped neckline that looks like it might be loose, but is firmly attached and stays put in this shape.

 My dress is basically the top with 18" added to the length, and I just extended the side seam lines at the original angles. I ended up doing one more gathered area toward the hem on the right side.
 Generally, I'd have to say I like this, but I think it might be better in a plain fabric, so the ruching would show a little better, and perhaps read as "cool ruching" rather than what I am afraid may be its message, "wrinkly wrinkles". The fashion-savvy will know the difference obviously, but the rest of the population may be flummoxed.
I think this is cute though, and I will probably wear it first for an early "Spring" luncheon in March. Hope it's not snowing and sleeting then!
%26nbsp;%20I%20got%20this%20pattern%20as%20a%20free%20pattern-of-the-month%20from%20StyleArc%20with%20the%20purchase%20of%20the%20Zoe%20Pencil%20Skirt.%26nbsp;%20I%20have%20to%20say,%20the%20skirt%20pattern%20was%20not%20a%20winner%20for%20me.%26nbsp;%20I%20made%20it%20up%20in%20a%20nice%20wool,%20lined%20it,%20had%20high%20hopes%20for%20the%20interesting%20side%20seams,%20and%20it%20was%20really%20nothing%20spectacular.%26nbsp;%20However,%20the%20Issy%20Top%20has%20been%20great%20fun,%20so%20I%20feel%20like%20it%20turned%20out%20well%20either%20way.%3Cbr%20/%3E%0A%3Cbr%20/%3E%0AAs%20you%20can%20see%20in%20the%20line%20drawing,%20it's%20an%20asymmetric%20top%20with%20gathers%20on%20both%20side%20seams,%20and%20an%20unusual%20draped%20neckline%20that%20looks%20like%20it%20might%20be%20loose,%20but%20is%20firmly%20attached%20and%20stays%20put%20in%20this%20shape.%3Cbr%20/%3E%0A%3Ca%20href%3D%22http://www.stylearc.com.au/stylearc/images/2014/ISSY-TOP.jpg%22%20imageanchor%3D%221%22%3E%3Cimg%20border%3D%220%22%20src%3D%22http://www.stylearc.com.au/stylearc/images/2014/ISSY-TOP.jpg%22%20height%3D%22204%22%20width%3D%22320%22%20/%3E%3C/a%3E%3Cbr%20/%3E%0A%3Cbr%20/%3E%0A%3Cbr%20/%3E%0A%3Cbr%20/%3E%0A%3Cbr%20/%3E%0A%3Cbr%20/%3E%0A%3Cbr%20/%3E%0A%3Cbr%20/%3E%0A%3Cbr%20/%3E%0A%3Cbr%20/%3E%0A%3Ca%20href%3D%22https://blogger.googleusercontent.com/img/b/R29vZ2xl/AVvXsEjXio_qqUzSNtPeujHLxd8nVZC-pn8w6C56K7eEJh5p30Pt5n88PoDUfmo0i9uZSmyi2Xu0qT-ET7hItZFHiVC3OY8g_3FTNXCKxdoRPvraESbUVo30P-yHMTMv_AnRsJBGX9kp/s1600/20160118_105036.jpg%22%20imageanchor%3D%221%22%3E%3Cimg%20border%3D%220%22%20height%3D%22640%22%20src%3D%22https://blogger.googleusercontent.com/img/b/R29vZ2xl/AVvXsEjXio_qqUzSNtPeujHLxd8nVZC-pn8w6C56K7eEJh5p30Pt5n88PoDUfmo0i9uZSmyi2Xu0qT-ET7hItZFHiVC3OY8g_3FTNXCKxdoRPvraESbUVo30P-yHMTMv_AnRsJBGX9kp/s640/20160118_105036.jpg%22%20width%3D%22192%22%20/%3E%3C/a%3EMy%20dress%20is%20basically%20the%20top%20with%2018%22%20added%20to%20the%20length,%20and%20I%20just%20extended%20the%20side%20seam%20lines%20at%20the%20original%20angles.%26nbsp;%20I%20ended%20up%20doing%20one%20more%20gathered%20area%20toward%20the%20hem%20on%20the%20right%20side.%3Cbr%20/%3E%0A%3Cbr%20/%3E%0A%3Cbr%20/%3E%0A%3Cbr%20/%3E%0A%3Ca%20href%3D%22https://blogger.googleusercontent.com/img/b/R29vZ2xl/AVvXsEhhAFyHenZhn87lAgbpcXg7XmPEqJ9rOFKx7RNq7q6ZAiwpRrHVcVBvf4JKcIkdcPisgA_zm3NaIA2m2Xb0VOl8ey4UPgvyOiAlfZMtAo5IaLvgjHBtL4M26mtlw3hyphenhyphenRzCuTq1i/s1600/20160117_121139.jpg%22%20imageanchor%3D%221%22%3E%3Cimg%20border%3D%220%22%20height%3D%22225%22%20src%3D%22https://blogger.googleusercontent.com/img/b/R29vZ2xl/AVvXsEhhAFyHenZhn87lAgbpcXg7XmPEqJ9rOFKx7RNq7q6ZAiwpRrHVcVBvf4JKcIkdcPisgA_zm3NaIA2m2Xb0VOl8ey4UPgvyOiAlfZMtAo5IaLvgjHBtL4M26mtlw3hyphenhyphenRzCuTq1i/s400/20160117_121139.jpg%22%20width%3D%22400%22%20/%3E%3C/a%3EGenerally,%20I'd%20have%20to%20say%20I%20like%20this,%20but%20I%20think%20it%20might%20be%20better%20in%20a%20plain%20fabric,%20so%20the%20ruching%20would%20show%20a%20little%20better,%20and%20perhaps%20read%20as%20%22cool%20ruching%22%20rather%20than%20what%20I%20am%20afraid%20may%20be%20its%20message,%20%22wrinkly%20wrinkles%22.%26nbsp;%26nbsp;%20The%20fashion-savvy%20will%20know%20the%20difference%20obviously,%20but%20the%20rest%20of%20the%20population%20may%20be%20flummoxed.%3Cbr%20/%3E%0A%3Cbr%20/%3E%0AI%20think%20this%20is%20cute%20though,%20and%20I%20will%20probably%20wear%20it%20first%20for%20an%20early%20%22Spring%22%20luncheon%20in%20March.%26nbsp;%20Hope%20it's%20not%20snowing%20and%20sleeting%20then!%26nbsp;%20%3Cstrike%3E%3C/strike%3E%3Cbr%20/%3E%0A%3Cbr%20/%3E%0A%3Cbr%20/%3E)
Still Swimming 18 Jan 2016 8:16 AM (9 years ago)


 I'm still doing Water Aerobics about 3 times a week, and so I still go through swimsuits with some regularity. I finished one about a week ago, and another one today. These are both from fabric I got at Spandex House when I was in New York last February, and shopped with Rosie, enabler extraordinaire.
They are the same pattern, but the green/brown print has a piece of Fold-Over Elastic (FOE) used as trim at the empire line and all around the back. I usually leave the back pretty open, but this needed something, I thought, and I think it's cute. You can see in the photos how the elastic works.
%20used%20as%20trim%20at%20the%20empire%20line%20and%20all%20around%20the%20back.%26nbsp;%20I%20usually%20leave%20the%20back%20pretty%20open,%20but%20this%20needed%20something,%20I%20thought,%20and%20I%20think%20it's%20cute.%26nbsp;%20You%20can%20see%20in%20the%20photos%20how%20the%20elastic%20works.)
Top This! DMC Toddler Giraffe Hat 11 Jan 2016 9:24 AM (9 years ago)


You knit the hat and the topper is tied on with the attached ribbons, through a rubbery "washer" on the inside of the hat.
I had enough yarn to do almost 2 toddler-size hats, and I finished the second one with a cabled cotton yarn I had on hand from a Prada style handbag I made several years ago. I use a pompon on the top of it, and will donate it.
%20and%20very%20cute.%3Cbr%20/%3E%0A%3Cbr%20/%3E%0AYou%20knit%20the%20hat%20and%20the%20topper%20is%20tied%20on%20with%20the%20attached%20ribbons,%20through%20a%20rubbery%20%22washer%22%20on%20the%20inside%20of%20the%20hat.%3Cbr%20/%3E%0A%3Cbr%20/%3E%0AI%20had%20enough%20yarn%20to%20do%20almost%202%20toddler-size%20hats,%20and%20I%20finished%20the%20second%20one%20with%20a%20cabled%20cotton%20yarn%20I%20had%20on%26nbsp;%20hand%20from%20a%20Prada%20style%20handbag%20I%20made%20several%20years%20ago.%26nbsp;%20I%20use%20a%20pompon%20on%20the%20top%20of%20it,%20and%20will%20donate%20it.)
American Girl Sweater Sets 9 Jan 2016 12:44 PM (9 years ago)


I really enjoyed knitting these sweater and hat sets. A friend asked me to make them for her granddaughters, and I thought I might try.
The pattern is free. Mochi Plus 18" Doll Sweater & Hat.
It's also available on Ravelry.
 Instead of the specified yarn, she chose Lion Brand's Amazing. I thought it was a good choice, and it worked beautifully for this pattern. I like the colors too. The color of the top set is Arcadia, the lower one is Wildflowers.
One skein made both the sweater and hat in each colorway with only a yard or two left over.
I did the Wildflowers set first, and used the specified needle sizes of 5 and 9. The Arcadia set was done second, and I changed to size 4 and 8 needles, although I did the hat with the original sizes in both cases.
Each set took about 3 days, and was a lot of fun to knit. I may try other doll clothes, as these were so much fun to knit.
 I
I

Tiny Hawaiian Shirt 27 Oct 2015 9:12 AM (9 years ago)
 This Hawaiian shirt is for an 18-month old.

 |
I realized that most Hawaiian prints are very large-scale, and would overwhelm a small boy. Luckily, we have a great source for prints of all types here. The Cosmic Cow. It's a quilting shop, but a really great one. I was pleased to find just what I wanted.

I've made a lot of shirts, but never one this tiny, and it was fun.
%20and%20I%20volunteered%20to%20assist.%26nbsp;%20Then%20I%20had%20to%20find%20fabric.%26nbsp;%3Cbr%20/%3E%0A%3Cbr%20/%3E%0A%26nbsp;I%20realized%20that%20most%20Hawaiian%20prints%20are%20very%20large-scale,%20and%20would%20overwhelm%20a%20small%20boy.%26nbsp;%20Luckily,%20we%20have%20a%20great%20source%20for%20prints%20of%20all%20types%20here.%26nbsp;%20%3Ca%20href%3D%22http://cosmiccowfabricsandquilting.com/%22%20target%3D%22_blank%22%3EThe%20Cosmic%20Cow%3C/a%3E.%26nbsp;%20It's%20a%20quilting%20shop,%20but%20a%20really%20great%20one.%26nbsp;%20I%20was%20pleased%20to%20find%20just%20what%20I%20wanted.%3Cbr%20/%3E%0A%3Cbr%20/%3E%0A%3Cdiv%3E%0A%3Ca%20href%3D%22https://blogger.googleusercontent.com/img/b/R29vZ2xl/AVvXsEj3qdjj02LQyKDp96pI4x_h4n9dJG9ZQ2YSHSeWsc3IxZaLOUYJuRaLXmn3rc0NOGijgpDj1lQq8VJMOvLH5djKk7ZzjpDB-nECLgM7YgQnU7vDhxMQWUlmJkdYiF1Wh5d8Ijfg/s1600/20151027_004406-1.jpg%22%20imageanchor%3D%221%22%3E%3Cimg%20border%3D%220%22%20height%3D%22320%22%20src%3D%22https://blogger.googleusercontent.com/img/b/R29vZ2xl/AVvXsEj3qdjj02LQyKDp96pI4x_h4n9dJG9ZQ2YSHSeWsc3IxZaLOUYJuRaLXmn3rc0NOGijgpDj1lQq8VJMOvLH5djKk7ZzjpDB-nECLgM7YgQnU7vDhxMQWUlmJkdYiF1Wh5d8Ijfg/s320/20151027_004406-1.jpg%22%20width%3D%22317%22%20/%3E%3C/a%3E%3C/div%3E%0AThis%20is%20a%20photo%20of%20the%20pattern%20schematic%20and%20beginning%20of%20the%20instructions,%20in%20case%20you%20don't%20know%20what%20Burda%20patterns%20are%20like.%3Cbr%20/%3E%0A%3Cbr%20/%3E%0AI've%20made%20a%20lot%20of%20shirts,%20but%20never%20one%20this%20tiny,%20and%20it%20was%20fun.)
Flounced Mauve Dress 27 Oct 2015 8:43 AM (9 years ago)
 Ruffles are not my style, but flounces are not ruffles, and asymmetric designs are always fun.


It was somewhat challenging to alter since the bodice is not symmetric, and it also has no 'regular' darts. So I used a combination of a princess FBA and using my saran wrap block to make sure I had made the changes I needed. I think it turned out pretty well, and actually, this was my 'muslin', though I had hopes that it would be very wearable. I think it is.

I left all the edges raw. In snoop shopping in NY and Chicago recently, and online of course, I am seeing a lot of this, and if they can do it, so can I. The trickiest part was making the hook and eye at the top of the zipper look neat on the outside since there was no facing to sew it to. I think this works well. It's visible, obviously, but not messy looking. It's stitched through the top of the zipper tape for stability, and to control the zipper tape as well.

%20appealed%20to%20me%20immediately%20when%20I%20received%20%0Athe%20catalog,%20and%20just%20FYI,%20there's%20a%20floor-length%20version%20that's%20%0Abeautiful%20and%20would%20make%20a%20great%20prom%20or%20evening%20gown.%26nbsp;%20It's%20a%20separate%20%0Apattern,%20which%20I%20can%26nbsp;%20understand,%20since%20all%20of%20those%20flounces%20are%20%0Aredrafted%20to%20attach%20to%20a%20longer%20main%20skirt.%26nbsp;%20This%20keeps%20the%20proportions%20%0Acorrect.%3Cbr%20/%3E%0A%3Cbr%20/%3E%0AIt%20was%20somewhat%20challenging%20to%20alter%20since%20%0Athe%20bodice%20is%20not%20symmetric,%20and%20it%20also%20has%20no%20'regular'%20darts.%26nbsp;%20So%20I%20%0Aused%20a%20combination%20of%20a%20princess%20FBA%20and%20using%20my%20saran%20wrap%20block%20to%20%0Amake%20sure%20I%20had%20made%20the%20changes%20I%20needed.%26nbsp;%20I%20think%20it%20turned%20out%20pretty%0A%20well,%20and%20actually,%20this%20was%20my%20'muslin',%20though%20I%20had%20hopes%20that%20it%20%0Awould%20be%20very%20wearable.%26nbsp;%20I%20think%20it%20is.%3Cbr%20/%3E%0A%3Cbr%20/%3E%0A%3Cdiv%3E%0A%3Ca%20href%3D%22https://blogger.googleusercontent.com/img/b/R29vZ2xl/AVvXsEj0zNLTM_-CpfoSQ9oekT7uy6CFG7XHQE5Q9baYSxMBIRuoeOD3Gwx8g2QfW9RAJnenxTfbTSUijArOIOJ-0FhKUb9DK6X7t7hOGXVaWG92FvJEUI6uZk3vEJd9cKuDn1V3mv1F/s1600/DSCN1950+%2525282%252529.JPG%22%20imageanchor%3D%221%22%3E%3Cimg%20border%3D%220%22%20height%3D%22320%22%20src%3D%22https://blogger.googleusercontent.com/img/b/R29vZ2xl/AVvXsEj0zNLTM_-CpfoSQ9oekT7uy6CFG7XHQE5Q9baYSxMBIRuoeOD3Gwx8g2QfW9RAJnenxTfbTSUijArOIOJ-0FhKUb9DK6X7t7hOGXVaWG92FvJEUI6uZk3vEJd9cKuDn1V3mv1F/s320/DSCN1950+%2525282%252529.JPG%22%20width%3D%22270%22%20/%3E%3C/a%3E%3C/div%3E%0AI%20used%20a%20%0Alightweight%20matte%20jersey%20I%20got%20from%20Kashi%20at%20%3Ca%20href%3D%22https://www.facebook.com/metrotextiles%22%20target%3D%22_blank%22%3EMetro%20Textiles%3C/a%3E%20in%20New%20%0AYork.%26nbsp;%3Cbr%20/%3E%0A%3Cbr%20/%3E%0AI%20left%20all%20the%20edges%20raw.%26nbsp;%20In%20snoop%20shopping%20in%20NY%20and%20Chicago%20recently,%20and%20online%20of%20course,%20I%20am%0A%20seeing%20a%20lot%20of%20this,%20and%20if%20they%20can%20do%20it,%20so%20can%20I.%26nbsp;%20The%20trickiest%20part%20was%20making%20the%20hook%20and%20eye%20at%20the%20top%20of%20the%20zipper%20look%20neat%20on%20the%20outside%20since%20there%20was%20no%20facing%20to%20sew%20it%20to.%26nbsp;%20I%20think%20this%20works%20well.%26nbsp;%20It's%20visible,%20obviously,%20but%20not%20messy%20looking.%26nbsp;%20It's%20stitched%20through%20the%20top%20of%20the%20zipper%20tape%20for%20stability,%20and%20to%20control%20the%20zipper%20tape%20as%20well.%3Cbr%20/%3E%0A%3Cdiv%3E%0A%3Ca%20href%3D%22https://blogger.googleusercontent.com/img/b/R29vZ2xl/AVvXsEjrpGXS8GN0Zeph1K97BqiIr5IgmRi48A6rDMZmFoM8jXYiJHS80YJHq4etPKuAdS4IC2xIOQVE0DFBPP1-mbnmyP2PuZnDEtOEDy89nV827AVqjZfufwIPYLQU6TeCq5BSXn3f/s1600/DSC_0279.JPG%22%20imageanchor%3D%221%22%3E%3Cimg%20border%3D%220%22%20height%3D%22640%22%20src%3D%22https://blogger.googleusercontent.com/img/b/R29vZ2xl/AVvXsEjrpGXS8GN0Zeph1K97BqiIr5IgmRi48A6rDMZmFoM8jXYiJHS80YJHq4etPKuAdS4IC2xIOQVE0DFBPP1-mbnmyP2PuZnDEtOEDy89nV827AVqjZfufwIPYLQU6TeCq5BSXn3f/s640/DSC_0279.JPG%22%20width%3D%22427%22%20/%3E%3C/a%3E%3C/div%3E)
Kearney and Sarah Veblen 14 Oct 2015 3:51 PM (9 years ago)


I had such a good time in Kearney last Friday and Saturday with old and new friends from the Kearney Area ASG chapter and the NBMCC (Nebraska Bishop Method of Clothing Construction). They put on a fantastic Expo every fall, and this year the presenter was Sarah Veblen! Of course, I could not miss it.
What an expert fitter she is, and I am dying to try some of her techniques. I'm on my own, since I was unable to stay for the hands-on workshop on Sunday at Cari's lovely sewing studio. It makes me think about going to one of her sewing weeks in Baltimore.
Here are a couple more photos of Sarah's classes, but you can probably tell that I was enjoying, and taking notes more than I was taking photos.


.%26nbsp;%20They%20put%20on%20a%20fantastic%20Expo%20every%20fall,%20and%20this%20year%20the%20presenter%20was%20Sarah%20Veblen!%26nbsp;%20Of%20course,%20I%20could%20not%20miss%20it.%3Cbr%20/%3E%0A%3Cbr%20/%3E%0AWhat%20an%20expert%20fitter%20she%20is,%20and%20I%20am%20dying%20to%20try%20some%20of%20her%20techniques.%26nbsp;%20I'm%20on%20my%20own,%20since%20I%20was%20unable%20to%20stay%20for%20the%20hands-on%20workshop%20on%20Sunday%20at%20Cari's%20lovely%20sewing%20studio.%26nbsp;%20It%20makes%20me%20think%20about%20going%20to%20one%20of%20her%20sewing%20weeks%20in%20Baltimore.%3Cbr%20/%3E%0A%3Cbr%20/%3E%0AHere%20are%20a%20couple%20more%20photos%20of%26nbsp;%20Sarah's%20classes,%20but%20you%20can%20probably%20tell%20that%20I%20was%20enjoying,%20and%20taking%20notes%20more%20than%20I%20was%20taking%20photos.%3Cbr%20/%3E%0A%3Cbr%20/%3E%0A%3Cbr%20/%3E%0A%3Cdiv%3E%0A%3Ca%20href%3D%22https://blogger.googleusercontent.com/img/b/R29vZ2xl/AVvXsEgZJrthlzlRvhjmhv2LFqNoass0x6idxJAdXtu0zrt8DIB7qREGJ4SFga-WRsZ2A9iE9ccWDVEpVzmV7xRlTVXIcOOjHeNIQJSChEclRkWq9tOveSNxR2N-9f0F9B8WIyxtZfaw/s1600/20151010_111750.jpg%22%20imageanchor%3D%221%22%3E%3Cimg%20border%3D%220%22%20height%3D%22320%22%20src%3D%22https://blogger.googleusercontent.com/img/b/R29vZ2xl/AVvXsEgZJrthlzlRvhjmhv2LFqNoass0x6idxJAdXtu0zrt8DIB7qREGJ4SFga-WRsZ2A9iE9ccWDVEpVzmV7xRlTVXIcOOjHeNIQJSChEclRkWq9tOveSNxR2N-9f0F9B8WIyxtZfaw/s320/20151010_111750.jpg%22%20width%3D%22180%22%20/%3E%3C/a%3E%3C/div%3E%0A%3Cdiv%3E%0A%3Ca%20href%3D%22https://blogger.googleusercontent.com/img/b/R29vZ2xl/AVvXsEgtzNShbvI_JOjM5odst0v14iuF1nMht5X9xkGWGVrWQV0ZUTGvE6SqrQRqxZBhLKpQzuyLYi4YEe4moOjrji2hlr0qJhim78vuxYjYn-KnLvDuJ4b3MLLetzg3W5MUgCXfp3Jv/s1600/20151010_111811.jpg%22%20imageanchor%3D%221%22%3E%3Cimg%20border%3D%220%22%20height%3D%22400%22%20src%3D%22https://blogger.googleusercontent.com/img/b/R29vZ2xl/AVvXsEgtzNShbvI_JOjM5odst0v14iuF1nMht5X9xkGWGVrWQV0ZUTGvE6SqrQRqxZBhLKpQzuyLYi4YEe4moOjrji2hlr0qJhim78vuxYjYn-KnLvDuJ4b3MLLetzg3W5MUgCXfp3Jv/s400/20151010_111811.jpg%22%20width%3D%22225%22%20/%3E%3C/a%3E%3C/div%3E%0A%3Cbr%20/%3E%0A%3Cdiv%3E%0A%3Cbr%20/%3E%3C/div%3E%0A%3Cdiv%3E%0A%3Cbr%20/%3E%3C/div%3E)
Marfy 1128 - Autumn Cocktail Dress - Completed 14 Oct 2015 3:40 PM (9 years ago)


The hem is my favorite part. I love the way it drapes and catches itself up, especially in the back. I changed the back neckline from a very low square back to a higher scoop, which is still fairly low.
I have quite a few inner construction photos for this. The blog photos are smaller than those you can see if you click here. As I think I said previously, I underlined this with a fairly heavy satin lining, almost something you would use for a coat lining. I turned the satin side toward the body, and extended it about 5" longer than the dress hem edge.
You can see how I turned the hem up to the outside on the finished garment photos, but here is the inside of the hem, which comes out very nicely since all the raw edges are inside the rolled part on the outside of the dress.
The original pattern has front horizontal and vertical darts, and gathering at the neckline under a chiffon collar. I stitched the horizontal darts, but used the other ease to drape from the waist up to the neckline. You can see close ups of the neckline and waist draping here.


Pins! 7 Oct 2015 6:54 AM (9 years ago)


It may seem a little weird to get very excited about straight pins, but we sewers know that there are pins, and then there are pins. My favorite used to be Iris Pins, but the last batch I bought simply weren't as good as they used to be, and this seems to be the consensus. So I've tried various brands and types. Clover Quilting Pins aren't bad, but I knew I hadn't tried everything out there.
When I was in Portland last April with the Fiberly Group, we went to Josephine's Dry Goods, a lovely store. She had Insect Pins in Size 2, which I like so far. I wanted to try some more, and decided to see what other brands and types were available.
I ended up purchasing Size 000 pins, to see just how much difference there was in sizes. These are much finer than the Size 2, and bend more easily, although not as easily as you might guess, given how fine they are. I like the little gold ball heads on the black pins, and have been happy to use these.
The photo above is of various sewing pins in my collection, and the 2 insect pins. They are the black ones, and the smaller one on the right is the Size 000. The pin on the far right is your average every day pin.

Autumn Cocktail Dress 5 Oct 2015 6:45 AM (9 years ago)
 I'm excited about this dress. It's been awhile since sewing has been this much fun, and I'm enjoying it. I'm going to a Friends of Opera Gala fundraiser this Sunday, and I thought I wanted something new to wear.
I'm using a TNT pattern, Marfy 1128. It's a fairly basic sheath dress, but with the gathered neckline under the chiffon collar, it give you a lot of leeway to manipulate the neckline if you don't want the collar.

I found the fabric at Hancock, and it really spoke to me. It's a very thin, non-wonderful brocade, but I love the colors and the look. This actually shows the wrong side while it's being cut out.


,%20which%20goes%20in%20the%20left%20side%20seam%20from%20the%20armscye%20to%20the%20hem.%20%20I%20probably%20would%20not%20have%20purchased%20this%20long%20a%20zipper%20on%20purpose%20for%20this,%20but%20it's%20great,%20actually.%20Apparently%20the%20longer,%20the%20better.%3Cbr%20/%3E%0A%3Cbr%20/%3E%0AI%20found%20the%20fabric%20at%20Hancock,%20and%20it%20really%20spoke%20to%20me.%20It's%20a%20very%20thin,%20non-wonderful%20brocade,%20but%20I%20love%20the%20colors%20and%20the%20look.%20%20This%20actually%20shows%20the%20wrong%20side%20while%20it's%20being%20cut%20out.%20%3Cdiv%3E%3Ca%20href%3D%22https://blogger.googleusercontent.com/img/b/R29vZ2xl/AVvXsEhJ6GHL-w2kCaV7leZ-Frk2UbQ1CEbQwtAlBSD9doGvlBmhNppfvBf7H4K-2CbGwTOHp5pWJ8GYSGqHQQaJKhYUJuzTfk7IK5TAugPczD6Q-2n-JPsg0pWPvZWS_sWFqsAWwWFt/s1600/IMG_20150930_100626.jpg%22%20imageanchor%3D%221%22%3E%3Cimg%20border%3D%220%22%20src%3D%22https://blogger.googleusercontent.com/img/b/R29vZ2xl/AVvXsEhJ6GHL-w2kCaV7leZ-Frk2UbQ1CEbQwtAlBSD9doGvlBmhNppfvBf7H4K-2CbGwTOHp5pWJ8GYSGqHQQaJKhYUJuzTfk7IK5TAugPczD6Q-2n-JPsg0pWPvZWS_sWFqsAWwWFt/s320/IMG_20150930_100626.jpg%22%20/%3E%3C/a%3E%3C/div%3EI'm%20%20underlining%20with%20a%20thicker%20satin%20lining%20fabric.%20Originally%20I%20thought%20I%20would%20do%20something%20along%20the%20lines%20of%20a%20car-wash%20skirt,%20as%20they%20are%20so%20current,%20and%20finally%20wearable%20now%20that%20they're%20not%20being%20shown%20only%20with%20absolutely%20nothing%20underneath%20them.%20%20However,%20I%20like%20what%20I%20have%20come%20up%20with%20even%20better.%20%20I%20extended%20the%20underlining%20about%205%22%20below%20the%20brocade%20and%20then%20turned%20it%20to%20the%20outside%20and%20asymmetrically%20attached%20it.%20%20Here's%20a%20photo%20of%20it%20on%20the%20dressform%20with%20the%20hem%20pinned.%20I%20am%20pinning%20a%20draped%20effect%20from%20the%20left%20waist%20to%20the%20right%20shoulder%20and%20I%20think%20the%20bow%20will%20be%20staying,%20but%20you%20never%20know.%3Cbr%20/%3E%0A%3Cdiv%3E%3Ca%20href%3D%22https://blogger.googleusercontent.com/img/b/R29vZ2xl/AVvXsEjC1tU2tT1cK1YKIjHy5tg2IpCNycmHZOFo9sT-gHXS-RMYd2oSWPq8Xjd8SWcwSpCxGlRomp5ztT03hF-TIZmgz9xMAEDxz3wt4pIwKGtzpt7EnLcEXCFNtCEEYkKi_jsu0w6E/s1600/20151003_134138-1.jpg%22%20imageanchor%3D%221%22%3E%3Cimg%20border%3D%220%22%20src%3D%22https://blogger.googleusercontent.com/img/b/R29vZ2xl/AVvXsEjC1tU2tT1cK1YKIjHy5tg2IpCNycmHZOFo9sT-gHXS-RMYd2oSWPq8Xjd8SWcwSpCxGlRomp5ztT03hF-TIZmgz9xMAEDxz3wt4pIwKGtzpt7EnLcEXCFNtCEEYkKi_jsu0w6E/s400/20151003_134138-1.jpg%22%20/%3E%3C/a%3E%3C/div%3E%3Cbr%20/%3E%0A%3Cbr%20/%3E%0A%3Cbr%20/%3E)
New York Trip Part V - Fabric (Mendel Goldberg) 25 Feb 2015 1:13 PM (10 years ago)


Finally, the pièce de résistance. I've been told for years that Mendel Goldberg was a magical place if you are in love with fabric, and Rosie took me to see it. Well, you all were right! We were lucky enough to be there when almost all of the new fabrics had come in, so we saw the stock at its most complete condition. Wow, just wow!

Every designer you can think of was represented, especially every couture designer. Of course there were things that I liked more than others, but the quality overall was exquisite. Rosie took lots of photos, and I will share with you.
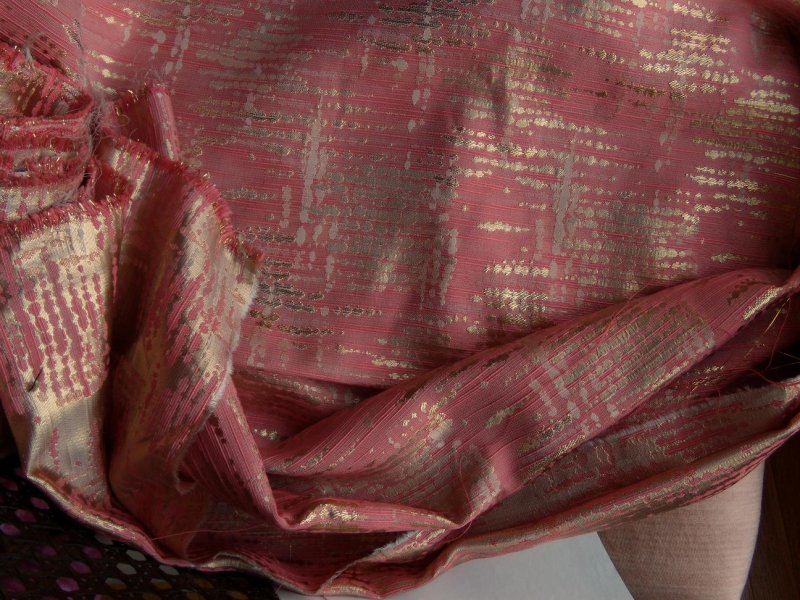
As you might have guessed, the first two photos are of the fabric that arrived on my doorstep. I am so thrilled with them, and although there was choice enough to find fabrics for 20 different beautiful suit combinations, this one leapt to my eye. The 'plain' fabric with the border texture is to be a skirt. The border is pieces of fabric and yarns attached to the base fabric, and as the photo suggests, that border will be a few inches above the hem edge of a straight skirt. Totally frivolous, yet somewhat restrained and severe. Just my kind of thing. The fabric to the left is for the jacket, and it's so much more beautiful in person I can't tell you. The yarns it's woven with are gorgeous and of such a quality that you would think they were high-end hand knitting yarns. There's a lot of gold in it and the selvedges are beautiful, and will be used as trim here and there.

 Now, on to the other fabrics we saw and 'snapped'.


Do you wish you'd been with us yet?
New York Trip Part IV - Metro Textiles (Kashi) 25 Feb 2015 12:34 PM (10 years ago)
 I love it when boxes are delivered, especially when there is wonderful fabric inside. As you might guess, more of the fabric I purchased in New York arrived here today. I am going to show you what I bought at Metro Textiles. It's a great shop that you should plan to visit if you get to New York's Garment District to shop. This was my second visit in the last 3 years, so I feel very lucky.
Normally I think of knits when I think of Kashi. It's not that he has only knits, or that he even has mostly knits, it's just that he always has very nice knits at good prices, and he usually has lots of colors. If you follow me at all, you know that I like "off" colors the best usually, and they're often difficult to find. When there is a limited selection of knits, they generally stick to fairly standard colors, and that's fine, but I tend to look for the ones that look like they might have been mis-dyed or something, and I have had good luck finding those here.
I got 4 knits. Counter-clockwise from the top left, they are 1. a Grey-green and 2. a Grey-brown, which go beautifully together, 3. a Chocolate brown, and 4. a Burgundy laminated with pink and orange. It's not quite as wild as it looks, but it is unusual.

I also got a pair of fabrics that I normally would not really consider. I like this kind of thing, but it's a little more contrast than I usually go for, but it just called my name, and whispered ladylike suit-type outfit. the first half of the duo is a Rust and Creamy White Brocade-type weave with a beautiful weight and texture to it. (I think if you click on the picture, you'll get a larger image that will allow you to see the texture better.)
At this time, my plan is that it will be a jacket, and the Rust heavy stretch woven satin behind it will be a skirt. Things could change, but I'm really kind of pleased with this idea so far. I suppose I could always do a dress, and in fact, I have an idea that this would be really good for, so you never know. I love the colors, though.

%26bodytext%3DI%20love%20it%20when%20boxes%20are%20delivered,%20especially%20when%20there%20is%20wonderful%20fabric%20inside.%26nbsp;%20As%20you%20might%20guess,%20more%20of%20the%20fabric%20I%20purchased%20in%20New%20York%20arrived%20here%20today.%26nbsp;%20I%20am%20going%20to%20show%20you%20what%20I%20bought%20at%20%3Ca%20href%3D%22https://www.facebook.com/metrotextiles%22%20target%3D%22_blank%22%3EMetro%20Textiles%3C/a%3E.%26nbsp;%20It's%20a%20great%20shop%20that%20you%20should%20plan%20to%20visit%20if%20you%20get%20to%20New%20York's%20Garment%20District%20to%20shop.%26nbsp;%20This%20was%20my%20second%20visit%20in%20the%20last%203%20years,%20so%20I%20feel%20very%20lucky.%3Cbr%20/%3E%0A%26nbsp;Normally%20I%20think%20of%20knits%20when%20I%20think%20of%20Kashi.%26nbsp;%20It's%20not%20that%20he%20has%20only%20knits,%20or%20that%20he%20even%20has%20mostly%20knits,%20it's%20just%20that%20he%20always%20has%20very%20nice%20knits%20at%20good%20prices,%20and%20he%20usually%20has%20lots%20of%20colors.%26nbsp;%20If%20you%20follow%20me%20at%20all,%20you%20know%20that%20I%20like%20%22off%22%20colors%20the%20best%20usually,%20and%20they're%20often%20difficult%20to%20find.%26nbsp;%20When%20there%20is%20a%20limited%20selection%20of%20knits,%20they%20generally%20stick%20to%20fairly%20standard%20colors,%20and%20that's%20fine,%20but%20I%20tend%20to%20look%20for%20the%20ones%20that%20look%20like%20they%20might%20have%20been%20mis-dyed%20or%20something,%20and%20I%20have%20had%20good%20luck%20finding%20those%20here.%26nbsp;%3Cbr%20/%3E%0A%3Cbr%20/%3E%0AI%20got%204%20knits.%26nbsp;%20Counter-clockwise%20from%20the%20top%20left,%20they%20are%201.%20a%20Grey-green%20and%202.%20a%20Grey-brown,%20which%20go%20beautifully%20together,%203.%20a%20Chocolate%20brown,%20and%204.%20a%20Burgundy%20laminated%20with%20pink%20and%20orange.%26nbsp;%20It's%20not%20quite%20as%20wild%20as%20it%20looks,%20but%20it%20is%20unusual.%3Cbr%20/%3E%0A%3Cdiv%3E%0A%3C/div%3E%0A%3Cdiv%3E%0A%3C/div%3E%0A%3Cdiv%3E%0A%3Ca%20href%3D%22https://blogger.googleusercontent.com/img/b/R29vZ2xl/AVvXsEgSoDkPFO-VPNeqOf2s2gc-q-m3LKu6IjsrqUUTyhQFssFwcKDfszeuKVMs2XqNj2uV9rzHamnsVPEyRd4b_My1Z7jNhg8D_w3IyVyqZLOsbxOkGFE19dzgE-4L74qXsKuhQeda/s1600/20150225_140826-1.jpg%22%20imageanchor%3D%221%22%3E%3Cimg%20border%3D%220%22%20src%3D%22https://blogger.googleusercontent.com/img/b/R29vZ2xl/AVvXsEgSoDkPFO-VPNeqOf2s2gc-q-m3LKu6IjsrqUUTyhQFssFwcKDfszeuKVMs2XqNj2uV9rzHamnsVPEyRd4b_My1Z7jNhg8D_w3IyVyqZLOsbxOkGFE19dzgE-4L74qXsKuhQeda/s1600/20150225_140826-1.jpg%22%20height%3D%22335%22%20width%3D%22400%22%20/%3E%3C/a%3E%3C/div%3E%0A%3Cbr%20/%3E%0AI%20also%20got%20a%20pair%20of%20fabrics%20that%20I%20normally%20would%20not%20really%20consider.%26nbsp;%20I%20like%20this%20kind%20of%20thing,%20but%20it's%20a%20little%20more%20contrast%20than%20I%20usually%20go%20for,%20but%20it%20just%20called%20my%20name,%20and%20whispered%20ladylike%20suit-type%20outfit.%26nbsp;%20the%20first%20half%20of%20the%20duo%20is%20a%20Rust%20and%20Creamy%20White%20Brocade-type%20weave%20with%20a%20beautiful%20weight%20and%26nbsp;%20texture%20to%20it.%26nbsp;%20(I%20think%20if%20you%20click%20on%20the%20picture,%20you'll%20get%20a%20larger%20image%20that%20will%20allow%20you%20to%20see%20the%20texture%20better.)%3Cbr%20/%3E%0A%3Cbr%20/%3E%0A%26nbsp;%20At%20this%20time,%20my%20plan%20is%20that%20it%20will%20be%20a%20jacket,%20and%20the%20Rust%20heavy%20stretch%20woven%20satin%20behind%20it%20will%20be%20a%20skirt.%26nbsp;%20Things%20could%20change,%20but%20I'm%20really%20kind%20of%20pleased%20with%20this%20idea%20so%20far.%26nbsp;%20I%20suppose%20I%20could%20always%20do%20a%20dress,%20and%20in%20fact,%20I%20have%20an%20idea%20that%20this%20would%20be%20really%20good%20for,%20so%20you%20never%20know.%26nbsp;%20I%20love%20the%20colors,%20though.%3Cbr%20/%3E%0A%3Cdiv%3E%0A%3Ca%20href%3D%22https://blogger.googleusercontent.com/img/b/R29vZ2xl/AVvXsEiR8Jq1_CoHPfOXb8hTLJFPqwnxBA7NEHNPSi8DidreiqJ9UMJcMLmPQqFnO2xuus5uuLpUsxhXQvO9EPDPRSW0PwO_BWmP9apndbUqc-xO64-dqpYulXVxo5duXyntb_JlvFKb/s1600/20150225_140909-1.jpg%22%20imageanchor%3D%221%22%3E%3Cimg%20border%3D%220%22%20src%3D%22https://blogger.googleusercontent.com/img/b/R29vZ2xl/AVvXsEiR8Jq1_CoHPfOXb8hTLJFPqwnxBA7NEHNPSi8DidreiqJ9UMJcMLmPQqFnO2xuus5uuLpUsxhXQvO9EPDPRSW0PwO_BWmP9apndbUqc-xO64-dqpYulXVxo5duXyntb_JlvFKb/s1600/20150225_140909-1.jpg%22%20height%3D%22640%22%20width%3D%22640%22%20/%3E%3C/a%3E%3C/div%3E)
2015 New York Trip Part III - Fabric (Elliott Berman) 24 Feb 2015 8:23 PM (10 years ago)
 Elliott Berman Textiles has long been a favorite on-line fabric source for me. I knew that I had to go there in person when I next was in New York, so we went. One interesting thing about having Rosie for my guide is that I found out that every fabric person in New York City knows and loves Rosie. It's quite amazing to be with someone who is so well-liked and who obviously knows all of these people well on a personal level. It was no different at Elliott Berman's, and I have to crow a little bit about the fact that Eugenia actually recognized me (or at least my name) when I met her. She said I was just about their first on-line purchaser when they began a website operation. I feel very special! I have bought a LOT on-line from them over several years, including the cashmere for the coat I made in 2008/09, and the Evening Coat I made in a gold and coral houndstooth, and it has all been top quality.
If you have not been to their website, then GO! Right now, and drool over the wonderful, top quality fabrics that are simply unobtainable elsewhere, at least for most of us. They are also on Facebook, Twitter and Pinterest, so follow for special deals and just good info.
I found that the wealth of fabrics on their website is only a very small fraction of what they have available in their warehouse area. We got a lovely tour from Eugenia, and then she left us to browse on our own and take photos and even a swatch or two. I didn't purchase anything that day, but I took some photos that I may turn into actual fabric. Here's what I saved to drool over.


%26bodytext%3D%3Ca%20href%3D%22http://www.elliottbermantextiles.com/%22%20target%3D%22_blank%22%3EElliott%20Berman%20Textiles%3C/a%3E%20has%20long%20been%20a%20favorite%20on-line%20fabric%20source%20for%20me.%26nbsp;%20I%20knew%20that%20I%20had%20to%20go%20there%20in%20person%20when%20I%20next%20was%20in%20New%20York,%20so%20we%20went.%26nbsp;%20One%20interesting%20thing%20about%20having%20Rosie%20for%20my%20guide%20is%20that%20I%20found%20out%20that%20every%20fabric%20person%20in%20New%20York%20City%20knows%20and%20loves%20Rosie.%26nbsp;%20It's%20quite%20amazing%20to%20be%20with%20someone%20who%20is%20so%20well-liked%20and%20who%20obviously%20knows%20all%20of%20these%20people%20well%20on%20a%20personal%20level.%26nbsp;%20It%20was%20no%20different%20at%20Elliott%20Berman's,%20and%20I%20have%20to%20crow%20a%20little%20bit%20about%20the%20fact%20that%20Eugenia%20actually%20recognized%20me%20(or%20at%20least%20my%20name)%20when%20I%20met%20her.%26nbsp;%20She%20said%20I%20was%20just%20about%20their%20first%20on-line%20purchaser%20when%20they%20began%20a%20website%20operation.%26nbsp;%20I%20feel%20very%20special!%26nbsp;%20I%20have%20bought%20a%20LOT%20on-line%20from%20them%20over%20several%20years,%20including%20the%20%3Ca%20href%3D%22http://sewintriguing.blogspot.com/2008/12/cashmere-coat-is-finished.html%22%20target%3D%22_blank%22%3Ecashmere%20for%20the%20coat%20I%20made%20in%202008/09%3C/a%3E,%20and%20the%20Evening%20Coat%20I%20made%20in%20a%20gold%20and%20coral%20houndstooth,%20and%20it%20has%20all%20been%20top%20quality.%3Cbr%20/%3E%0A%3Cbr%20/%3E%0A%3Cdiv%3E%0A%3Ca%20href%3D%22http://www.pbase.com/lianasews/image/111572808.jpg%22%20imageanchor%3D%221%22%3E%3Cimg%20border%3D%220%22%20src%3D%22http://www.pbase.com/lianasews/image/111572808.jpg%22%20height%3D%22240%22%20width%3D%22320%22%20/%3E%3C/a%3E%3C/div%3E%0A%3Cbr%20/%3E%0A%3Cbr%20/%3E%0AIf%20you%20have%20not%20been%20to%20their%20website,%20then%20GO!%26nbsp;%20Right%20now,%20and%20drool%20over%20the%20wonderful,%20top%20quality%20fabrics%20that%20are%20simply%20unobtainable%20elsewhere,%20at%20least%20for%20most%20of%20us.%26nbsp;%20They%20are%20also%20on%20%3Ca%20href%3D%22https://www.facebook.com/pages/Elliott-Berman-Textiles-Exclusive-Fashion-Fabrics/119835938064445%22%20target%3D%22_blank%22%3EFacebook%3C/a%3E,%3Ca%20href%3D%22https://twitter.com/Fashion_Fabrics%22%20target%3D%22_blank%22%3E%20Twitter%3C/a%3E%20and%20%3Ca%20href%3D%22https://www.pinterest.com/eugeniaebt/%22%20target%3D%22_blank%22%3EPinterest%3C/a%3E,%20so%20follow%20for%20special%20deals%20and%20just%20good%20info.%26nbsp;%3Cbr%20/%3E%0A%3Cbr%20/%3E%0AI%20found%20that%20the%20wealth%20of%20fabrics%20on%20their%20website%20is%20only%20a%20very%20small%20fraction%20of%20what%20they%20have%20available%20in%20their%20warehouse%20area.%26nbsp;%20We%20got%20a%20lovely%20tour%20from%20Eugenia,%20and%20then%20she%20left%20us%20to%20browse%20on%20our%20own%20and%20take%20photos%20and%20even%20a%20swatch%20or%20two.%26nbsp;%20I%20didn't%20purchase%20anything%20that%20day,%20but%20I%20took%20some%20photos%20that%20I%20may%20turn%20into%20actual%20fabric.%26nbsp;%20Here's%20what%20I%20saved%20to%20drool%20over.%3Cbr%20/%3E%0A%3Cbr%20/%3E%0A%3Cdiv%3E%0A%3Ca%20href%3D%22https://blogger.googleusercontent.com/img/b/R29vZ2xl/AVvXsEiXuaDpv-rCsQBpbtnnC3B6eimJ5ilHVUbS7FcTfrpAoJbeWUUqGPQ96Y8-HSr2JzogBV-q-iMxKTNHTjX0OA-BgkBE8PNI6cXFJqOhuBuR38hADlrmACg12BO1rDiYh0faJ94P/s1600/20150219_124734.jpg%22%20imageanchor%3D%221%22%3E%3Cimg%20border%3D%220%22%20src%3D%22https://blogger.googleusercontent.com/img/b/R29vZ2xl/AVvXsEiXuaDpv-rCsQBpbtnnC3B6eimJ5ilHVUbS7FcTfrpAoJbeWUUqGPQ96Y8-HSr2JzogBV-q-iMxKTNHTjX0OA-BgkBE8PNI6cXFJqOhuBuR38hADlrmACg12BO1rDiYh0faJ94P/s1600/20150219_124734.jpg%22%20height%3D%22360%22%20width%3D%22640%22%20/%3E%3C/a%3E%3C/div%3E%0A%3Cbr%20/%3E%0A%3Cdiv%3E%0A%3Ca%20href%3D%22https://blogger.googleusercontent.com/img/b/R29vZ2xl/AVvXsEjFZGm-WqieNtvA1PIcAFzLWmP71-TkVx_OmYqEk2O7Zp-S3-gieOW916JdOV-WNSc3p3sBajT5jkZCOMw9Ee6WElFLnL-0_Z8bthPTxmfG4GitcLbX1CUnTB1gbWwPhcJWGBZt/s1600/20150219_125026.jpg%22%20imageanchor%3D%221%22%3E%3Cimg%20border%3D%220%22%20src%3D%22https://blogger.googleusercontent.com/img/b/R29vZ2xl/AVvXsEjFZGm-WqieNtvA1PIcAFzLWmP71-TkVx_OmYqEk2O7Zp-S3-gieOW916JdOV-WNSc3p3sBajT5jkZCOMw9Ee6WElFLnL-0_Z8bthPTxmfG4GitcLbX1CUnTB1gbWwPhcJWGBZt/s1600/20150219_125026.jpg%22%20height%3D%22360%22%20width%3D%22640%22%20/%3E%3C/a%3E%3C/div%3E%0A%3Cbr%20/%3E%0A%3Cdiv%3E%0A%3Ca%20href%3D%22https://blogger.googleusercontent.com/img/b/R29vZ2xl/AVvXsEhbQKnnLbLkOMYGyL0qsK1StDZ_zmN414XJYg6kB4cAqtaVxgXAKZES4Gh6ir_WBt9L6jpvJLj3S_FslvxGIfyHwjbuSzTwFl28liuvM1kuYF0cO-YWgo-91I1h449KIaF7ajiq/s1600/20150219_125401.jpg%22%20imageanchor%3D%221%22%3E%3Cimg%20border%3D%220%22%20src%3D%22https://blogger.googleusercontent.com/img/b/R29vZ2xl/AVvXsEhbQKnnLbLkOMYGyL0qsK1StDZ_zmN414XJYg6kB4cAqtaVxgXAKZES4Gh6ir_WBt9L6jpvJLj3S_FslvxGIfyHwjbuSzTwFl28liuvM1kuYF0cO-YWgo-91I1h449KIaF7ajiq/s1600/20150219_125401.jpg%22%20height%3D%22640%22%20width%3D%22360%22%20/%3E%3C/a%3E%3C/div%3E%0A%3Cdiv%3E%0A%3C/div%3E%0A%3Cdiv%3E%0A%3C/div%3E%0A%3Cdiv%3E%0A%3C/div%3E)
2015 New York Trip Part II - Fabric (Spandex & Notions) 24 Feb 2015 7:28 PM (10 years ago)


If you've never been, it's not as easy as you'd think. Some of the places are on the street, but quite a few are above street level, even unto the 9th floor, and there's not a lot of signage telling you where to go and how to get there. When you do arrive, they are so very gracious and kind, and of course they have the fabulous things we all want. My only complaint is that I cannot just pop back in whenever I'm looking for just that particular thing that I want and cannot find anywhere near here, but they have it right there. Oh well, that's my problem, not theirs.
Rosie and I began with breakfast and moved quickly to Metro Textiles and Kashi (fabric still en route, so I will report later.) He always has great fabrics at great prices, and this was no exception. I was especially looking for knits from him.

I particularly wanted to get some swimsuit fabric and foldover elastic as well as looking at zippers and O-rings. Spandex House , interior shown on the left, was the place for swimsuit fabric, and I got the 4 pieces that you see above. A yard will make at least a couple of one-piece suits, and I got about 3 yards of the chain print since I think it will make a fun top as well as a swimsuit. You can see it in the photos below, as well as the foldover elastic I chose, and the O-rings. Both of those items came from Daytona Trimming.


%26bodytext%3D%3Cdiv%3E%0A%3Ca%20href%3D%22https://blogger.googleusercontent.com/img/b/R29vZ2xl/AVvXsEhhADn97zlBtw7Lh3EHaNdLaT6EOowgdMtOQKXXS46BayhfRIPKFwY4_rBg6zts7rcE8Mccq3kNIEg0xnA_btZ4G7F3ueiUNwbdbJHKWbA1QtOBth58P9hiELWj8plNQMdbRUJ5/s1600/20150224_213519-1.jpg%22%20imageanchor%3D%221%22%3E%3Cimg%20border%3D%220%22%20src%3D%22https://blogger.googleusercontent.com/img/b/R29vZ2xl/AVvXsEhhADn97zlBtw7Lh3EHaNdLaT6EOowgdMtOQKXXS46BayhfRIPKFwY4_rBg6zts7rcE8Mccq3kNIEg0xnA_btZ4G7F3ueiUNwbdbJHKWbA1QtOBth58P9hiELWj8plNQMdbRUJ5/s1600/20150224_213519-1.jpg%22%20height%3D%22355%22%20width%3D%22400%22%20/%3E%3C/a%3E%3C/div%3E%0AI%20had%20the%20BEST%20guide%20for%20my%20fabric%20shopping%20that%20anyone%20could%20ask%20for.%26nbsp;%20Rosie%20Lynshue,%20who%20will%20be%20joining%20us%20on%20the%20Fiberly%20Trip%20this%20year%20(we're%20going%20to%20Portland!!)%20kindly%20offered%20to%20show%20me%20around.%26nbsp;%20It's%20been%20several%20years%20since%20I%20was%20in%20the%20Garment%20District,%20and%20then%20I%20had%20the%20fabulous%20%3Ca%20href%3D%22http://catfurstudio.blogspot.com/%22%20target%3D%22_blank%22%3EBarbara%20Bell%3C/a%3E%20to%20show%20me%20where%20to%20go,%20but%20this%20time%20I%20was%20on%20my%20own%20with%20hazy%20memories%20of%20where%20things%20were,%20a%20list,%20and%20Google%20Maps.%26nbsp;%3Cbr%20/%3E%0A%3Cbr%20/%3E%0AIf%20you've%20never%20been,%20it's%20not%20as%20easy%20as%20you'd%20think.%26nbsp;%20Some%20of%20the%20places%20are%20on%20the%20street,%20but%20quite%20a%20few%20are%20above%20street%20level,%20even%20unto%20the%209th%20floor,%20and%20there's%20not%20a%20lot%20of%20signage%20telling%20you%20where%20to%20go%20and%20how%20to%20get%20there.%26nbsp;%20When%20you%20do%20arrive,%20they%20are%20so%20very%20gracious%20and%20kind,%20and%20of%20course%20they%20have%20the%20fabulous%20things%20we%20all%20want.%26nbsp;%20My%20only%20complaint%20is%20that%20I%20cannot%20just%20pop%20back%20in%20whenever%20I'm%20looking%20for%20just%20that%20particular%20thing%20that%20I%20want%20and%20cannot%20find%20anywhere%20near%20here,%20but%20they%20have%20it%20right%20there.%26nbsp;%20Oh%20well,%20that's%20my%20problem,%20not%20theirs.%26nbsp;%3Cbr%20/%3E%0A%3Cbr%20/%3E%0ARosie%20and%20I%20began%20with%20breakfast%20and%20moved%20quickly%20to%20%3Ca%20href%3D%22https://www.facebook.com/metrotextiles%22%20target%3D%22_blank%22%3EMetro%20Textiles%20and%20Kashi%3C/a%3E%20(fabric%20still%20en%20route,%20so%20I%20will%20report%20later.)%26nbsp;%20He%20always%20has%20great%20fabrics%20at%20great%20prices,%20and%20this%20was%20no%20exception.%26nbsp;%20I%20was%20especially%20looking%20for%20knits%20from%20him.%3Cbr%20/%3E%0A%3Cdiv%3E%0A%3Ca%20href%3D%22https://blogger.googleusercontent.com/img/b/R29vZ2xl/AVvXsEh0cOq6kLHMjJjSZfCfGvyl556UBcKJFG1jPBh4JRXGzZcGgUTp3KNNIUrZflB1ipLbafOCnEbTF4O51D0H5YRpvt-V6wX8nXR2z_BxZuRibceYW6ZMerAuVMDeuYnQpHW46xJu/s1600/SpandexHouse.JPG%22%20imageanchor%3D%221%22%3E%3Cimg%20border%3D%220%22%20src%3D%22https://blogger.googleusercontent.com/img/b/R29vZ2xl/AVvXsEh0cOq6kLHMjJjSZfCfGvyl556UBcKJFG1jPBh4JRXGzZcGgUTp3KNNIUrZflB1ipLbafOCnEbTF4O51D0H5YRpvt-V6wX8nXR2z_BxZuRibceYW6ZMerAuVMDeuYnQpHW46xJu/s1600/SpandexHouse.JPG%22%20height%3D%22240%22%20width%3D%22320%22%20/%3E%3C/a%3E%3C/div%3E%0A%3Cbr%20/%3E%0AI%20particularly%20wanted%20to%20get%20some%20swimsuit%20fabric%20and%20foldover%20elastic%20as%20well%20as%20looking%20at%20zippers%20and%20O-rings.%26nbsp;%20%3Ca%20href%3D%22http://www.spandexhouse.com/%22%20target%3D%22_blank%22%3ESpandex%20House%3C/a%3E%20,%20interior%20shown%20on%20the%20left,%20was%20the%20place%20for%20swimsuit%20fabric,%20and%20I%20got%20the%204%20pieces%20that%20you%20see%20above.%26nbsp;%20A%20yard%20will%20make%20at%20least%20a%20couple%20of%20one-piece%20suits,%20and%20I%20got%20about%203%20yards%20of%20the%20chain%20print%20since%20I%20think%20it%20will%20make%20a%20fun%20top%20as%20well%20as%20a%20swimsuit.%26nbsp;%20You%20can%20see%20it%20in%20the%20photos%20below,%20as%20well%20as%20the%20foldover%20elastic%20I%20chose,%20and%20the%20O-rings.%20Both%20of%20those%20items%20came%20from%20Daytona%20Trimming.%3Cbr%20/%3E%0A%3Cbr%20/%3E%0A%3Cbr%20/%3E%0A%3Cdiv%3E%0A%3Ca%20href%3D%22https://blogger.googleusercontent.com/img/b/R29vZ2xl/AVvXsEjnU2UV2W39-Fgp5B_a4X4sp01UV2Hk_2-Lr0xvPKvs3eA-7tJfdqZRI7w56TcPr8w-Ke4RTvW3I60yi1a3XGTjdcYK309lhRZXQY58qVElB2cjmT11XGJxJksVkwBBhyphenhyphenClMfVE/s1600/daytona-trimming-1.jpg%22%20imageanchor%3D%221%22%3E%3Cimg%20border%3D%220%22%20src%3D%22https://blogger.googleusercontent.com/img/b/R29vZ2xl/AVvXsEjnU2UV2W39-Fgp5B_a4X4sp01UV2Hk_2-Lr0xvPKvs3eA-7tJfdqZRI7w56TcPr8w-Ke4RTvW3I60yi1a3XGTjdcYK309lhRZXQY58qVElB2cjmT11XGJxJksVkwBBhyphenhyphenClMfVE/s1600/daytona-trimming-1.jpg%22%20height%3D%22214%22%20width%3D%22320%22%20/%3E%3C/a%3E%3C/div%3E%0A%3Ca%20href%3D%22https://blogger.googleusercontent.com/img/b/R29vZ2xl/AVvXsEieT0hzkvKm3aoIT5xBOfJV-3R33xphVQ4mM7mdt5kYiGDpho1vAMVbCgoAzsHbOJXIM0eg9Z5QsegFe2fbn9LHIemc7u5HtrS0ZzuY9kIB3tH9UaTCLsXsypZyup1105vjnZ_c/s1600/20150219_113430.jpg%22%20imageanchor%3D%221%22%3E%3Cimg%20border%3D%220%22%20src%3D%22https://blogger.googleusercontent.com/img/b/R29vZ2xl/AVvXsEieT0hzkvKm3aoIT5xBOfJV-3R33xphVQ4mM7mdt5kYiGDpho1vAMVbCgoAzsHbOJXIM0eg9Z5QsegFe2fbn9LHIemc7u5HtrS0ZzuY9kIB3tH9UaTCLsXsypZyup1105vjnZ_c/s1600/20150219_113430.jpg%22%20height%3D%22400%22%20width%3D%22225%22%20/%3E%3C/a%3E%3Cbr%20/%3E%0A%3Cdiv%3E%0A%3Ca%20href%3D%22https://blogger.googleusercontent.com/img/b/R29vZ2xl/AVvXsEhouemvtV_PddQ6BGtVly2tzzi_vZ8Ooxw-ikM7wDb3eZnYcZu92QPM0CvtIc2AhSENjANhVSbyBLxMRVfsFG2mIWl60qTBlhPbHxdgo-OffeMqfxmuX-GxR11cGVlbQssHjnWt/s1600/20150224_213626-1.jpg%22%20imageanchor%3D%221%22%3E%3Cimg%20border%3D%220%22%20src%3D%22https://blogger.googleusercontent.com/img/b/R29vZ2xl/AVvXsEhouemvtV_PddQ6BGtVly2tzzi_vZ8Ooxw-ikM7wDb3eZnYcZu92QPM0CvtIc2AhSENjANhVSbyBLxMRVfsFG2mIWl60qTBlhPbHxdgo-OffeMqfxmuX-GxR11cGVlbQssHjnWt/s1600/20150224_213626-1.jpg%22%20height%3D%22310%22%20width%3D%22400%22%20/%3E%26nbsp;%3C/a%3E%3C/div%3E%0A%3Cdiv%3E%0A%3Cbr%20/%3E%3C/div%3E%0A%3Cdiv%3E%0ALastly,%20a%20couple%20of%20so%20very%20sweet%20treats%20from%20Rosie%20to%20welcome%20me%20to%20New%0A%20York.%26nbsp;%20Totally%20unexpected%20and%20as%20I%20was%20to%20come%20to%20understand,%20so%20very%20%0Amuch%20her%20style.%26nbsp;%20Thanks%20Rosie,%20for%20everything!%26nbsp;%3C/div%3E%0A%3Cdiv%3E%0A%3Cbr%20/%3E%3C/div%3E%0A%3Cdiv%3E%0A%3Ca%20href%3D%22https://blogger.googleusercontent.com/img/b/R29vZ2xl/AVvXsEio_NIWAvfX1kZ7VCochlsnKktaBTBbbMWjDd0DqGdzYeM88ozd4rbjsrIVQsIcAJWYrecesqfcTK_DnzQuelzMRso50p2LVNRTpKxqFcvNDvta0-GFGI4eZ42A-fasE7GM1YYY/s1600/2015-02-19+15.39.35.jpg%22%20imageanchor%3D%221%22%3E%3Cimg%20border%3D%220%22%20src%3D%22https://blogger.googleusercontent.com/img/b/R29vZ2xl/AVvXsEio_NIWAvfX1kZ7VCochlsnKktaBTBbbMWjDd0DqGdzYeM88ozd4rbjsrIVQsIcAJWYrecesqfcTK_DnzQuelzMRso50p2LVNRTpKxqFcvNDvta0-GFGI4eZ42A-fasE7GM1YYY/s1600/2015-02-19+15.39.35.jpg%22%20height%3D%22186%22%20width%3D%22200%22%20/%3E%3C/a%3E%3C/div%3E)
2015 New York Trip Part I - Opera, etc. 24 Feb 2015 6:23 PM (10 years ago)


I was lucky enough to see a probably once-in-a-lifetime Carmen (yes, it was really that good) with Elīna Garanča (Carmen), Roberto Alagna (Don Jose) and Gábor Bretz (Escamillo).

Even the view from my hotel room window was pretty nice. Definitely way above brick-wall status, and I have to say I had a wonderful trip all in all.
While I was there I saw not only the 3 operas referenced above, but 2 musicals and a play on Broadway. Kinky Boots, Chicago, and It's Only A Play. They were all really good, and I'm glad I got the chance to see so many productions. Originally I was to leave Sunday, but my flight was cancelled because of weather, and so I had Sunday to see It's Only A Play.
I did some shopping besides fabric shopping, although I didn't do much buying other than fabric, etc. There will be a couple posts on fabric, and most of it is still en route to me since I had it shipped. Saves weight in your luggage.
%20with%20%3Ca%20href%3D%22http://joycedidonato.com/%22%20target%3D%22_blank%22%3EJoyce%20DiDonato%3C/a%3E%20and%20%3Ca%20href%3D%22http://juandiegoflorez.com/%22%20target%3D%22_blank%22%3EJuan%20Diego%20Fl%C3%B3rez.%3C/a%3E%20%3Cbr%20/%3E%0A%3Cbr%20/%3E%0A%3Cdiv%3E%0A%3Ca%20href%3D%22https://blogger.googleusercontent.com/img/b/R29vZ2xl/AVvXsEjT-sCzg6q4RGKi3misTqCnB60X02-wwObrdB2no4rzYSzYAPpf-_9hSccUcI2jDWeD4C2L3oU_BZtIBlmp1Ge_j17oPpY1Jm3aFS1lH4zz2ssaL8kVshc7CjB2gkO2tQ6bN62r/s1600/20150217_190928.jpg%22%20imageanchor%3D%221%22%3E%3Cimg%20border%3D%220%22%20src%3D%22https://blogger.googleusercontent.com/img/b/R29vZ2xl/AVvXsEjT-sCzg6q4RGKi3misTqCnB60X02-wwObrdB2no4rzYSzYAPpf-_9hSccUcI2jDWeD4C2L3oU_BZtIBlmp1Ge_j17oPpY1Jm3aFS1lH4zz2ssaL8kVshc7CjB2gkO2tQ6bN62r/s1600/20150217_190928.jpg%22%20height%3D%22320%22%20width%3D%22180%22%20/%3E%3C/a%3E%3C/div%3E%0A%26nbsp;To%20the%20left%20is%20their%20glorious%20proscenium%20arch%20and%20the%20rows%20of%20balconies%20and%20boxes%20taken%20before%20Don%20Giovanni%20began.%3Cbr%20/%3E%0A%3Cbr%20/%3E%0AI%20was%20lucky%20enough%20to%20see%20a%26nbsp;%20probably%20once-in-a-lifetime%20Carmen%20(yes,%20it%20was%20really%20that%20good)%20with%20%3Ca%20href%3D%22http://youtu.be/jGFUKsv1epk%22%20target%3D%22_blank%22%3EEl%C4%ABna%20Garan%C4%8Da%3C/a%3E%20(Carmen),%20%3Ca%20href%3D%22https://www.youtube.com/channel/UCXwU0IvrrZx6-Pe7HU-VHmw%22%20target%3D%22_blank%22%3ERoberto%20Alagna%3C/a%3E%20(Don%20Jose)%20and%20%3Ca%20href%3D%22https://www.youtube.com/results?search_query%253DG%25C3%25A1bor+Bretz%22%20target%3D%22_blank%22%3EG%C3%A1bor%20Bretz%3C/a%3E%20(Escamillo).%3Cbr%20/%3E%0A%3Cbr%20/%3E%0A%3Cbr%20/%3E%0A%3Cbr%20/%3E%0A%3Cbr%20/%3E%0A%3Ca%20href%3D%22https://blogger.googleusercontent.com/img/b/R29vZ2xl/AVvXsEhMaHvzwKZSitf0N-J8yPo09myir0tm6MRMDo_i0w2Esny5ikkJTk93859yGQRbu9RKgR4t_pePiqRM3todbLtozAKIegKspjtgJxmagbuxKb-HRln4cSjE6YZAVEWH48Ye5Ny7/s1600/20150217_165139.jpg%22%20imageanchor%3D%221%22%3E%3Cimg%20border%3D%220%22%20src%3D%22https://blogger.googleusercontent.com/img/b/R29vZ2xl/AVvXsEhMaHvzwKZSitf0N-J8yPo09myir0tm6MRMDo_i0w2Esny5ikkJTk93859yGQRbu9RKgR4t_pePiqRM3todbLtozAKIegKspjtgJxmagbuxKb-HRln4cSjE6YZAVEWH48Ye5Ny7/s1600/20150217_165139.jpg%22%20height%3D%22320%22%20width%3D%22180%22%20/%3E%3C/a%3E%3Cbr%20/%3E%0AEven%20the%20view%20from%20my%20hotel%20room%20window%20was%20pretty%20nice.%26nbsp;%20Definitely%20way%20above%20brick-wall%20status,%20and%20I%20have%20to%20say%20I%20had%20a%20wonderful%20trip%20all%20in%20all.%20%3Cbr%20/%3E%0A%3Cbr%20/%3E%0A%3Cbr%20/%3E%0A%3Cbr%20/%3E%0A%3Cbr%20/%3E%0A%26nbsp;While%20I%20was%20there%20I%20saw%20not%20only%20the%203%20operas%20referenced%20above,%20but%202%20musicals%20and%20a%20play%20on%20Broadway.%26nbsp;%20Kinky%20Boots,%20Chicago,%20and%20It's%20Only%20A%20Play.%26nbsp;%20They%20were%20all%20really%20good,%20and%20I'm%20glad%20I%20got%20the%20chance%20to%20see%20so%20many%20productions.%26nbsp;%20Originally%20I%20was%20to%20leave%20Sunday,%20but%20my%20flight%20was%20cancelled%20because%20of%20weather,%20and%20so%20I%20had%20Sunday%20to%20see%20It's%20Only%20A%20Play.%3Cbr%20/%3E%0A%3Cbr%20/%3E%0AI%20did%20some%20shopping%20besides%20fabric%20shopping,%20although%20I%20didn't%20do%20much%20buying%20other%20than%20fabric,%20etc.%26nbsp;%20There%20will%20be%20a%20couple%20posts%20on%20fabric,%20and%20most%20of%20it%20is%20still%20en%20route%20to%20me%20since%20I%20had%20it%20shipped.%26nbsp;%20Saves%20weight%20in%20your%20luggage.)
Gardening Warrior Basket (with Voodoo Rabbit!) 18 Jan 2015 7:49 PM (10 years ago)


%26bodytext%3D%3Cdiv%3E%0A%3Ca%20href%3D%22https://blogger.googleusercontent.com/img/b/R29vZ2xl/AVvXsEj-_lo3C5HtCUOUp7x6iQC_ZLhrYsFHhEi4qWtt3X5IcWaghKxVf7CbmGB1eXvQiaAbekksjfaVhX1by7jgJaglXnSZV0DjGHJk4l1uUH7ZplvpOEOl4HSECGTROOQrwEQTgrk4/s1600/GardenWarrior.jpg%22%20imageanchor%3D%221%22%3E%3Cimg%20border%3D%220%22%20src%3D%22https://blogger.googleusercontent.com/img/b/R29vZ2xl/AVvXsEj-_lo3C5HtCUOUp7x6iQC_ZLhrYsFHhEi4qWtt3X5IcWaghKxVf7CbmGB1eXvQiaAbekksjfaVhX1by7jgJaglXnSZV0DjGHJk4l1uUH7ZplvpOEOl4HSECGTROOQrwEQTgrk4/s1600/GardenWarrior.jpg%22%20height%3D%22640%22%20width%3D%22360%22%20/%3E%3C/a%3E%3C/div%3E%0A%3Cdiv%3E%0A%20%3C/div%3E%0A%3Cdiv%3E%0AGardening%20Warrior%20Basket%3C/div%3E%0A%3Cdiv%3E%0A%3Cbr%20/%3E%3C/div%3E%0A%3Cdiv%3E%0AThis%20is%20a%20gift%20basket%20for%20a%20man%20who%20is%20an%20enthusiastic%20gardener.%20%26nbsp;%20He%20also%20has%20a%20never%20ending%20battle%20over%20that%20garden%20with%20rabbits.%20%26nbsp;It's%20going%20to%20accompany%20a%20gift%20card,%20and%20I%20had%20a%20lot%20of%20ideas%20for%20something%20cute%20and%20kind%20of%20funny,%20so%20I%20was%20elected.%20%26nbsp;I%20thought%20it%20turned%20out%20so%20cute%20that%20I%20had%20share.%26nbsp;%20I%20hope%20you%20think%20it's%20cute%20too.%3C/div%3E%0A%3Cdiv%3E%0A%3Cbr%20/%3E%3C/div%3E%0A%3Cdiv%3E%0AIt%20includes:%3C/div%3E%0A%3Cdiv%3E%0AGarden-themed%20Potholder%3C/div%3E%0A%3Cdiv%3E%0ACarrot-shaped%20Candy%20Bags%3C/div%3E%0A%3Cdiv%3E%0APotting%20Soil%3C/div%3E%0A%3Cdiv%3E%0ARabbit-shaped%20Candy%20Peeps%3C/div%3E%0A%3Cdiv%3E%0ARabbit%20Voodoo%20Doll%3C/div%3E%0A%3Cdiv%3E%0A%26nbsp;%20%26nbsp;%20%26nbsp;%20and....%20%3C/div%3E%0A%3Cdiv%3E%0AAmmo,%20in%20case%20Voodoo%20doesn't%20work.%3C/div%3E)