Photos of Moving Subjects: Focus Tips to Blur or Freeze Motion (VIDEO) 15 Apr 12:00 AM (yesterday, 12:00 am)
We're all faced with a choice when it comes to photographing fast-moving subjects, whether they're birds in flight, sports subjects, shots of rambunctious kids or pets, or vehicles passing quickly through the frame. One option is to freeze the peak moment of action as it occurs, while the other is to intentionally blur the subject to create a unique, visual representation of speed.
This super quick tutorial is presented by the folks at Great Big Photography World, a great source of imaging information on a wide range of subjects of interest to beginners and experienced photographers alike. The popular YouTube channel also provides access to a supportive network of experts who share your passion for photography.
Today's unnamed instructor breaks down various techniques for capturing the look you're after, and it's all about selecting an appropriate shutter speed and dialing in the best focus mode for the specific task at hand. As he says, "this photography tutorial will give you practical easy-to-follow tips to level-up your skills and instantly capture better photos."

This eye-opening lesson begins with an overview of how shutter speed impacts motion blur and sharpness. When your goal is freezing a subject, the faster it moves the higher your shutter speed should be. And that means paying attention to how aperture and ISO settings impact exposure at the speed you select.
When sense of movement is the name of the game, however, it's necessary to reverse the approach you take, and you'll learn a few easy techniques for using motion-blur creatively for stunning effects.
Our instructor also explains when autofocus works best, and why focusing manually may be preferable in certain situations. The lesson also includes a discussion of focus mode options; namely AF Single (AF-S), and AF Continuous (AF-C). The decision of whether or not to use a tripod or shoot handheld also factors into the equation.

As with most tasks in photography there's no one "correct" solution to these challenges, which is why the instructor recommends that after understanding the basics you should "experiment with different shutter speeds to see how motion blur and sharpness changes in your shots." Bottom line: This four-minute explainer is well worth your time.
There's plenty more to learn on the Great Big Photography World YouTube channel, so browse through their selection of instructional videos.
Then check put the related tutorial we featured with another accomplished pro who demonstrates how to choose the best camera settings for capturing awe-inspiring photographs of flying and perched birds when shooting in Manual mode.


%26bodytext%3D%3Cp%3EWe're%20all%20faced%20with%20a%20choice%20when%20it%20comes%20to%20photographing%20fast-moving%20subjects,%20whether%20they're%20birds%20in%20flight,%20sports%20subjects,%20shots%20of%20rambunctious%20kids%20or%20pets,%20or%20vehicles%20passing%20quickly%20through%20the%20frame.%20One%20option%20is%20to%20freeze%20the%20peak%20moment%20of%20action%20as%20it%20occurs,%20while%20the%20other%20is%20to%20intentionally%20blur%20the%20subject%20to%20create%20a%20unique,%20visual%20representation%20of%20speed.%3C/p%3E%0A%0A%3Cp%3EThis%20super%20quick%20tutorial%20is%20presented%20by%20the%20folks%20at%20%3Ca%20href%3D%22http://www.youtube.com/@GBPWofficial%22%20target%3D%22_blank%22%3EGreat%20Big%20Photography%20World%3C/a%3E,%20a%20great%20source%20of%20imaging%20information%20on%20a%20wide%20range%20of%20subjects%20of%20interest%20to%20beginners%20and%20experienced%20photographers%20alike.%20The%20popular%20YouTube%20channel%20also%20provides%20access%20to%20a%20supportive%20network%20of%20experts%20who%20share%20your%20passion%20for%20photography.%3C/p%3E%0A%0A%3Cp%3EToday's%20unnamed%20instructor%20breaks%20down%20various%20techniques%20for%20capturing%20the%20look%20you're%20after,%20and%20it's%20all%20about%20selecting%20an%20appropriate%20shutter%20speed%20and%20dialing%20in%20the%20best%20focus%20mode%20for%20the%20specific%20task%20at%20hand.%20As%20he%20says,%20%22this%20photography%20tutorial%20will%20give%20you%20practical%20easy-to-follow%20tips%20to%20level-up%20your%20skills%20and%20instantly%20capture%20better%20photos.%22%3C/p%3E%0A%0A%3Cp%3E%3Cimg%20alt%3D%22%22%20src%3D%22https://www.shutterbug.com/images/22/1BG41525.png%22%20style%3D%22width:%20600px;%20height:%20481px;%22%20/%3E%3C/p%3E%0A%0A%3Cp%3EThis%20eye-opening%20lesson%20begins%20with%20an%20overview%20of%20how%20shutter%20speed%20impacts%20motion%20blur%20and%20sharpness.%20When%20your%20goal%20is%20freezing%20a%20subject,%20the%20faster%20it%20moves%20the%20higher%20your%20shutter%20speed%20should%20be.%20And%20that%20means%20paying%20attention%20to%20how%20aperture%20and%20ISO%20settings%20impact%20exposure%20at%20the%20speed%20you%20select.%3C/p%3E%0A%0A%3Cp%3EWhen%20sense%20of%20movement%20is%20the%20name%20of%20the%20game,%20however,%20it's%20necessary%20to%20reverse%20the%20approach%20you%20take,%20and%20you'll%20learn%20a%20few%20easy%20techniques%20for%20using%20motion-blur%20creatively%20for%20stunning%20effects.%3C/p%3E%0A%0A%3Cp%3EOur%20instructor%20also%20explains%20when%20autofocus%20works%20best,%20and%20why%20focusing%20manually%20may%20be%20preferable%20in%20certain%20situations.%20The%20lesson%20also%20includes%20a%20discussion%20of%20focus%20mode%20options;%20namely%20AF%20Single%20(AF-S),%20and%20AF%20Continuous%20(AF-C).%20The%20decision%20of%20whether%20or%20not%20to%20use%20a%20tripod%20or%20shoot%20handheld%20also%20factors%20into%20the%20equation.%3C/p%3E%0A%0A%3Cp%3E%3Cimg%20alt%3D%22%22%20src%3D%22https://www.shutterbug.com/images/22/2BG41525.png%22%20style%3D%22width:%20600px;%20height:%20333px;%22%20/%3E%3C/p%3E%0A%0A%3Cp%3EAs%20with%20most%20tasks%20in%20photography%20there's%20no%20one%20%22correct%22%20solution%20to%20these%20challenges,%20which%20is%20why%20the%20instructor%20recommends%20that%20after%20understanding%20the%20basics%20you%20should%20%22experiment%20with%20different%20shutter%20speeds%20to%20see%20how%20motion%20blur%20and%20sharpness%20changes%20in%20your%20shots.%22%20Bottom%20line:%20This%20four-minute%20explainer%20is%20well%20worth%20your%20time.%3C/p%3E%0A%0A%3Cp%3EThere's%20plenty%20more%20to%20learn%20on%20the%20%3Ca%20href%3D%22http://www.youtube.com/@GBPWofficial%22%20target%3D%22_blank%22%3EGreat%20Big%20Photography%20World%20YouTube%20channel%3C/a%3E,%20so%20browse%20through%20their%20selection%20of%20instructional%20videos.%3C/p%3E%0A%0A%3Cp%3EThen%20check%20put%20the%20related%20tutorial%20we%20featured%20with%20another%20accomplished%20pro%20who%20demonstrates%20how%20to%20choose%20the%20best%20camera%20settings%20for%20capturing%20awe-inspiring%20%3Ca%20href%3D%22http://www.shutterbug.com/content/simplified-settings-bird-photos-manual-mode-video%22%20target%3D%22_blank%22%3Ephotographs%20of%20flying%20and%20perched%20birds%20when%20shooting%20in%20Manual%20mode%3C/a%3E.%3C/p%3E%0A%0A%3Cp%3E%3C/p%3E)


3 Spring Photos Ideas: Settings, Shooting Tips & More (VIDEO) 15 Apr 12:00 AM (yesterday, 12:00 am)
Spring is a favorite season among everyone who shoots outdoors, and many of the best opportunities can be pursued close to home. The trick is knowing what subjects to shoot and how to achieve optimum results in the camera, and that's the topic of the how-to video below from the PHLOG Photography YouTube channel.
Instructor Christian Mohrle is a highly acclaimed German landscape photographer whose straightforward post-processing tutorials are among the most popular we share. In this episode he explores this beautiful season with three captivating photo ideas and the proper settings to use, along with in-camera shooting techniques for photographers of all skill levels.
His practical tips also involve lens choice, the use of interesting camera angles and effective composition to help you nail each shot with confidence. His first topic may the most obvious; namely spring flowers, buds, and blossoms. We've all tried this before at one time or another, but Mohrle's advice can make the difference between good images and great ones.

His first suggestion for creating a more immersive and intimate perspective is getting closer to the subject and lower to the ground. He recommends placing your camera atop a beanbag or other small support to capture a captivating view of a flower from the side. His goal for composing the shot is to accentuate the small subject by separating it from a soft background.
Mohrle demonstrates two simple tricks for enhancing this effect, the first being a wide aperture to create shallow depth of field "so your subject stays sharp while the background blurs into a soft wash of color." The second less-familiar option is to take advantage of backlight while shooting at Golden Hour, "letting the sun hit your subject from behind to introduce more depth and a beautiful glow."
Just as with flower photography Mohrle's other two recommended subjects each require a unique method of configuring the camera and their own approach to focusing, composition, lighting, and other essential variables. Next on the agenda is photographing forest scenes, taking advantage of fresh green foliage.

One tip here is to shoot after an early morning rain when the low angle of the sun imbues a scene with soft, moody light passing through the trees. You'll also learn a variety of helpful ways to compose such scenes using leading lines, tall tree trunks, long shadows, and other eye-catching elements.
Last on the list is harnessing the beauty of gentle, rolling hills that paint a scene with lush green tones and soft textures, capped by dramatic skies. One again, Mohrle walks you through the process with some very helpful tips and techniques with which you may not be familiar
The PHLOG Photography YouTube channel is full of how-to videos for shooting and editing outdoor photos to perfection, so be sure to pay a visit and explore.
And don't miss the tutorial we featured with another adept outdoor photographer who demonstrates how easy it is to avoid mistakes when shooting panorama landscapes with an iPhone, with all the camera settings and techniques you need for doing it right.
%26bodytext%3D%3Cp%3ESpring%20is%20a%20favorite%20season%20among%20everyone%20who%20shoots%20outdoors,%20and%20many%20of%20the%20best%20opportunities%20can%20be%20pursued%20close%20to%20home.%20The%20trick%20is%20knowing%20%3Cem%3Ewhat%3C/em%3E%20subjects%20to%20shoot%20and%20%3Cem%3Ehow%3C/em%3E%20to%20achieve%20optimum%20results%20in%20the%20camera,%20and%20that's%20the%20topic%20of%20the%20how-to%20video%20below%20from%20the%20%3Ca%20href%3D%22http://www.youtube.com/@ThePhlogPhotography%22%20target%3D%22_blank%22%3EPHLOG%20Photography%20YouTube%20channel%3C/a%3E.%3C/p%3E%0A%0A%3Cp%3EInstructor%20Christian%20Mohrle%20is%20a%20highly%20acclaimed%20German%20landscape%20photographer%20whose%20straightforward%20post-processing%20tutorials%20are%20among%20the%20most%20popular%20we%20share.%20In%20this%20episode%20he%20explores%20this%20beautiful%20season%20with%20three%20captivating%20photo%20ideas%20and%20the%20proper%20settings%20to%20use,%20along%20with%20in-camera%20shooting%20techniques%20for%20photographers%20of%20all%20skill%20levels.%3C/p%3E%0A%0A%3Cp%3EHis%20practical%20tips%20also%20involve%20lens%20choice,%20the%20use%20of%20interesting%20camera%20angles%20and%20effective%20composition%20to%20help%20you%20nail%20each%20shot%20with%20confidence.%20His%20first%20topic%20may%20the%20most%20obvious;%20namely%20spring%20flowers,%20buds,%20and%20blossoms.%20We've%20all%20tried%20this%20before%20at%20one%20time%20or%20another,%20but%20Mohrle's%20advice%20can%20make%20the%20difference%20between%20%3Cem%3Egood%3C/em%3E%20images%20and%20%3Cem%3Egreat%3C/em%3E%20ones.%3C/p%3E%0A%0A%3Cp%3E%3Cimg%20alt%3D%22%22%20src%3D%22https://www.shutterbug.com/images/22/1CM41525_0.png%22%20style%3D%22width:%20600px;%20height:%20328px;%22%20/%3E%3C/p%3E%0A%0A%3Cp%3EHis%20first%20suggestion%20for%20creating%20a%20more%20immersive%20and%20intimate%20perspective%20is%20getting%20closer%20to%20the%20subject%20and%20lower%20to%20the%20ground.%20He%20recommends%20placing%20your%20camera%20atop%20a%20beanbag%20or%20other%20small%20support%20to%20capture%20a%20captivating%20view%20of%20a%20flower%20from%20the%20side.%20His%20goal%20for%20composing%20the%20shot%20is%20to%20accentuate%20the%20small%20subject%20by%20separating%20it%20from%20a%20soft%20background.%3C/p%3E%0A%0A%3Cp%3EMohrle%20demonstrates%20two%20simple%20tricks%20for%20enhancing%20this%20effect,%20the%20first%20being%20a%20wide%20aperture%20to%20create%20shallow%20depth%20of%20field%20%22so%20your%20subject%20stays%20sharp%20while%20the%20background%20blurs%20into%20a%20soft%20wash%20of%20color.%22%20The%20second%20less-familiar%20option%20is%20to%20take%20advantage%20of%20backlight%20while%20shooting%20at%20Golden%20Hour,%20%22letting%20the%20sun%20hit%20your%20subject%20from%20behind%20to%20introduce%20more%20depth%20and%20a%20beautiful%20glow.%22%3C/p%3E%0A%0A%3Cp%3EJust%20as%20with%20flower%20photography%20Mohrle's%20other%20two%20recommended%20subjects%20each%20require%20a%20unique%20method%20of%20configuring%20the%20camera%20and%20their%20own%20approach%20to%20focusing,%20composition,%20lighting,%20and%20other%20essential%20variables.%20Next%20on%20the%20agenda%20is%20photographing%20forest%20scenes,%20taking%20advantage%20of%20fresh%20green%20foliage.%3C/p%3E%0A%0A%3Cp%3E%3Cimg%20alt%3D%22%22%20src%3D%22https://www.shutterbug.com/images/22/2CM41525.png%22%20style%3D%22width:%20600px;%20height:%20339px;%22%20/%3E%3C/p%3E%0A%0A%3Cp%3EOne%20tip%20here%20is%20to%20shoot%20after%20an%20early%20morning%20rain%20when%20the%20low%20angle%20of%20the%20sun%20imbues%20a%20scene%20with%20soft,%20moody%20light%20passing%20through%20the%20trees.%20You'll%20also%20learn%20a%20variety%26nbsp;%20of%20helpful%20ways%20to%20compose%20such%20scenes%20using%20leading%20lines,%20tall%20tree%20trunks,%20long%20shadows,%20and%20other%20eye-catching%20elements.%3C/p%3E%0A%0A%3Cp%3ELast%20on%20the%20list%20is%20harnessing%20the%20beauty%20of%20gentle,%20rolling%20hills%20that%20paint%20a%20scene%20with%20lush%20green%20tones%20and%20soft%20textures,%20capped%20by%20dramatic%20skies.%20One%20again,%20Mohrle%20walks%20you%20through%20the%20process%20with%20some%20very%20helpful%20tips%20and%20techniques%20with%20which%20you%20may%20not%20be%20familiar%3C/p%3E%0A%0A%3Cp%3EThe%20%3Ca%20href%3D%22http://www.youtube.com/@ThePhlogPhotography%22%20target%3D%22_blank%22%3EPHLOG%20Photography%20YouTube%20channel%3C/a%3E%20is%20full%20of%20how-to%20videos%20for%20shooting%20and%20editing%20outdoor%20photos%20to%20perfection,%20so%20be%20sure%20to%20pay%20a%20visit%20and%20explore.%3C/p%3E%0A%0A%3Cp%3EAnd%20don't%20miss%20the%20tutorial%20we%20featured%20with%20another%20adept%20outdoor%20photographer%20who%20demonstrates%20how%20easy%20it%20is%20to%20avoid%20mistakes%20when%20%3Ca%20href%3D%22http://www.shutterbug.com/content/breathtaking-iphone-panorama-photos-made-easy-video%22%20target%3D%22_blank%22%3Eshooting%20panorama%20landscapes%20with%20an%20iPhone%3C/a%3E,%20with%20all%20the%20camera%20settings%20and%20techniques%20you%20need%20for%20doing%20it%20right.%3C/p%3E%0A%0A%3Cp%3E%3C/p%3E)
Dynamic Range: Use it to Fix Common Photo Mistakes (VIDEO) 14 Apr 12:00 AM (2 days ago)
A firm understanding of Dynamic Range is super important for achieving optimum results, yet this key element is often ignored. In fact, this crucial concept is one key to capturing well-balanced, high-quality images that make you proud.
Today's quick explainer comes to us from the Great Big Photography YouTube channel, a popular network of experienced creatives who share a wide range of courses catering to both amateurs and professional shooters. This three-minute episode explains Dynamic Range in simple terms and demonstrates why is particularly important if you're struggling with overexposed highlights or crushed shadows that are virtually devoid of detail.
Our unnamed instructor begins with this definition: "Dynamic Range is the ratio between the maximum and minimum light intensities that your camera can record in a single frame," and it's a value that can differ significantly from one model to another.

Consider this interesting fact: "The scope of tones that your camera can record is far more limited than what our eyes can see" (although the disparity has narrowed somewhat as sensor technology has evolved). This is one reason why what you see in the field isn't always what you get.
When shooting contrasty scenes in harsh sunlight, for example, even the best cameras can fail to deliver a sufficient range of tones from bright highlights to deep shadows. And this dilemma often holds true when photographing in low light.
In either case, there are techniques for dealing with these issues to achieve properly balanced exposures. You'll learn how file format (i.e. Raw or Jpeg) affects dynamic range, and why our instructor recommends shooting in Raw for maximum post-processing flexibility. He also describes how the metering mode you select factors into the equation—specifically with regard to Spot vs. Evaluative metering.

Another topic of discussion involves using a technique known as "HDR photography" to blend multiple exposures into one perfect shot, and another method used in bright conditions when the trick is exposing for the highlights.
You'll also see why our instructor recommends shooting in diffused light whenever possible to capture a naturally balanced tonal range. The Great Big Photography YouTube channel has thousands of subscribers and many more how-to lessons like this one.
And don't miss the explainer we featured recently with another accomplished pro who demonstrates why Photoshop's new Hue/Saturation tool is a game-changing upgrade for creating photographs with perfect colors.
%26bodytext%3D%3Cp%3EA%20firm%20understanding%20of%20Dynamic%20Range%20is%20super%20important%20for%20achieving%20optimum%20results,%20yet%20this%20key%20element%20%26nbsp;is%20often%20ignored.%20In%20fact,%20this%20crucial%20concept%20is%20one%20key%20to%20capturing%20well-balanced,%20high-quality%20images%20that%20make%20you%20proud.%3C/p%3E%0A%0A%3Cp%3EToday's%20quick%20explainer%20comes%20to%20us%20from%20the%20%3Ca%20href%3D%22http://www.youtube.com/@GBPWofficial%22%20target%3D%22_blank%22%3EGreat%20Big%20Photography%20YouTube%20channel%3C/a%3E,%20a%20popular%20network%20of%20experienced%20creatives%20who%20share%20a%20wide%20range%20of%20courses%20catering%20to%20both%20amateurs%20and%20professional%20shooters.%20This%20three-minute%20episode%20explains%20Dynamic%20Range%20in%20simple%20terms%20and%20demonstrates%20why%20is%20particularly%20important%20if%20you're%20struggling%20with%20overexposed%20highlights%20or%20crushed%20shadows%20that%20are%20virtually%20devoid%20of%20detail.%3C/p%3E%0A%0A%3Cp%3EOur%20unnamed%20instructor%20begins%20with%20this%20definition:%20%22Dynamic%20Range%20is%20the%20ratio%20between%20the%20maximum%20and%20minimum%20light%20intensities%20that%20your%20camera%20can%20record%20in%20a%20single%20frame,%22%20and%20it's%20a%20value%20that%20can%20differ%20significantly%20from%20one%20model%20to%20another.%3C/p%3E%0A%0A%3Cp%3E%3Cimg%20alt%3D%22%22%20src%3D%22https://www.shutterbug.com/images/22/1G41425.png%22%20style%3D%22width:%20600px;%20height:%20334px;%22%20/%3E%3C/p%3E%0A%0A%3Cp%3EConsider%20this%20interesting%20fact:%20%22The%20scope%20of%20tones%20that%20your%20camera%20can%20record%20is%20far%20more%20limited%20than%20what%20our%20eyes%20can%20see%22%20(although%20the%20disparity%20has%20narrowed%20somewhat%20as%20sensor%20technology%20has%20evolved).%20This%20is%20one%20reason%20why%20what%20you%20see%20in%20the%20field%20isn't%20always%20what%20you%20get.%3C/p%3E%0A%0A%3Cp%3EWhen%20shooting%20contrasty%20scenes%20in%20harsh%20sunlight,%20for%20example,%20even%20the%20best%20cameras%20can%20fail%20to%20deliver%20a%20sufficient%20range%20of%20tones%20from%20bright%20highlights%20to%20deep%20shadows.%20And%20this%20dilemma%20often%20holds%20true%20when%20photographing%20in%20low%20light.%3C/p%3E%0A%0A%3Cp%3EIn%20either%20case,%20there%20are%20techniques%20for%20dealing%20with%20these%20issues%20to%20achieve%20properly%20balanced%20exposures.%20You'll%20learn%20how%20file%20format%20(i.e.%20Raw%20or%20Jpeg)%20affects%20dynamic%20range,%20and%20why%20our%20instructor%20recommends%20shooting%20in%20Raw%20for%20maximum%20post-processing%20flexibility.%20He%20also%20describes%20how%20the%20metering%20mode%20you%20select%20factors%20into%20the%20equation%E2%80%94specifically%20with%20regard%20to%20Spot%20vs.%20Evaluative%20metering.%3C/p%3E%0A%0A%3Cp%3E%3Cimg%20alt%3D%22%22%20src%3D%22https://www.shutterbug.com/images/22/2G41425_0.png%22%20style%3D%22width:%20600px;%20height:%20335px;%22%20/%3E%3C/p%3E%0A%0A%3Cp%3EAnother%20topic%20of%20discussion%20involves%20using%20a%20technique%20known%20as%20%22HDR%20photography%22%20to%20blend%20multiple%20exposures%20into%20one%20perfect%20shot,%20and%20another%20method%20used%20in%20bright%20conditions%20when%20the%20trick%20is%20exposing%20for%20the%20highlights.%3C/p%3E%0A%0A%3Cp%3EYou'll%20also%20see%20why%20our%20instructor%20recommends%20shooting%20in%20diffused%20light%20whenever%20possible%20to%20capture%20a%20naturally%20balanced%20tonal%20range.%20The%20%3Ca%20href%3D%22http://www.youtube.com/@GBPWofficial%22%20target%3D%22_blank%22%3EGreat%20Big%20Photography%20YouTube%20channel%3C/a%3E%20has%20thousands%20of%20subscribers%20and%20many%20more%20how-to%20lessons%20like%20this%20one.%3C/p%3E%0A%0A%3Cp%3EAnd%20don't%20miss%20the%20explainer%20we%20featured%20recently%20with%20another%20accomplished%20pro%20who%20demonstrates%20why%20%3Ca%20href%3D%22http://www.shutterbug.com/content/photoshops-new-huesaturation-tool-gamechanger-video%22%20target%3D%22_blank%22%3EPhotoshop's%20new%20Hue/Saturation%20tool%20is%20a%20game-changing%20upgrade%3C/a%3E%20for%20creating%20photographs%20with%20perfect%20colors.%3C/p%3E%0A%0A%3Cp%3E%3C/p%3E)
Simplified Settings for Bird Photos in Manual Mode (VIDEO) 14 Apr 12:00 AM (2 days ago)
Do you understand the benefits of shooting in Manual mode, but you're still struggling to achieve the right combination of settings when photography birds? If so, this tutorial from the Flying Parrot Photography YouTube channel will quickly simplify the process.
Today's instructor Sonia is a "nature-obsessed" Australian pro whose how-to videos are designed to help you find art in nature, take bird photography to the next level, and approach all conditions with confidence. She summarizes today's nine-minute episode like this: "I'll walk you through how I choose the best manual settings for bird photography so you can stop guessing and start capturing well-exposed shots."
The tips in this nine-minute video fly by in a hurry so you may want to prepare to jot down a few notes before clicking the "Play" button. Sonia covers her entire process from arriving in the field to understanding how to handle ever-changing light and avoid missed shots while fumbling around with your settings.

The bottom line is this: Whether the subject is stationary, you're chasing small fast-moving birds, or photographing large raptors, you'll know exactly how to configure the camera for success. There's also a link in the description beneath the video for downloading Sonia's free guides and other helpful assets.
Sonia also explains why this genre of nature photography poses unique changes, and she demonstrates straightforward solutions for getting the job done to perfection with whatever camera you own. She prefers shooting in early morning when many birds are most active and recommends setting your lens to maximum aperture.
Step number two is dialing in a setting of ISO 2,500 and taking a look at the shutter speed that this gives you. Sonia is aiming for a speed of 1/1,600 to 1/2,000 so her preliminary ISO setting may need to be modified accordingly depending upon available light. As she explains, "If the day is particularly dull I may have to boost my ISO up to 4,000 or even 5,000 to get a fast enough shutter speed."

Sonia takes a deeper dive into the foregoing and several other important settings and considerations, and you'll pick up some enlightening tips on camera angles, lens choice, and composing bird photographs for maximum impact.
Her popular YouTube channel includes many more instructional videos for photographing our feathered friends, so be sure to check it out.
We also recommend watching the video we shared recently from another accomplished pro who presents a beginners guide to Exposure Bracketing that will enable you to capture outdoor photographs with perfect tones in challenging light.
%26bodytext%3D%3Cp%3EDo%20you%20understand%20the%20benefits%20of%20shooting%20in%20Manual%20mode,%20but%20you're%20still%20struggling%20to%20achieve%20the%20right%20combination%20of%20settings%20when%20photography%20birds?%20%26nbsp;If%20so,%20this%20tutorial%20from%20the%20%3Ca%20href%3D%22http://www.youtube.com/@flyingparrotphotography%22%20target%3D%22_blank%22%3EFlying%20Parrot%20Photography%20YouTube%20channel%3C/a%3E%20will%20quickly%20simplify%20the%20process.%3C/p%3E%0A%0A%3Cp%3EToday's%20instructor%20Sonia%20is%20a%20%22nature-obsessed%22%20Australian%20pro%20whose%20how-to%20videos%20are%20designed%20to%20help%20you%20find%20art%20in%20nature,%20take%20bird%20photography%20to%20the%20next%20level,%20and%20approach%20all%20conditions%20with%20confidence.%20She%20summarizes%20today's%20nine-minute%20episode%20like%20this:%20%22I'll%20walk%20you%20through%20how%20I%20choose%20the%20best%20manual%20settings%20for%20bird%20photography%20so%20you%20can%20stop%20guessing%20and%20start%20capturing%20well-exposed%20shots.%22%3C/p%3E%0A%0A%3Cp%3EThe%20tips%20in%20this%20nine-minute%20video%20fly%20by%20in%20a%20hurry%20so%20you%20may%20want%20to%20prepare%20to%20jot%20down%20a%20few%20notes%20before%20clicking%20the%20%22Play%22%20button.%20Sonia%20covers%20her%20entire%20process%20from%20arriving%20in%20the%20field%20to%20understanding%20how%20to%20handle%20ever-changing%20light%20and%20avoid%20missed%20shots%20while%20fumbling%20around%20with%20your%20settings.%3C/p%3E%0A%0A%3Cp%3E%3Cimg%20alt%3D%22%22%20src%3D%22https://www.shutterbug.com/images/22/1S41425.png%22%20style%3D%22width:%20600px;%20height:%20332px;%22%20/%3E%3C/p%3E%0A%0A%3Cp%3EThe%20bottom%20line%20is%20this:%20Whether%20the%20subject%20is%20stationary,%20you're%20chasing%20small%20fast-moving%20birds,%20or%20photographing%20large%20raptors,%20you'll%20know%20exactly%20how%20to%20configure%20the%20camera%20for%20success.%20There's%20also%20a%20link%20in%20the%20description%20beneath%20the%20video%20for%20downloading%20Sonia's%20free%20guides%20and%20other%20helpful%20assets.%3C/p%3E%0A%0A%3Cp%3ESonia%20also%20explains%20why%20this%20genre%20of%20nature%20photography%20poses%20unique%20changes,%20and%20she%20demonstrates%20straightforward%20solutions%20for%20getting%20the%20job%20done%20to%20perfection%20with%20whatever%20camera%20you%20own.%20She%20prefers%20shooting%20in%20early%20morning%20when%20many%20birds%20are%20most%20active%20and%20recommends%20setting%20your%20lens%20to%20maximum%20aperture.%3C/p%3E%0A%0A%3Cp%3EStep%20number%20two%20is%20dialing%20in%20a%20setting%20of%20ISO%202,500%20and%20taking%20a%20look%20at%20the%20shutter%20speed%20that%20this%20gives%20you.%20Sonia%20is%20aiming%20for%20a%20speed%20of%201/1,600%20to%201/2,000%20so%20her%20preliminary%20ISO%20setting%20may%20need%20to%20be%20modified%20accordingly%20depending%20upon%20available%20light.%20As%20she%20explains,%20%22If%20the%20day%20is%20particularly%20dull%20I%20may%20have%20to%20boost%20my%20ISO%20up%20to%204,000%20or%20even%205,000%20to%20get%20a%20fast%20enough%20shutter%20speed.%22%3C/p%3E%0A%0A%3Cp%3E%3Cimg%20alt%3D%22%22%20src%3D%22https://www.shutterbug.com/images/22/2S41425.png%22%20style%3D%22width:%20600px;%20height:%20312px;%22%20/%3E%3C/p%3E%0A%0A%3Cp%3ESonia%20takes%20a%20deeper%20dive%20into%20the%20foregoing%20and%20several%20other%20important%20settings%20and%20considerations,%20and%20you'll%20pick%20up%20some%20enlightening%20tips%20on%20camera%20angles,%20lens%20choice,%20and%20composing%20bird%20photographs%20for%20maximum%20impact.%3C/p%3E%0A%0A%3Cp%3E%3Ca%20href%3D%22http://www.youtube.com/@flyingparrotphotography%22%20target%3D%22_blank%22%3EHer%20popular%20YouTube%20channel%3C/a%3E%20includes%20many%20more%20instructional%20videos%20for%20photographing%20our%20feathered%20friends,%20so%20be%20sure%20to%20check%20it%20out.%3C/p%3E%0A%0A%3Cp%3EWe%20also%20recommend%20watching%20the%20video%20we%20shared%20recently%20from%20another%20accomplished%20pro%20who%20presents%20a%20%3Ca%20href%3D%22http://www.shutterbug.com/content/exposure-bracketing-beginners-what-when-why-and-how%22%20target%3D%22_blank%22%3Ebeginners%20guide%20to%20Exposure%20Bracketing%3C/a%3E%20that%20will%20enable%20you%20to%20capture%20outdoor%20photographs%20with%20perfect%20tones%20in%20challenging%20light.%3C/p%3E%0A%0A%3Cp%3E%3C/p%3E)
Breathtaking iPhone Panorama Photos Made Easy (VIDEO) 14 Apr 12:00 AM (2 days ago)
Want to capture stunning ultra-wide photos with your iPhone? Most folks don't understand how to how to use the Panorama mode correctly, but this quick tutorial from the iPhone Photography School explains everything necessary to get the job done with ease.
Today's instructor Emil Pakarklis is founder of the channel and promises that by following his straightforward tips "your shots will look bigger, better, and more immersive than ever." And like with Emil's other tutorials you'll learn why you don't need an expensive mirrorless camera or DSLR to capture jaw-dropping images.
Emil is on location atop a cliff in a beautiful national park looking down on a giant u-shaped riverbend—a perfect vantage point for shooting a breathtaking panorama with a unique perspective. The first step is opening the iPhone camera app that by default is set to a 1X wide-angle view that prevents him from capturing the entire scene in one shot.
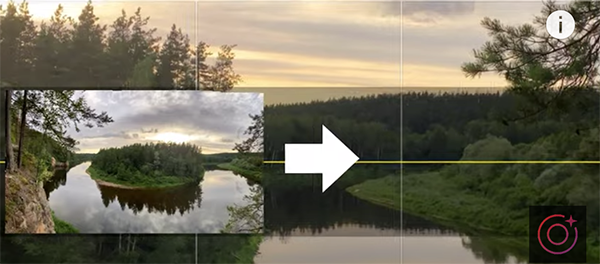
Switching to the .5X ultra-wide setting almost solves the problem by encompassing the beautiful sky along with an interesting foreground element. It's a really nice image but Emil laments, "it still doesn't convey everything in the expansive scene." And this is when the easy-to-use Panorama mode saves the day.
You'll see why this technique requires that you rotate the camera to a vertical orientation before proceeding. Then Emil swipes his finder from right to left twice to bring up the Panorama mode. There's another key consideration to understand; namely, determining which of the phone's lenses will deliver optimum results.
Emil makes this determination by "pre-visualizing the scene while moving the phone from left to right." He also explains how to decide whether you should start shooting from the left or the right. As you'll see, there's a white arrow on the screen for making the choice.

Emil's says, "I like to start where there's more interest or the where the scene is brighter" which is why he begins shooting from the left for this particular image. Then he presses the shutter button and moves slowly and gently from left to right, explaining that "the slower I move, the better it's going to work."
You're goal throughout the capture is to keep the white arrow atop the yellow horizonal line on the screen. Another rule, according to Emil, is to capture your panorama image more than once. That's because the iPhone is stitching a lot of individual photos together and occasionally there may a mistake with one attempt surpassing another.
Emil walks you through a few other important techniques that are super simple to master, and we recommend having your iPhone handy as this helpful lesson proceeds. Then head over to the iPhone Photography YouTube channel many more mobile photography tips and techniques.
%26bodytext%3D%3Cp%3EWant%20to%20capture%20stunning%20ultra-wide%20photos%20with%20your%20iPhone?%20Most%20folks%20don't%20understand%20how%20to%20how%20to%20use%20the%20Panorama%20mode%20correctly,%20but%20this%20quick%20tutorial%20from%20the%20%3Ca%20href%3D%22http://www.youtube.com/@iPhone_Photography_School%22%20target%3D%22_blank%22%3EiPhone%20Photography%20School%3C/a%3E%20explains%20everything%20necessary%20to%20get%20the%20job%20done%20with%20ease.%3C/p%3E%0A%0A%3Cp%3EToday's%20instructor%20Emil%20Pakarklis%20is%20founder%20of%20the%20channel%20and%20promises%20that%20by%20following%20his%20straightforward%20tips%20%22your%20shots%20will%20look%20bigger,%20better,%20and%20more%20immersive%20than%20ever.%22%20And%20like%20with%20Emil's%20other%20tutorials%20you'll%20learn%20why%20you%20don't%20need%20an%20expensive%20mirrorless%20camera%20or%20DSLR%20to%20capture%20jaw-dropping%20images.%3C/p%3E%0A%0A%3Cp%3EEmil%20is%20on%20location%20atop%20a%20cliff%20in%20a%20beautiful%20national%20park%20looking%20down%20on%20a%20giant%20u-shaped%20riverbend%E2%80%94a%20perfect%20vantage%20point%20for%20shooting%20a%20breathtaking%20panorama%20with%20a%20unique%20perspective.%20The%20first%20step%20is%20opening%20the%20iPhone%20camera%20app%20that%20by%20default%20is%20set%20to%20a%201X%20wide-angle%20view%20that%26nbsp;prevents%20him%20from%20capturing%20the%20entire%20scene%20in%20one%20shot.%3C/p%3E%0A%0A%3Cp%3E%3Cimg%20alt%3D%22%22%20src%3D%22https://www.shutterbug.com/images/22/1EP41425.png%22%20style%3D%22width:%20600px;%20height:%20264px;%22%20/%3E%3C/p%3E%0A%0A%3Cp%3ESwitching%20to%20the%20.5X%20ultra-wide%20setting%20%3Cem%3Ealmost%3C/em%3E%20solves%20the%20problem%20by%20encompassing%20the%20beautiful%20sky%20along%20with%20an%20interesting%20foreground%20element.%20It's%20a%20really%20nice%20image%20but%20Emil%20laments,%20%22it%20still%20doesn't%20convey%20everything%20in%20the%20expansive%20scene.%22%20And%20this%20is%20when%20the%20easy-to-use%20Panorama%20mode%20saves%20the%20day.%3C/p%3E%0A%0A%3Cp%3EYou'll%20see%20why%20this%20technique%20requires%20that%20you%20rotate%20the%20camera%20to%20a%20vertical%20orientation%20before%20proceeding.%20Then%20Emil%20swipes%20his%20finder%20from%20right%20to%20left%20twice%20to%20bring%20up%20the%20Panorama%20mode.%20There's%20another%20key%20consideration%20to%20understand;%20namely,%20determining%20which%20of%20the%20phone's%20lenses%20will%20deliver%20optimum%20results.%3C/p%3E%0A%0A%3Cp%3EEmil%20makes%20this%20determination%20by%20%22pre-visualizing%20the%20scene%20while%20moving%20the%20phone%20from%20left%20to%20right.%22%20He%20also%20explains%20how%20to%20decide%20whether%20you%20should%20start%20shooting%20from%20the%20left%20or%20the%20right.%20As%20you'll%20see,%20there's%20a%20white%20arrow%20on%20the%20screen%20for%20making%20the%20choice.%3C/p%3E%0A%0A%3Cp%3E%3Cimg%20alt%3D%22%22%20src%3D%22https://www.shutterbug.com/images/22/2EP41425.png%22%20style%3D%22width:%20600px;%20height:%20197px;%22%20/%3E%3C/p%3E%0A%0A%3Cp%3EEmil's%20says,%20%22I%20like%20to%20start%20where%20there's%20more%20interest%20or%20the%20where%20the%20scene%20is%20brighter%22%20which%20is%20why%20he%20begins%20shooting%20from%20the%20left%20for%20this%20particular%20image.%20Then%20he%20presses%20the%20shutter%20button%20and%20moves%20slowly%20and%20gently%20from%20left%20to%20right,%20explaining%20that%20%22the%20slower%20I%20move,%20the%20better%20it's%20going%20to%20work.%22%3C/p%3E%0A%0A%3Cp%3EYou're%20goal%20throughout%20the%20capture%20is%20to%20keep%20the%20white%20arrow%20atop%20the%20yellow%20horizonal%20line%20on%20the%20screen.%20Another%20rule,%20according%20to%20Emil,%20is%20to%20capture%20your%20panorama%20image%20more%20than%20once.%20That's%20because%20the%20iPhone%20is%20stitching%20a%20lot%20of%26nbsp;%20individual%20photos%20together%20and%20occasionally%20there%20may%20a%20mistake%20with%20one%20attempt%20surpassing%20another.%3C/p%3E%0A%0A%3Cp%3EEmil%20walks%20you%20through%20a%20few%20other%20important%20techniques%20that%20are%20super%20simple%20to%20master,%20and%20we%20recommend%20having%20your%20iPhone%20handy%20as%20this%20helpful%20lesson%20proceeds.%20Then%20head%20over%20to%20the%20%3Ca%20href%3D%22http://www.youtube.com/@iPhone_Photography_School%22%20target%3D%22_blank%22%3EiPhone%20Photography%20YouTube%20channel%3C/a%3E%20many%20more%20mobile%20photography%20tips%20and%20techniques.%3C/p%3E%0A%0A%3Cp%3E%3C/p%3E)
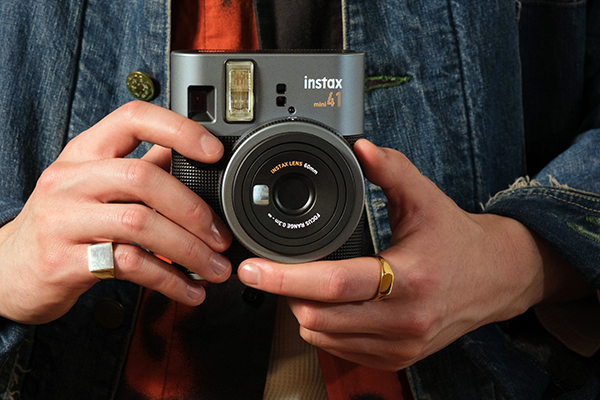
Instantly Cool: Fujifilm Mini 41 Camera 13 Apr 12:00 AM (3 days ago)
Fujifilm, the undisputed leader in instant printing cameras, just introduced the Mini 41, an updated replacement for the popular Mini 40. If you're on the early lookout for a Mother's Day or graduation gift, the fashionable Mini 41 deserves a close look.

Fujifilm Instax Mini 41 Key Features
• Modern, youthful styling
• Automatic exposure
• Auto flash
• Close-up mode with parallax correction
Price & Availability
The Mini 41 should be available by the end of this month. Pricing has not been officially announced, but an unpublished listing discovered on Best Buy's website implies it will be $99. Similar listings (all unpublished) were found on other major retail sites.

For more information about the Fujifilm Instax Mini 41 instant camera, visit Fujifilm's Instax website.

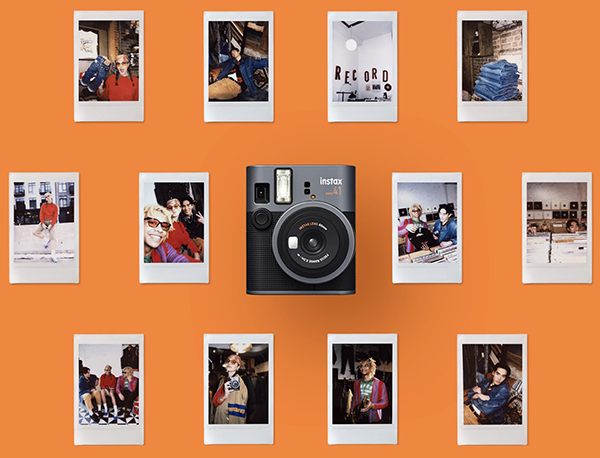
Fujifilm Instax Film Packs
Two 10-shot packs of Instax film sell for around $15. Sometimes it can be found less expensive or offered in bulk at a lower price. Order from Amazon.
Read our 2023 review of the colorful Fujifilm Instax Mini 12 here.
∞ Shutterbug Staff
%20were%20found%20on%20other%20major%20retail%20sites.%3C/p%3E%0A%0A%3Cp%3E%3Cimg%20alt%3D%22%22%20src%3D%22https://www.shutterbug.com/images/22/04132025.FMini41.Best%2520Buy.jpg%22%20style%3D%22width:%20600px;%20height:%20300px;%22%20/%3E%3C/p%3E%0A%0A%3Cp%3EFor%20more%20information%20about%20the%20Fujifilm%20Instax%20Mini%2041%20instant%20camera,%20visit%20%3Ca%20href%3D%22https://www.instaxus.com/cameras/instax-mini-41%22%20target%3D%22_blank%22%3EFujifilm's%20Instax%20website%3C/a%3E.%3C/p%3E%0A%0A%3Cp%3E%3Cimg%20alt%3D%22%22%20src%3D%22https://www.shutterbug.com/images/22/04132025.FMini41.mini41-3.jpg%22%20style%3D%22width:%20600px;%20height:%20600px;%22%20/%3E%3C/p%3E%0A%0A%3Cp%3E%3Cstrong%3EFujifilm%20Instax%20Film%20Packs%3C/strong%3E%3Cbr%20/%3E%0ATwo%2010-shot%20packs%20of%20Instax%20film%20sell%20for%20around%20$15.%20Sometimes%20it%20can%20be%20found%20less%20expensive%20or%20offered%20in%20bulk%20at%20a%20lower%20price.%20%3Ca%20href%3D%22https://www.amazon.com/Fujifilm-INSTAX-Instant-Twin-Pack/dp/B00EB4ADQW?tag%253Dix-shutterbug-20%22%20target%3D%22_blank%22%3EOrder%20from%20Amazon.%3C/a%3E%3C/p%3E%0A%0A%3Cp%3ERead%20our%202023%20review%20of%20the%20colorful%20%3Ca%20href%3D%22https://www.shutterbug.com/content/fujifilm-introduces-instax-mini-12-instax-app%22%20target%3D%22_blank%22%3EFujifilm%20Instax%20Mini%2012%20here%3C/a%3E.%3C/p%3E%0A%0A%3Cp%20align%3D%22right%22%3E%3Cem%3E%E2%88%9E%20Shutterbug%20Staff%3C/em%3E%3C/p%3E%0A%0A%3Cp%20align%3D%22right%22%3E%26nbsp;%3C/p%3E%0A%0A%3Cp%3E%3Cimg%20alt%3D%22%22%20src%3D%22https://www.shutterbug.com/images/22/04132025.FMini41.on%2520orange.jpg%22%20style%3D%22width:%20600px;%20height:%20458px;%22%20/%3E%3C/p%3E%0A%0A%3Cp%3E%26nbsp;%3C/p%3E)
Filthy Camera Gear? Safe Cleaning Hacks from a Pro (VIDEO) 11 Apr 12:00 AM (5 days ago)
Yesterday we provided an important warning about the finite lifespan of your camera and why it's essential that you check shutter count regularly to anticipate costly repairs, missed shots on location, or even a total breakdown. We're following up on that today with a couple less-dire maintenance hacks from pro Andy Rouse.
Rouse is an award-winning wildlife photographer whose enlightening tutorials take us behind the scenes as he travels the globe "in search of the perfect shot." Today's episode finds him in India during a dusty time of year, and both he and his cameras are covered in dirt. His main concern is the filthy equipment, and in the next four minutes he provides simple tips "that will keep your cameras and lenses in tip-top condition."
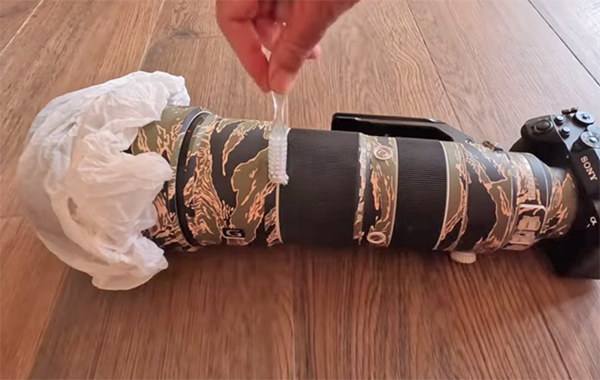
He begins with a preventative measure using a free elasticized shower cap "borrowed" from a hotel that he stretches over a lens while hiking on dusty days. In fact, he admits to having "a whole load of them in my rucksack." And remember that precautionary measures are always worth taking for extra protection—even if you shoot with "weather and dust resistant" equipment.

The first beneficiary of Rouse's cleaning process is his camera. He explains that a cloth doesn't get the job done effectively because it can't get in between dials, buttons, and other difficult-to-reach crevasses. Instead, he carefully employs both a blower-brush and a soft toothbrush ("nicked off an airplane") to clean out all the grime-filled nooks and crannies. Unfortunately, he doesn't reveal where he stole the blower-brush.
Now Rouse turns his attention to a lens with "the twisty bits caked in dust." Once again, his toothbrush and blower-brush play an important role in a process that Rouse says, "I find quite therapeutic."
Rouse provides some cautionary notes about cleaning the front and rear elements of the lens, and he recommends not to undertake this task unless necessary. So there you have it: Just go out and "obtain" the simple cleaning accessories required and get the job done today.
Then head over to the Wildman Rouse YouTube channel for more gear tips and shooting techniques.
And please don’t ignore the tutorial mentioned at the onset with regard to checking your camera's shutter count to avoid any unwelcome surprises before it's too late..
%26bodytext%3D%3Cp%3EYesterday%20we%20provided%20an%20important%20warning%20about%20the%20finite%20lifespan%20of%20your%20camera%20and%20why%26nbsp;%3Ca%20href%3D%22http://www.shutterbug.com/content/your-camera-about-die-how-check-shutter-count-its-too-late-video%22%20target%3D%22_blank%22%3Eit's%20essential%20that%20you%20check%20shutter%20count%20regularly%3C/a%3E%20to%20anticipate%20costly%20repairs,%20missed%20shots%20on%20location,%20or%20even%20a%20total%20breakdown.%20We're%20following%20up%20on%20that%20today%20with%20a%20couple%20less-dire%20maintenance%20hacks%20from%20%3Ca%20href%3D%22http://www.youtube.com/@Wildmanrouse%22%20target%3D%22_blank%22%3Epro%20Andy%20Rouse%3C/a%3E.%3C/p%3E%0A%0A%3Cp%3ERouse%20is%20an%20award-winning%20wildlife%20photographer%20whose%20enlightening%20tutorials%20take%20us%20behind%20the%20scenes%20as%20he%20travels%20the%20globe%20%22in%20search%20of%20the%20perfect%20shot.%22%20Today's%20episode%20finds%20him%20in%20India%20during%20a%20dusty%20time%20of%20year,%20and%20both%20he%20and%20his%20cameras%20are%20covered%20in%20dirt.%20His%20main%20concern%20is%20the%20filthy%20equipment,%20and%20in%20the%20next%20four%20minutes%20he%20provides%20simple%20tips%20%22that%20will%20keep%20your%20cameras%20and%20lenses%20in%20tip-top%20condition.%22%3C/p%3E%0A%0A%3Cp%3EHe%20begins%20with%20a%20preventative%20measure%20using%20a%20free%20elasticized%20shower%20cap%20%22borrowed%22%20from%20a%20hotel%20that%20he%20stretches%20over%20a%20lens%20while%20hiking%20on%20dusty%20days.%20In%20fact,%20he%20admits%20to%20having%20%22a%20whole%20load%20of%20them%20in%20my%20rucksack.%22%20And%20remember%20that%20precautionary%20measures%20are%20always%20worth%20taking%20for%20extra%20protection%E2%80%94even%20if%20you%20shoot%20with%20%22weather%20and%20dust%20resistant%22%20equipment.%3C/p%3E%0A%0A%3Cp%3E%3Cimg%20alt%3D%22%22%20src%3D%22https://www.shutterbug.com/images/22/1AR41125.png%22%20style%3D%22width:%20600px;%20height:%20445px;%22%20/%3E%3C/p%3E%0A%0A%3Cp%3EThe%20first%20beneficiary%20of%20Rouse's%20cleaning%20process%20is%20his%20camera.%20He%20explains%20that%20a%20cloth%20doesn't%20get%20the%20job%20done%20effectively%20because%20it%20can't%20get%20in%20between%20dials,%20buttons,%20and%20other%20difficult-to-reach%20crevasses.%20Instead,%20he%20carefully%20employs%20both%20a%20blower-brush%20and%20a%20soft%20toothbrush%20(%22nicked%20off%20an%20airplane%22)%20to%20clean%20out%20all%20the%20grime-filled%20nooks%20and%20crannies.%20Unfortunately,%20he%20doesn't%20reveal%20where%20he%20stole%20the%20blower-brush.%3C/p%3E%0A%0A%3Cp%3ENow%20Rouse%20turns%20his%20attention%20to%20a%20lens%20with%20%22the%20twisty%20bits%20caked%20in%20dust.%22%20Once%20again,%20his%20toothbrush%20and%20blower-brush%20play%20an%20important%20role%20in%20a%20process%20that%20Rouse%20says,%20%22I%20find%20quite%20therapeutic.%22%3C/p%3E%0A%0A%3Cp%3ERouse%20provides%20some%20cautionary%20notes%20about%20cleaning%20the%20front%20and%20rear%20elements%20of%20the%20lens,%20and%20he%20recommends%20not%20to%20undertake%20this%20task%20unless%20necessary.%20So%20there%20you%20have%20it:%20Just%20go%20out%20and%20%22obtain%22%20the%20simple%20cleaning%20accessories%20required%20and%20get%20the%20job%20done%20today.%3C/p%3E%0A%0A%3Cp%3E%3Cimg%20alt%3D%22%22%20src%3D%22https://www.shutterbug.com/images/22/2AR41125.png%22%20style%3D%22width:%20600px;%20height:%20380px;%22%20/%3E%3C/p%3E%0A%0A%3Cp%3EThen%20head%20over%20to%20the%20%3Ca%20href%3D%22http://www.youtube.com/@Wildmanrouse%22%20target%3D%22_blank%22%3EWildman%20Rouse%20YouTube%20channel%3C/a%3E%20for%20more%20gear%20tips%20and%20shooting%20techniques.%3C/p%3E%0A%0A%3Cp%3EAnd%20please%20don%E2%80%99t%20ignore%20the%20tutorial%20mentioned%20at%20the%20onset%20with%20regard%20to%20%3Ca%20href%3D%22http://www.shutterbug.com/content/your-camera-about-die-how-check-shutter-count-its-too-late-video%22%20target%3D%22_blank%22%3Echecking%20your%20camera's%20shutter%20count%3C/a%3E%20to%20avoid%20any%20unwelcome%20surprises%20before%20it's%20too%20late..%3C/p%3E%0A%0A%3Cp%3E%3C/p%3E)
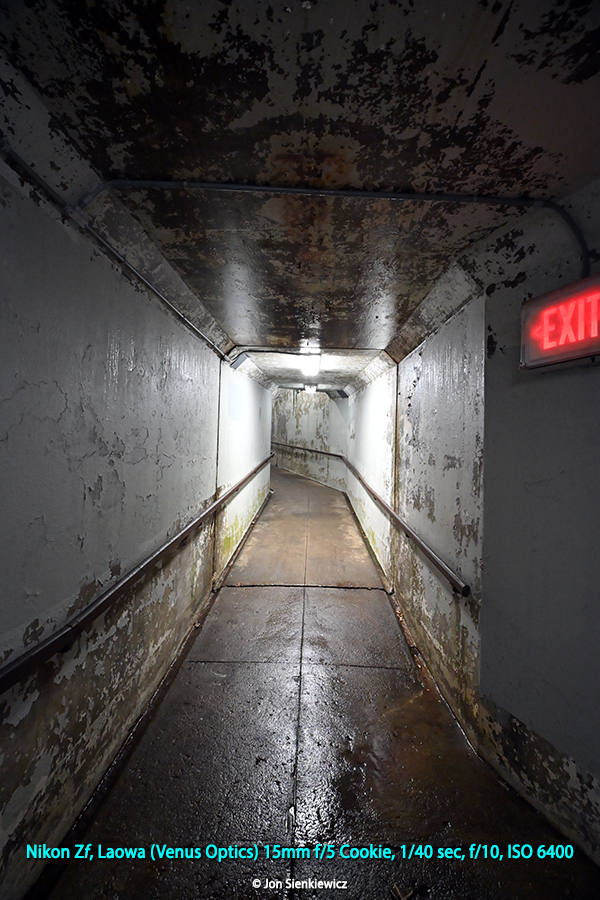
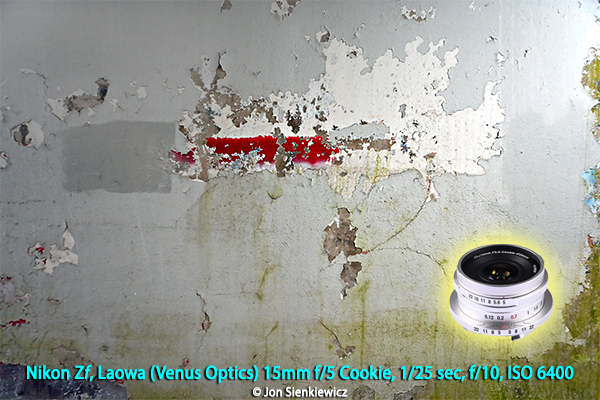
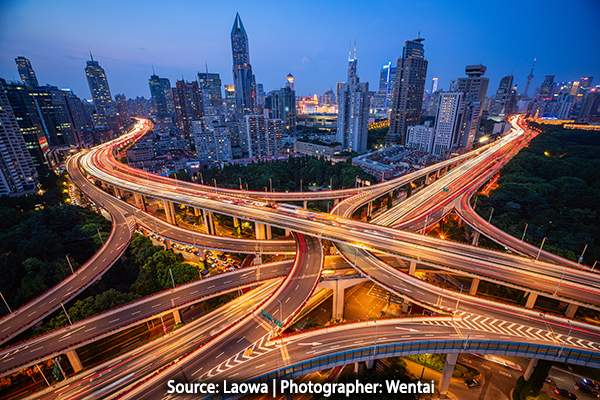
Super Wide and Super Sharp: Laowa 15mm f/5 Cookie — Review & Image Gallery 11 Apr 12:00 AM (5 days ago)
Wanna go really wide with an affordable full-frame optic? Check out this Cookie from Laowa. Cookie? No, I think I'll call it "Jewel." Laowa has created a full-frame 15mm (110° coverage) manual focus lens that opens a myriad of creative doors for Nikon Z, Canon RF, Sony E, L-Mount and Leica M users.
Overview & First Impressions
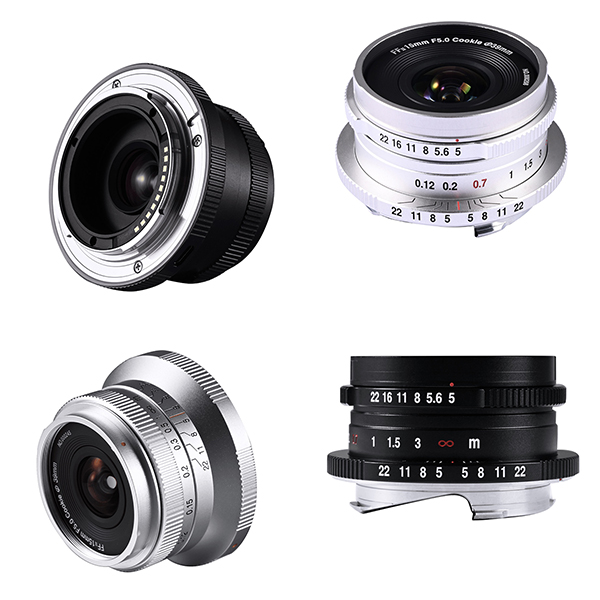
The Laowa 15mm f/5 Cookie FF is a very compact, lightweight (5.5 ounces), manual focus ultra-wideangle lens for full-frame mirrorless cameras. She delivers a 110° angle of view (diagonal measure) and focuses as close as 4.7 inches (12cm)—from the sensor! The build quality is exceptionally good, a distinction we've come to expect from Laowa. Laowa uses the Venus brand name here-and-there, so you'll find this lens listed as a Venus on some retail websites. It's confusing, I know; in this review we'll stick with Laowa.
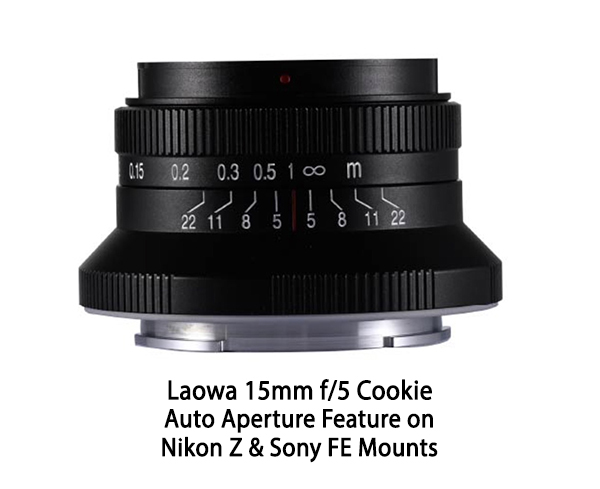
Laowa calls her a "cookie," suggesting a size imaginatively comparable to a pancake. If you're familiar with Double Stuff Oreos, you're on the right track (heaven help our waistlines). The 15mm f/5 Laowa is extremely handsome when wearing the included square lens hood. Clearly built with tons of appeal for serious photographers, it accepts 39mm filters (same as many Leica lenses). The aperture is set via the camera on Sony FE and Nikon Z models and the aperture function is automatic. Canon RF, Leica M and L-mount specimen have a traditional aperture ring. Personally, I prefer that, but there's no difference in the final output. The auto-aperture type enables recording of more EXIF exposure data, and adds auto-aperture functionality.
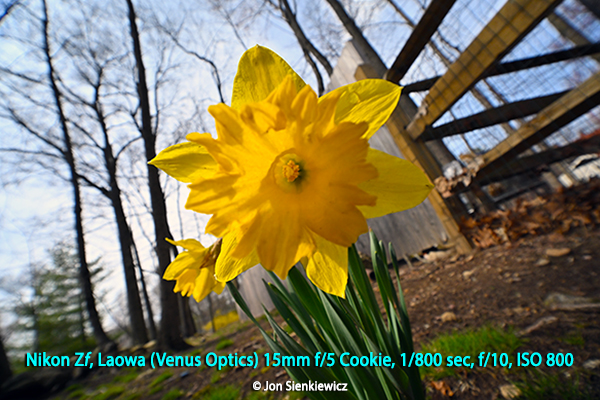
The 12cm (4.7 inch) minimum focusing distance—measured from the sensor plane, not the front element—combined with the depth of field provided by the f/5 (down to f/22) aperture, allows you to get some incredible close-wideangle images. The Laowa 15mm f/5 Cookie FF is a lot of fun to use and begs for experimentation. It made my neighbor's daffodils look humungous.

About f/5: no, that's not very fast, but with modern mirrorless cameras, ISO 800 is the new ISO 100. So why does it matter? And as far as it being manual focus, the Focus Peaking feature found on practically every camera negates any disadvantage, not to mention the extended depth of field that makes precise focusing less necessary.
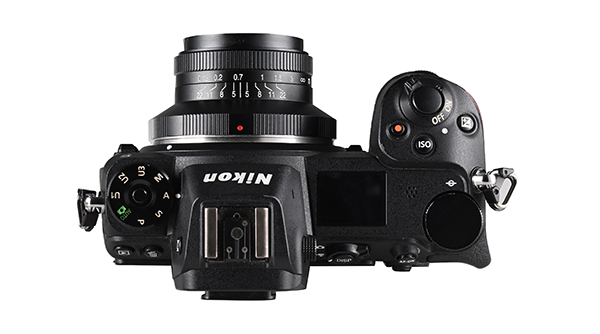
I reviewed the Laowa 15mm f/5 Cookie FF on both full-frame and APS-C Nikon Z mount cameras. Of course, on the smaller APS-C sensor, the effective focal length is about 22.5mm, a very popular choice.
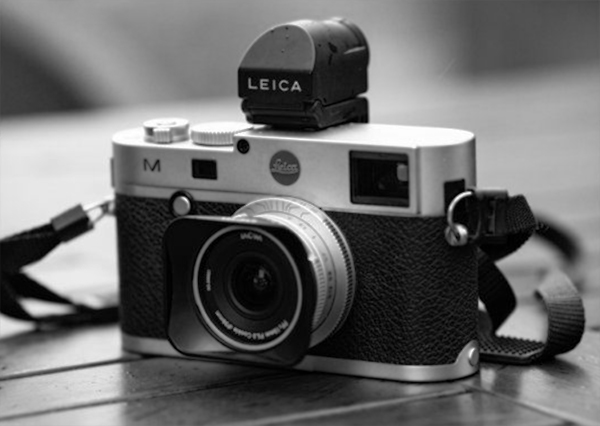
I did not use (or even handle) this ultra-wideangle in the Leica M mount, but I understand it's less than one-inch tall overall, and it has the aforementioned manual aperture ring. I think that makes it a viable option for Leica owners, many of whom are reluctant to use non-Leica lenses except in dark rooms when no one can possibly see them.
Watch the YouTube Video here.

Venus Optics Laowa 7.5mm F/2 Lens Review: Super Wide and Super Fast Lens for Micro Four Thirds
Laowa 4mm f/2.8 Circular Fisheye Lens Review
Venus Optics Just Introduced the Weirdest Lens You’ve Ever Seen: The Laowa 24mm f/14 Macro
Venus Optics Laowa 9mm f/2.8 Zero-D Lens for Fujifilm X Review
3 Unique Lenses For Sony Full-frame Mirrorless Cameras That Caught Our Eye

Specifications & Features of the Laowa 15mm f/5 Cookie FF
15mm f/5 (to f/22)
Full-frame format
Manual focus and manual aperture
Auto aperture in Sony FE and Nikon Z versions
110° angle of view
Minimum focus distance 4.7 inches (12cm) from film/sensor plane
Front filter thread is widely available 39mm
10-Point starburst effect
Weighs 5.5 ounces (158g)
Measures >2.1 x 1.4 inches (53 x 35mm) d x l
In Leica M mount: >2.1 x >1 inches (53 x 25mm) d x l
Optical Construction
The Laowa 15mm f/5 Cookie FF contains 13 elements in 9 groups, including four ultrahigh refraction lenses, two aspherical lenses, and four extra-low dispersion lenses. It has a 5-blade aperture diaphragm. This is according to Laowa; I do not dissect lenses these days.
Performance Summary
I should let the images speak for themselves. This story includes several I shot and a short gallery of images that were captured by professionals and provided by Laowa. Theirs are better, but they had more time and probably got free coffee and maybe a sandwich. I did not.
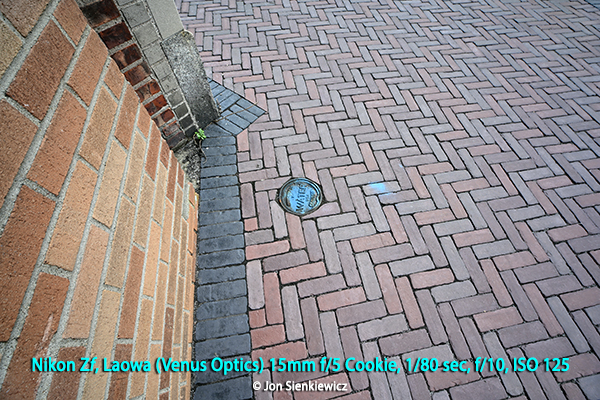
The images I captured with the Laowa 15mm f/5 Cookie FF were clean and sharp. I was pleasantly surprised that exposure was even across the frame, corner to corner, because all ultra-wideangle lenses occasionally render vignetting.
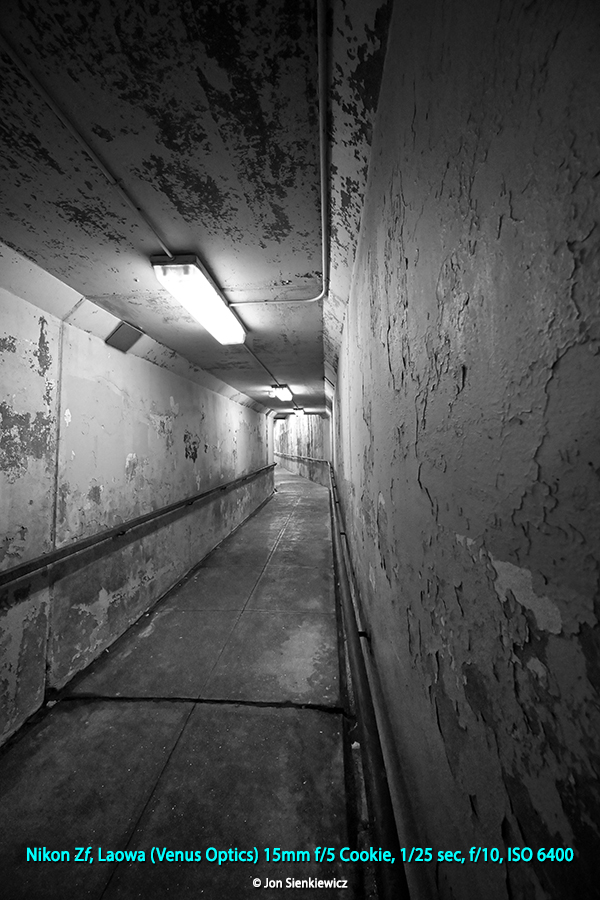
Overall image quality was first class and goodlooking. Saturation and contrast were spot on and pleasing. I did not encounter DPF (Dreaded Purple Fringe) often attributed to chromatic aberrations. In summary, this lens is a winner.
Conclusion
The Laowa 15mm f/5 Cookie FF is highly recommended. The small size, light weight and superb image quality make it an easy choice for walk-abouts and creative explorations.

Travel photography often involves cramped interiors and scenic vistas. The 15mm (110° angle of view) makes it possible to shoot from one side of a narrow street and capture a wide expanse. Or the inside of building. Considering how tiny and portable it is, it belongs in your travel bag for sure. You won't even notice it's there, it's that small.
The Laowa 15mm f/5 Cookie FF will embolden you to explore unique angles, unusual perspectives and all-new photo ops. I found it invigorating to use and I really like the results.

Price & Availability
The full-frame Laowa 15mm f/5 Cookie FF is available from Amazon for Nikon Z, Canon RF and Sony FE. Price is $399. It's also available in L-Mount and Leica M lens mounts. You can order today, in black or silver color, directly from Laowa.
Visit the Official Laowa Store at amazon.com.
Image Gallery (copyrighted images provided by Laowa)
See more on Laowa's website.

Want to Become a Better Photographer?
Begin by taking more pictures. Carry a camera (not just a smartphone) everywhere you go and shoot even when you're 100% sure the picture won't turn out. Review all of your images with a critical eye and share them with others – and that includes posting the best on our Gallery. Subscribe to our newsletter (see sign-up form on our homepage) and bookmark Shutterbug as a Favorite on your browser so you can check back often. We’re in this for the same reason as you – we love photography, and we're learning more about it every day.
—Jon Sienkiewicz
(As an Amazon Associate, Shutterbug earns from qualifying purchases linked in this story.)

Photoshop's New Hue/Saturation Tool is a Gamechanger (VIDEO) 11 Apr 12:00 AM (5 days ago)
Adobe has updated Photoshop's frequently used Hue/Saturation tool, and this tutorial from PHLEARN explores the myriad of improvements in less than 10 minutes. As you'll see, this latest version is quicker and easier to use, delivers precise results, and features a bold, new, intuitive interface.
Instructor Aaron Nace is the brains behind the PHLEARN YouTube channel that's billed as "the number one Photoshop and Lightroom online resource." In this quick episode Nace provides his recommendations for employing the revised options to fine-tune hues, enhance color vibrancy, and more.
Nace summarizes today's lesson like this: "We'll show you its user-friendly interface and powerful capabilities, and then demonstrate how to select and modify the colors within your photos." There's a link in the description beneath the video for downloading his sample image so you can follow along and make the Hue/Saturation adjustments yourself as the simple steps are explained.

You'll see that a lot of the functionality resembles what we had before, but the visual representation is dramatically different. Not only that, but Nace explains how the tools are much easier to use. The sample shot is full of vivid tones, and Nace demonstrates how you can quickly change these engaging colors to create a variety of attention-grabbing effects.
The starting point is creating a new layer and choosing the Hue/Saturation option from a dropdown menu that appears. Then take a look at the Layer panel on the right of the screen where you can double-click a tab to access Photoshop's newly designed Properties panel.
You'll immediately notice a row of predefined colored circles. Then it's a simple matter of clicking on the appropriate button to adjust those specific tones. Nace explains why this approach is referrable to the dropdown menu you've used in the past. Even better is the fact that these quick-access options are available in the contextual taskbar so that they're readily available at any time during your edit.

The remainder of the video illustrates exactly how to navigate and employ the new Hue/Saturation tool for a variety of purposes. Nace starts from the top and works his way down, beginning with a selection of easy-to-use presets. like Cyanotype, Increase Saturation, Sepia, and others. It's important to note that choosing the Default option rather than a preset will affect all of the colors in an image at once.
At this point we've barely scratched the surface of everything you'll learn in this must-see video. Once you get the hang of it (it doesn't take long) you'll have a much a much easier time adjusting colors to perfection with any image you shoot.
The PHLEARN YouTube channel is a great source of information about all things Adobe, so be sure to take a look when you have time to explore.
We also recommend watching the Photoshop tutorial we featured recently with another post-processing expert who demonstrates what he says are, "five HUGE image-editing mistakes that are very easy to fix."
%26bodytext%3D%3Cp%3EAdobe%20has%20updated%20Photoshop's%20frequently%20used%20Hue/Saturation%20tool,%20and%20this%20tutorial%20from%20PHLEARN%20explores%20the%20myriad%20of%20improvements%20in%20less%20than%2010%20minutes.%20As%20you'll%20see,%20this%20latest%20version%20is%20quicker%20and%20easier%20to%20use,%20delivers%20precise%20results,%20and%20features%20a%20bold,%20new,%20intuitive%20interface.%3C/p%3E%0A%0A%3Cp%3EInstructor%20%3Ca%20href%3D%22http://www.youtube.com/@phlearn%22%20target%3D%22_blank%22%3EAaron%20Nace%20is%20the%20brains%20behind%20the%20PHLEARN%20YouTube%20channel%3C/a%3E%20that's%20billed%26nbsp;as%20%22the%20number%20one%20Photoshop%20and%20Lightroom%20online%20resource.%22%20In%20this%20quick%20episode%20Nace%20provides%20his%20recommendations%20for%20employing%20the%20revised%20options%20to%20fine-tune%20hues,%20enhance%20color%20vibrancy,%20and%20more.%3C/p%3E%0A%0A%3Cp%3ENace%20summarizes%20today's%20lesson%20like%20this:%20%22We'll%20show%20you%20its%20user-friendly%20interface%20and%20powerful%20capabilities,%20and%20then%20demonstrate%20how%20to%20select%20and%20modify%20the%20colors%20within%20your%20photos.%22%20There's%20a%20link%20in%20the%20description%20beneath%20the%20video%20for%20downloading%20his%20sample%20image%20so%20you%20can%20follow%20along%20and%20make%20the%20Hue/Saturation%20adjustments%20yourself%20as%20the%20simple%20steps%20are%20explained.%3C/p%3E%0A%0A%3Cp%3E%3Cimg%20alt%3D%22%22%20src%3D%22https://www.shutterbug.com/images/22/1A41124.png%22%20style%3D%22width:%20600px;%20height:%20342px;%22%20/%3E%3C/p%3E%0A%0A%3Cp%3EYou'll%20see%20that%20a%20lot%20of%20the%20functionality%20resembles%20what%20we%20had%20before,%20but%20the%20visual%20representation%20is%20dramatically%20different.%20Not%20only%20that,%20but%20Nace%20explains%20how%20the%20tools%20are%20much%20easier%20to%20use.%20The%20sample%20shot%20is%20full%20of%20vivid%20tones,%20and%20Nace%20demonstrates%20how%20you%20can%20quickly%20change%20these%20engaging%20colors%20to%20create%20a%20variety%20of%20attention-grabbing%20effects.%3C/p%3E%0A%0A%3Cp%3EThe%20starting%20point%20is%20creating%20a%20new%20layer%20and%20choosing%20the%20Hue/Saturation%20option%20from%20a%20dropdown%20menu%20that%20appears.%20Then%20take%20a%20look%20at%20the%20Layer%20panel%20on%20the%20right%20of%20the%20screen%20where%20you%20can%20double-click%20a%20tab%20to%20access%20Photoshop's%20newly%20designed%20Properties%20panel.%3C/p%3E%0A%0A%3Cp%3EYou'll%20immediately%20notice%20a%20row%20of%20predefined%20colored%20circles.%20Then%20it's%20a%20simple%20matter%20of%20clicking%20on%20the%20appropriate%20button%20to%20adjust%20those%20specific%20tones.%20Nace%20explains%20why%20this%20approach%20is%20referrable%20to%20the%20dropdown%20menu%20you've%20used%20in%20the%20past.%20Even%20better%20is%20the%20fact%20that%20these%20quick-access%20options%20are%20available%20in%20the%20contextual%20taskbar%26nbsp;%20so%20that%20they're%20readily%20available%20at%20any%20time%20during%20your%20edit.%3C/p%3E%0A%0A%3Cp%3E%3Cimg%20alt%3D%22%22%20src%3D%22https://www.shutterbug.com/images/22/2A41125.png%22%20style%3D%22width:%20600px;%20height:%20450px;%22%20/%3E%3C/p%3E%0A%0A%3Cp%3EThe%20remainder%20of%20the%20video%20illustrates%20exactly%20how%20to%20navigate%20and%20employ%20the%20new%20Hue/Saturation%20tool%20for%20a%20variety%20of%20purposes.%20Nace%20starts%20from%20the%20top%20and%20works%20his%20way%20down,%20beginning%20with%20a%20selection%20of%20easy-to-use%20presets.%20like%20Cyanotype,%20Increase%20Saturation,%20Sepia,%20and%20others.%20It's%20important%20to%20note%20that%20choosing%20the%20Default%20option%20rather%20than%20a%20preset%20will%20affect%20all%20of%20the%20colors%20in%20an%20image%20at%20once.%3C/p%3E%0A%0A%3Cp%3EAt%20this%20point%20we've%20barely%20scratched%20the%20surface%20of%20everything%20you'll%20learn%20in%20this%20must-see%20video.%20Once%20you%20get%20the%20hang%20of%20it%20(it%20doesn't%20take%20long)%20you'll%20have%20a%20much%20a%20much%20easier%20time%20adjusting%20colors%20to%20perfection%20with%20any%20image%20you%20shoot.%3C/p%3E%0A%0A%3Cp%3E%3Ca%20href%3D%22http://www.youtube.com/@phlearn%22%20target%3D%22_blank%22%3EThe%20PHLEARN%20YouTube%20channel%3C/a%3E%20is%20a%20great%20source%20of%20information%20about%20all%20things%20Adobe,%20so%20be%20sure%20to%20take%20a%20look%20when%20you%20have%20time%20to%20explore.%3C/p%3E%0A%0A%3Cp%3EWe%20also%20recommend%20watching%20the%20Photoshop%20tutorial%20we%20featured%20recently%20with%20another%20post-processing%20expert%20who%20demonstrates%20what%20he%20says%20are,%20%3Ca%20href%3D%22http://www.shutterbug.com/content/5-huge-photo-editing-mistakes-are-easy-fix-video%22%20target%3D%22_blank%22%3E%22five%20HUGE%20image-editing%20mistakes%20that%20are%20very%20easy%20to%20fix.%22%3C/a%3E%3C/p%3E%0A%0A%3Cp%3E%3C/p%3E)
Is Your Camera About to Die? How to Check Shutter Count Before It's Too Late (VIDEO) 10 Apr 12:00 AM (6 days ago)
This quick tutorial from instructor Mark Denney begins with a question nobody wants to hear: "Is your camera secretly dying?" This disturbing concern has to do with the fact that every camera has a finite life span, and if you don't check the shutter count regulalrly you may be in for a rude awakening.
In fact, Denney refers to shutter count as "the hidden number that could kill your camera." In other words, ignore it at your peril because your camera might be closer to failure than you think. Bottom line: "this video could save you from costly repairs, missed shots, or even a total camera breakdown."
It doesn't really matter if you're an amateur or pro, or whether you're shooting with a DSLR or mirrorless camera. Thus, this oft-ignored number affects every single photographer. Denney covers this essential topic in barely eight minutes, beginning with what shutter count really means and why it matters—even if if you take care of your gear and the camera you use looks virtually.

Denney explains the procedure for determining how many clicks are too many for your specific camera, because the answer varies wildly from one model to another—with higher-end cameras designed to last the longest before it's time to consider repair or replacement. He then walks you through the fasted and easiest method for checking your shutter count now and in the future.
One key consideration is the differences between mechanical and electronic shuuters, and the associated ramifications for longevity. You'll also learn why some modern cameras like the Nikon Z8 no longer even have a mechanical shutter.

So here's the deal: Check your shutter count today and hope you don't receive an alarming surprise. Then head over to Denney's instructional YouTube channel where there's plenty learn about gear, outdoor shooting techniques, and post-processing methods.
On a related note, don't miss the recent tutorial we featured with another accomplished pro who demonstrates several interesting techniques for using shutter speed to capture attention-grabbing photographs with an artistic flair.
%26bodytext%3D%3Cp%3EThis%20quick%20tutorial%20from%20%3Ca%20href%3D%22http://www.youtube.com/@MarkDenneyPhoto%22%20target%3D%22_blank%22%3Einstructor%20Mark%20Denney%3C/a%3E%20begins%20with%20a%20question%20nobody%20wants%20to%20hear:%20%22Is%20your%20camera%20secretly%20dying?%22%20This%20disturbing%20concern%20has%20to%20do%20with%20the%20fact%20that%20every%20camera%20has%20a%20finite%20life%20span,%20and%20if%20you%20don't%20check%20the%20shutter%20count%20regulalrly%20you%20may%20be%20in%20for%20a%20rude%20awakening.%3C/p%3E%0A%0A%3Cp%3EIn%20fact,%20Denney%20refers%20to%20shutter%20count%20as%20%22the%20hidden%20number%20that%20could%20kill%20your%20camera.%22%20In%20other%20words,%20ignore%20it%20at%20your%20peril%20because%20your%20camera%20might%20be%20closer%20to%20failure%20than%20you%20think.%20Bottom%20line:%20%22this%20video%20could%20save%20you%20from%20costly%20repairs,%20missed%20shots,%20or%20even%20a%20total%20camera%20breakdown.%22%3C/p%3E%0A%0A%3Cp%3EIt%20doesn't%20really%20matter%20if%20you're%20an%20amateur%20or%20pro,%20or%20whether%20you're%20shooting%20with%20a%20DSLR%20or%20mirrorless%20camera.%20Thus,%20this%20oft-ignored%20number%20affects%20every%20single%20photographer.%20Denney%20covers%20this%20essential%20topic%20in%20barely%20eight%20minutes,%20beginning%20with%20what%20shutter%20count%20really%20means%20and%20why%20it%20matters%E2%80%94even%20if%20if%20you%20take%20care%20of%20your%20gear%20and%20the%20camera%20you%20use%20looks%20virtually.%3C/p%3E%0A%0A%3Cp%3E%3Cimg%20alt%3D%22%22%20src%3D%22https://www.shutterbug.com/images/22/1MD41025.png%22%20style%3D%22width:%20600px;%20height:%20433px;%22%20/%3E%3C/p%3E%0A%0A%3Cp%3EDenney%20explains%20the%20procedure%20for%20determining%20how%20many%20clicks%20are%20too%20many%20for%20your%20specific%20camera,%20because%20the%20answer%20varies%20wildly%20from%20one%20model%20to%20another%E2%80%94with%20higher-end%20cameras%20designed%20to%20last%20the%20longest%20before%20it's%20time%20to%20consider%20repair%20or%20replacement.%20He%20then%20walks%20you%20through%20the%20fasted%20and%20easiest%20method%20for%20checking%20your%20shutter%20count%20now%20and%20in%20the%20future.%3C/p%3E%0A%0A%3Cp%3EOne%20key%20consideration%20is%20the%20differences%20between%20mechanical%20and%20electronic%20shuuters,%20and%20the%20associated%20ramifications%20for%20longevity.%20You'll%20also%20learn%20why%20some%20modern%20cameras%20like%20the%20Nikon%20Z8%20no%20longer%20even%20have%20a%20mechanical%20shutter.%3C/p%3E%0A%0A%3Cp%3E%3Cimg%20alt%3D%22%22%20src%3D%22https://www.shutterbug.com/images/22/2MD41025.png%22%20style%3D%22width:%20603px;%20height:%20531px;%22%20/%3E%3C/p%3E%0A%0A%3Cp%3ESo%20here's%20the%20deal:%20Check%20your%20shutter%20count%20today%20and%20hope%20you%20don't%20receive%20an%20alarming%20surprise.%20Then%20head%20over%20to%20%3Ca%20href%3D%22http://www.youtube.com/@MarkDenneyPhoto%22%20target%3D%22_blank%22%3EDenney's%20instructional%20YouTube%20channel%3C/a%3E%20where%20there's%20plenty%20learn%20about%20gear,%20outdoor%20shooting%20techniques,%20and%20post-processing%20methods.%3C/p%3E%0A%0A%3Cp%3EOn%20a%20related%20note,%20don't%20miss%20the%20recent%20tutorial%20we%20featured%20with%20another%20accomplished%20pro%20who%20demonstrates%20several%20interesting%20techniques%20for%20using%20shutter%20speed%20to%20capture%20%3Ca%20href%3D%22http://www.shutterbug.com/content/how-use-shutter-speed-more-artistic-photos-video%22%20target%3D%22_blank%22%3Eattention-grabbing%20photographs%20with%20an%20artistic%20flair%3C/a%3E.%3C/p%3E%0A%0A%3Cp%3E%3C/p%3E)